SDDC Business
SDDC Business is a single-tenant private cloud that enables customers to conveniently transition or extend on-premises VMware workloads into the hosted VMware environment at Rackspace. SDDC Business provides a range of features and add-ons that enable customers to deploy and manage workloads with familiar tools and processes used in their own data centers. SDDC Business includes 365 x 24 x 7 support for infrastructure components and VMware-EE for added services, with support provided by Rackspace operational support teams and Rackspace partners. This handbook is your primary resource for information related to SDDC Business, including chapters on how to get started, using SDDC Business, and how to get help. It also includes additional resources that are external to the handbook.
Add Sections below after adding more files:
- About SDDC Business
- Accessing Your Platform
- SDDC Business Networking
- SDDC Business Resource Pools
- SDDC Business Content Libraries
- SDDC Business Virtual Machines
- Understanding VMware vCenter
- Understanding vCPU
- Understanding vRAM
- Deploy Virtual Machine from Template
- Deploy Virtual Machine from Template
- Deploy Virtual Machine Template Using OS Customization Spec
- Fetching Initial Admin Credentials
- Deploy Virtual Machine from ISO
- VMware Tools Installation
- Request a Public IP
- Working With Tags
- How To Manage Virtual Machines and Settings
- Changing a Virtual Network Interface Card Segment
- Adding a Virtual Network Interface Card
- Removing a Virtual Network Interface Card
- Modifying Virtual CPU and Memory Settings
- Adding a Virtual Disk
- Expanding a Virtual Disk
- Deleting a Virtual Disk
- Performing a vMotion
- Performing a Storage vMotion
- Creating a Snapshot
- Managing and Deleting Snapshots
- Shutting Down a Virtual Machine
- Rebooting a Virtual Machine
- Renaming a Virtual Machine
- SDDC Business Storage
- SDDC Busines Roles and Permissions
- Maintain Your SDDC Environment
About SDDC Business
SDDC Business offers you the ability to expand data center capacity without the need for further investment in physical assets. With direct access to the VMware APIs, you can use your existing scripts and the same VMware and third-party tools to manage the hosting VMware environment, improving agility by reducing long procurement lead times and ensuring that you meet new business demands while maintaining control.
SDDC Business is a dedicated, per-customer instance of the VMware Software Defined Data Center (SDDC) stack.
Rackspace provides the following core components:
- VMware ESXi™ hypervisor running on dedicated hardware
- VMware vSphere
- Supporting infrastructure services: DNS, NTP.
SDDC Business is a modular solution that supports a variety of services and technologies that can easily be integrated to the solution adding to its value proposition.
Below are the currently available add-ons:
- vRealize Operations: vROPs provides full-stack visibility, proactive planning, continuous performance optimization, efficient capacity, and cost management.
- vRealize Log Insight: Intelligent log management for infrastructure and applications.
- VMware NSX-T: Agile software defined networking with security, automation, and operational simplicity
- vRealize Network Insight: Intelligent operations for software defined networking and security.
- VM Management: OS Administration, Patching, Monitoring and Anti-virus for the workload running on SDDC Business
- RackConnect Global: A software-defined multi-cloud interconnection platform that links Rackspace customers with other Rackspace data centers, third party data centers, and third-party clouds via direct, private, low latency virtual connection
- Rackspace Data Protection: A Backup solution for workload running on SDDC Enterprise.
- Disaster Recovery / Business Continuity: Various managed and unmanaged solutions to cater for your disaster recovery needs.
SDDC Business Core Platform
- Dedicated, single tenant compute, network, and storage.
- Compute Storage: sSAN, dSAN, File
- SDDC Core: VMware vSphere (ESXi + vCenter Server)
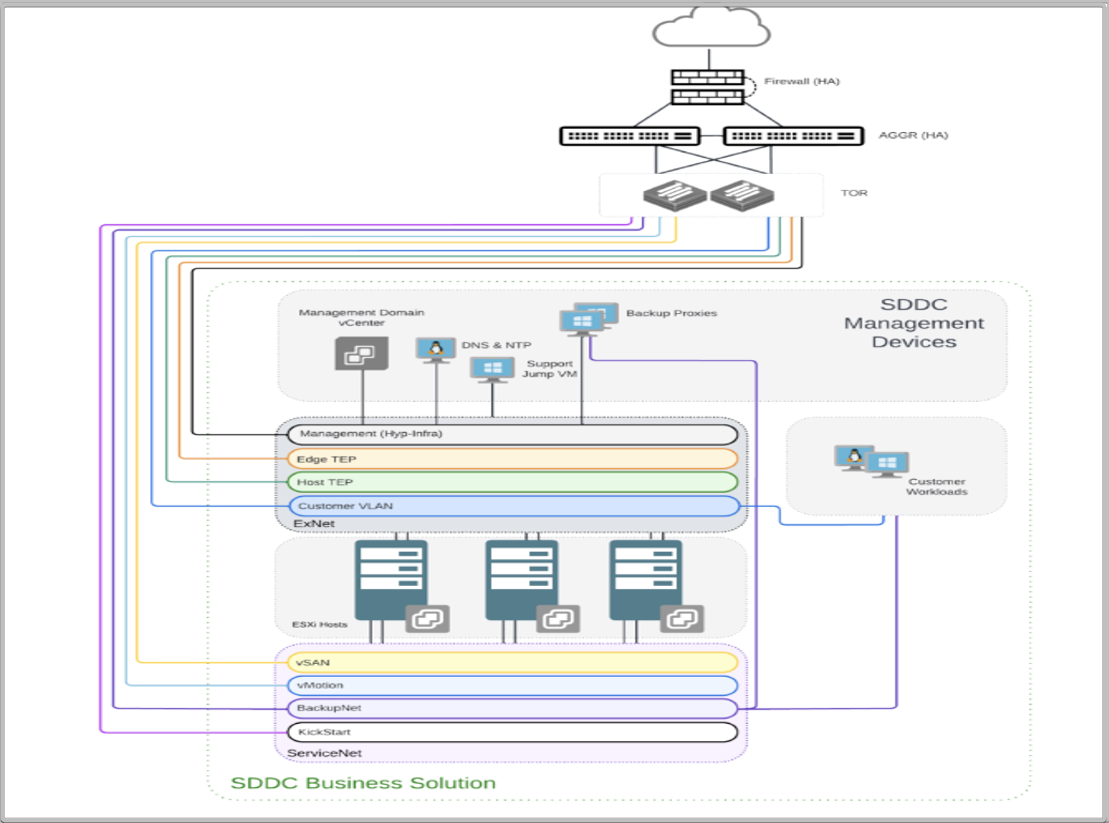
Below is the high level diagram of SDDC Business:
Accessing Your Platform
For security reasons, you must establish a VPN connection to the Rackspace firewall to access your SDDC Business environment. You can establish either a site-to-site or client-to-site VPN to satisfy this requirement.
Your SDDC environment includes DNS servers, which provide local DNS resolution. Therefore, you must configure conditional forwarding in your DNS infrastructure to correctly resolve DNS records for SDDC Business management services. Contact your support team for more details.
Rackspace creates ticket with the details of how to establish a VPN connection and how to access the various services in your environment. If you have purchased several environments in different data centers, you will receive individual tickets specific to each environment.
Log in to the Rackspace Customer Portal
After we build your environment to your specifications, you receive an email that includes your username and password to the Rackspace Technology Customer Portal using below link.
To get started, we recommend reviewing the contents of the:
The portal onboarding guide shows you how to create tickets, manage notifications, and perform several administrative tasks.
Support Ticket Creation
- Log in to the MyRackspace Portal
- Select Tickets > Create New Ticket.
Step 1. Choose Category.
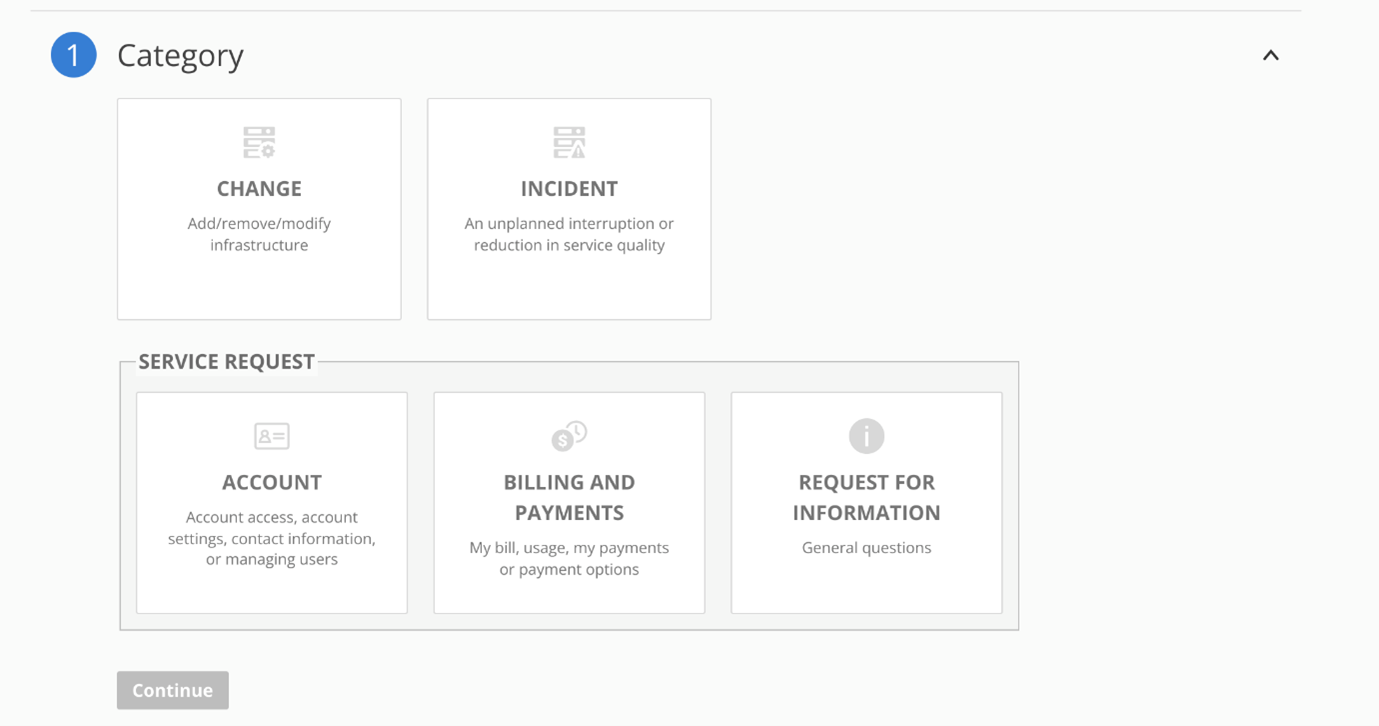
You must choose the required category from the pre-defined ITIL/ITSM management options. Below is the list of categories:
-
Change: Change category is used to raise the ticket for add, remove or modify the infrastructure. Examples of change category are Configuration of Manager Console, add or remove hosts, add or remove device and so on.
-
Incident: Incident category is used to raise the unplanned interruption or reduction in service quality. Examples of incidents are email delivery issues, lack of access to the network, website down and so on.
-
Account: Account category is used to raise an issue related to overall account access, account settings, contact information or managing users.
-
Billing and Payments: The Billing and Payments category is used to raise an issue related to usage and payments or payment options.
-
Request for Information: Request for Information category is used to request general information. Examples of general information are the address of the organization, headquarters location, and so on.
Step 2. Account & Product
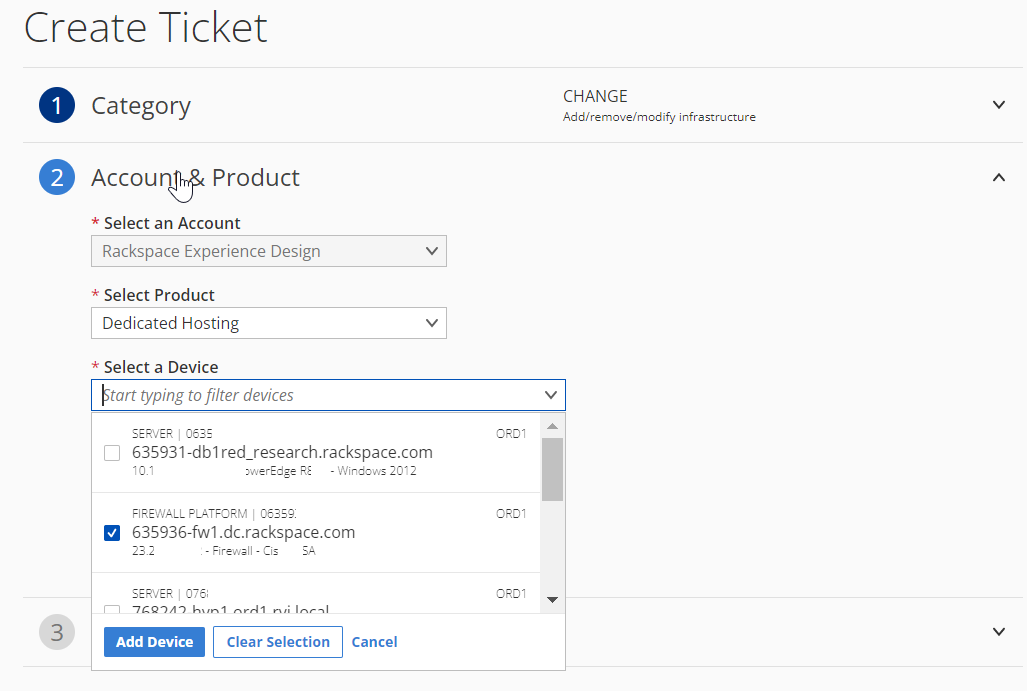
-
If you only have access to one account, then that account will auto populate. The input will also be disabled since no other options exist for selection.
-
If you only have access to one product, then that product will auto populate. If you have access to multiple products, then select the product that best relates to your request from the options in the drop-down list.
-
The application only allows for dedicated devices to be added to a ticket. Adding multi-cloud devices is not allowed at this current time.
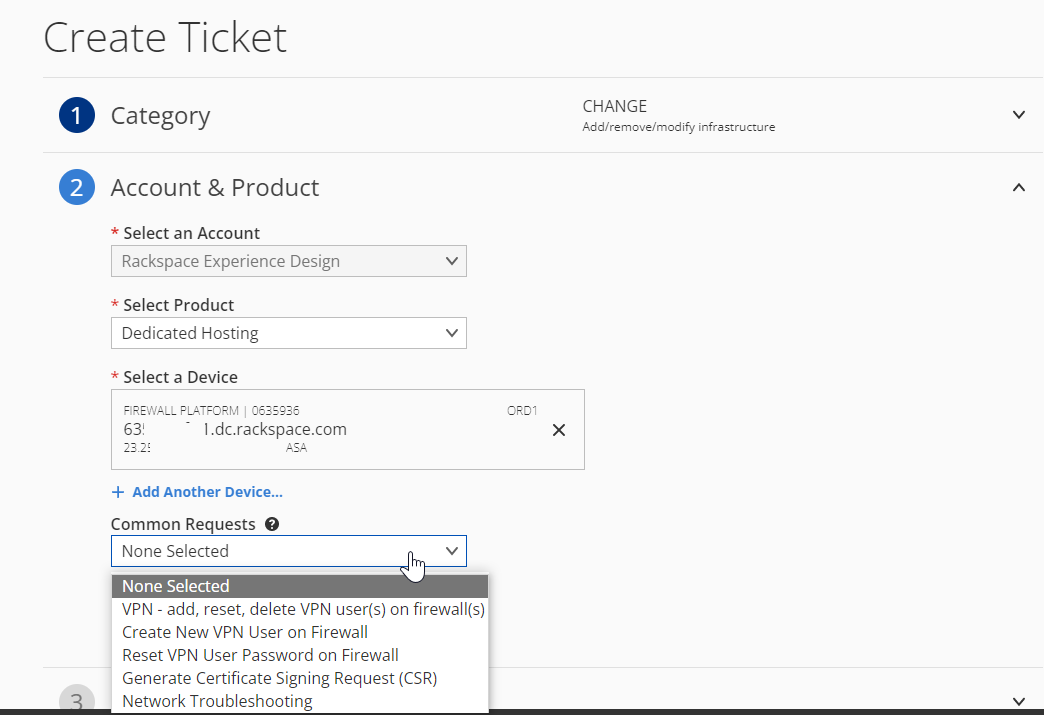
- This option drop-down depends on the previous selections you have made. Only the list of options that relate to your previous device, product, and account selections will display. Leave this field with the "None Selected" value in order to create a Custom Ticket or choose one of the template options to create a ticket based on common change requests. Visit our Common request templates article for more information about accessing each template.
Draft Saved (Autosave)

At the bottom of step two you will see a message that says, Draft Saved. A ticket draft tracks the selected step, selected field values, and progress of you create ticket page. This allows you to continue the ticket in a different browser, or device at any time. The draft does not have a time limit and can be continued days, or months later. Each time you visit the "Create Ticket" page the application will check for the most recent draft.
Step 3: Issue Details
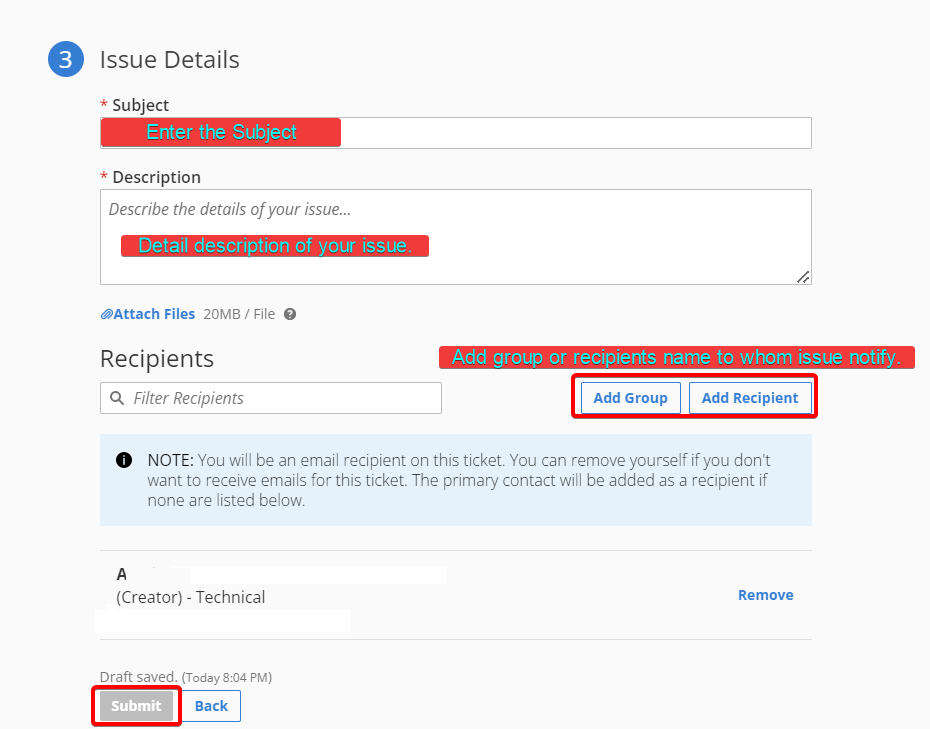
You fill in details of subject, description, and recipient(s). Optionally you can upload attachments up to 20MB per file. After clicking the Submit button, the draft will be cleared, and a new ticket will be available at the top of the ticket list.
Requesting A New VM
You may submit a support ticket to Rackspace requesting a new VM deployment from a pre-defined template on your behalf using the following request form:
Hi Rackspace,
Please create a Virtual Machine with the following specifications:
Template Name and Location:
Virtual Machine Name:
Storage Specs:
- Datastore: (where the Virtual Machine configuration and vDisk files will be located)
vNIC: (Insert destination port group)
IP allocation details:
- IP address:
- Subnet Mask:
- Gateway:
- DNS (Domain Name System) Servers:
By default, virtual hardware configurations are predefined by the template you choose; if customized hardware configurations are required, please also specify the hardware components and their desired allocations as follows:
vCPU: (Insert # of vCPUs (sockets, cores))
vRAM: (Insert amount of vRAM)
vDisk(s): (Insert disk size(s) and datastore)
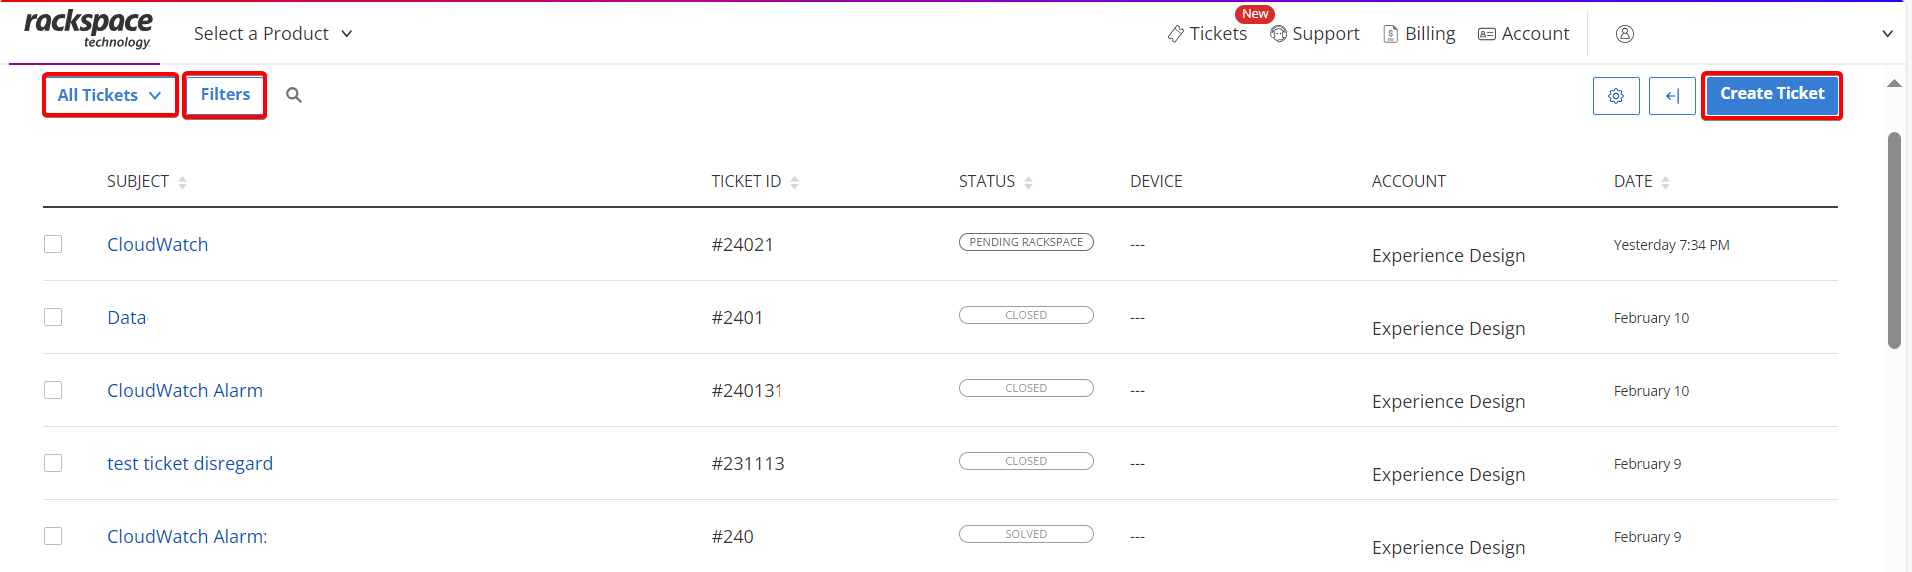
Your Support Ticket List
The ticket list allows you to create new support tickets and review previously opened or closed support tickets.
SDDC Business Networking
This section explains networking concepts that are important to understand when you use the SDDC platform.
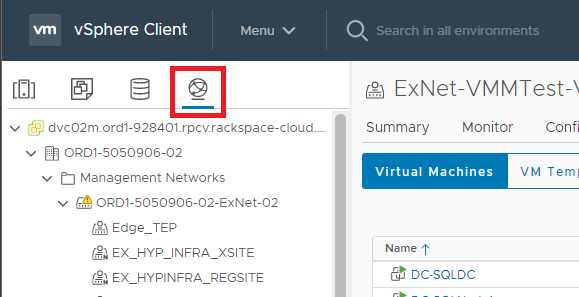
Understanding Distributed vSwitches
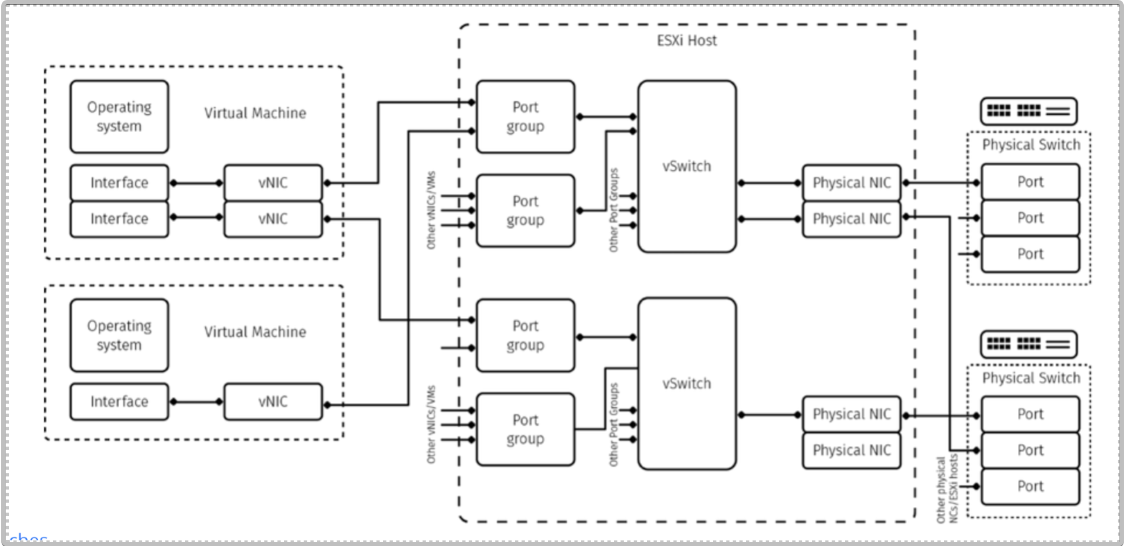
Within ESXi, a Distributed vSwitch is a virtual switch, which is a logical construct that provides a link between uplinks and port groups. A vSwitch can use multiple uplinks and manage multiple port groups.
If a Distributed vSwitch uses two or more uplinks, a vNIC can only use one uplink at a time. For example, if you have two 1000 Gbps uplinks connected to the vSwitch and your VM connected to the port group connected to that vSwitch, the maximum theoretical bandwidth for that VM is 1000 Gbps, rather than 2000 Gbps.
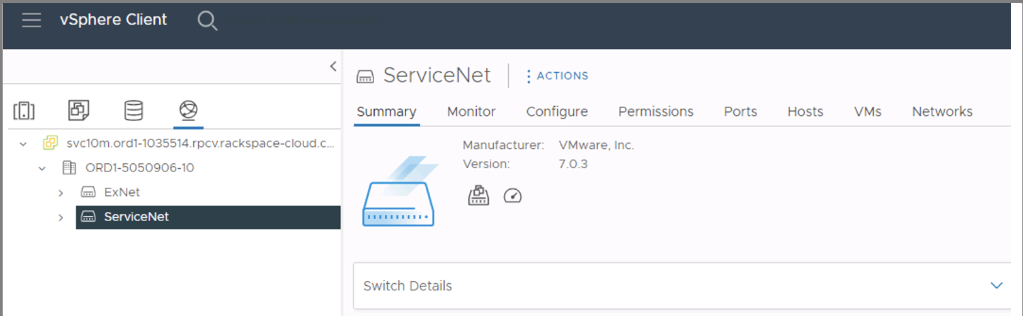
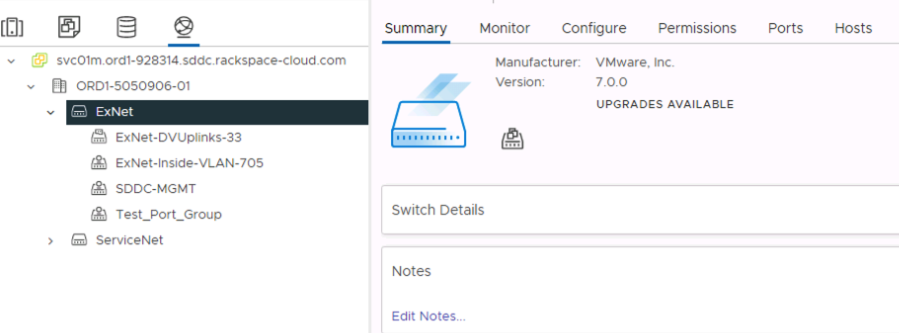
By default SDDC Business is configured with two Distributed Switches:
ExNet - Private, customer-specific network segments usually representing VLANs hosted behind single tenant firewalls or load balancers.
ServiceNet- Backend network that most servers attach to with Rackspace-assigned 10.128.0.0/17 IPs used to reach internal services such as backup.
The following diagram illustrates virtual and physical networking components and their relationships to each other:
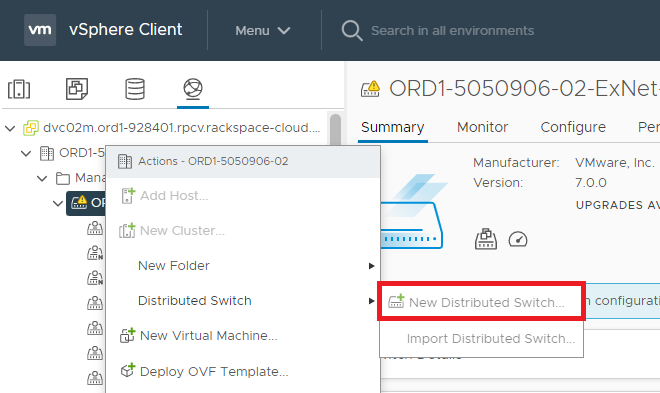
Adding a New Distributed vSwitch
-
Open the VMware vSphere Client or the VMware vSphere Web Client, and connect to the vCenter Server.
-
In the inventory panel, click on Networking.
-
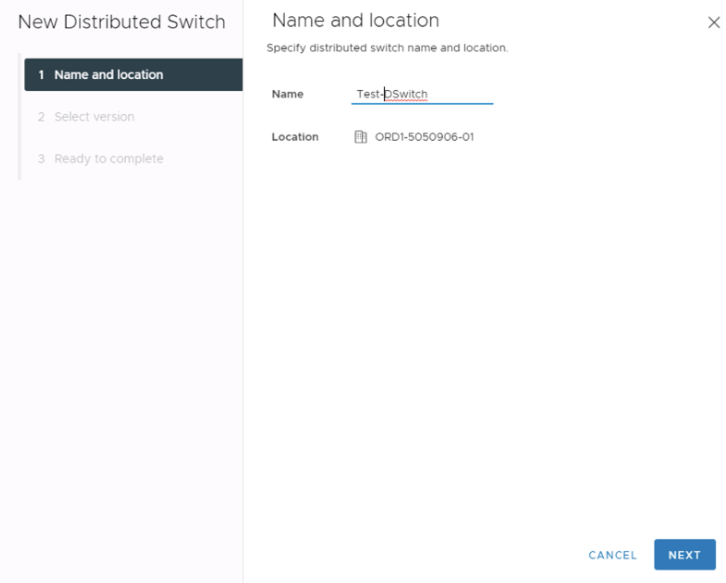
Select the datacentre where you want to create the dvSwitch. Right-click on the datacenter and select New Distributed Switch from the context menu. This will open the New Distributed Switch wizard.
-
Name your DvSwitch, click Next.
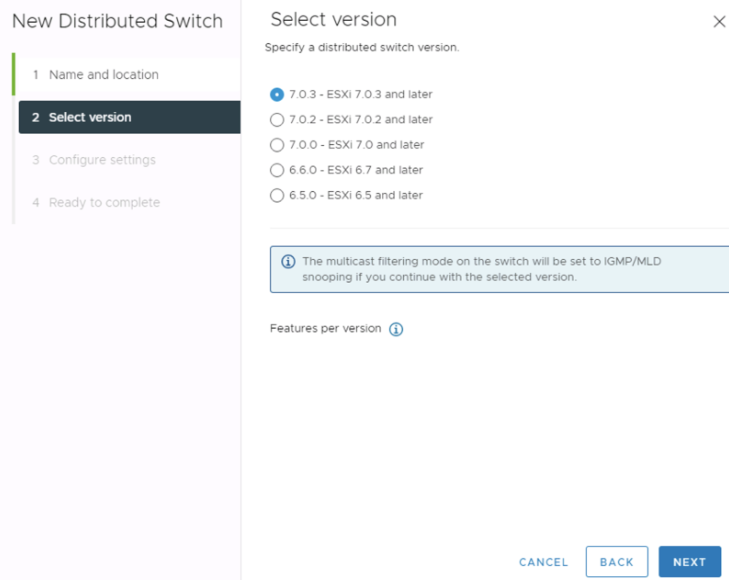
-
Select the version, we recommend the latest. Click Next.
-
Configure the settings based on your requirements, click Next.
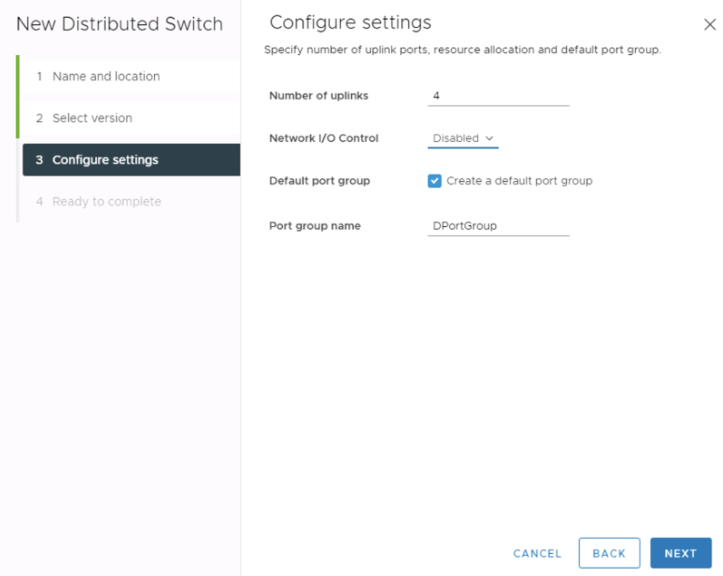
-
Review your setting, click Finish to start the DvSwitch creation.
Understanding Uplinks
An uplink is the physical interface between the hypervisor and the physical switch. An uplink is assigned to only one Distributed vSwitch. You can refer to an uplink as vmnicX, with X being a sequential number of a physical network ports on the hypervisor.
Understanding Port Groups
A port group is a logical construct on the Distributed vSwitch to which vNICs can connect. A port group typically has a name and a VLAN ID. One port group can serve multiple vNICs.
Understanding vNICs
A vNIC, or virtual network interface card, is a piece of the VM’s virtual hardware. A vNIC provides an interface for the OS and connects to a port group.There are multiple types of vNICs, such as E1000 or E1000E. We recommend using VMNXET3 for all VMs.
Adding a New Port Group
- Open the VMware vSphere Client or the VMware vSphere Web Client, and connect to the vCenter Server that manages the dvSwitch you want to add the port group to.
- In the inventory panel, click on Networking.

- Select the dvSwitch you want to add the portgroup to.
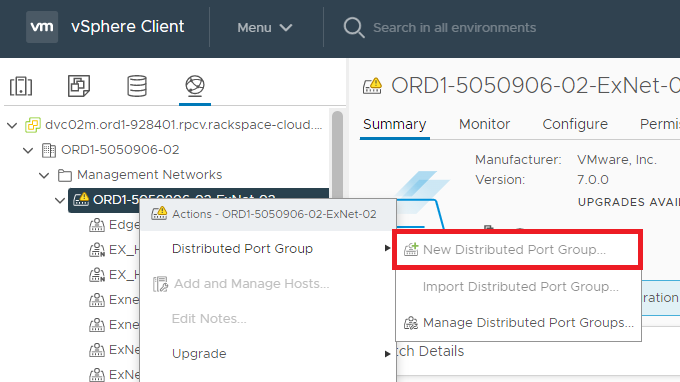
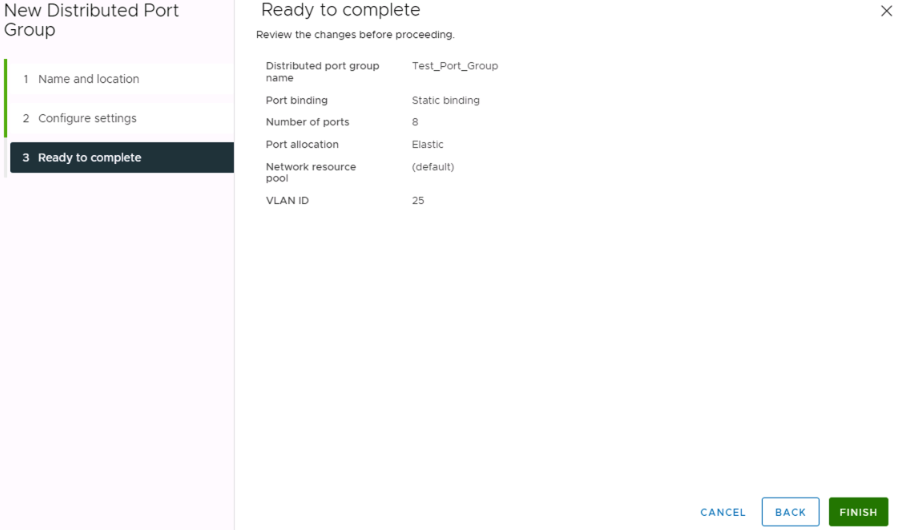
- Right-click on the dvSwitch and select Distributed Port Group then New Distributed Port Groups from the context menu. This will open the New Distributed Port Group wizard.
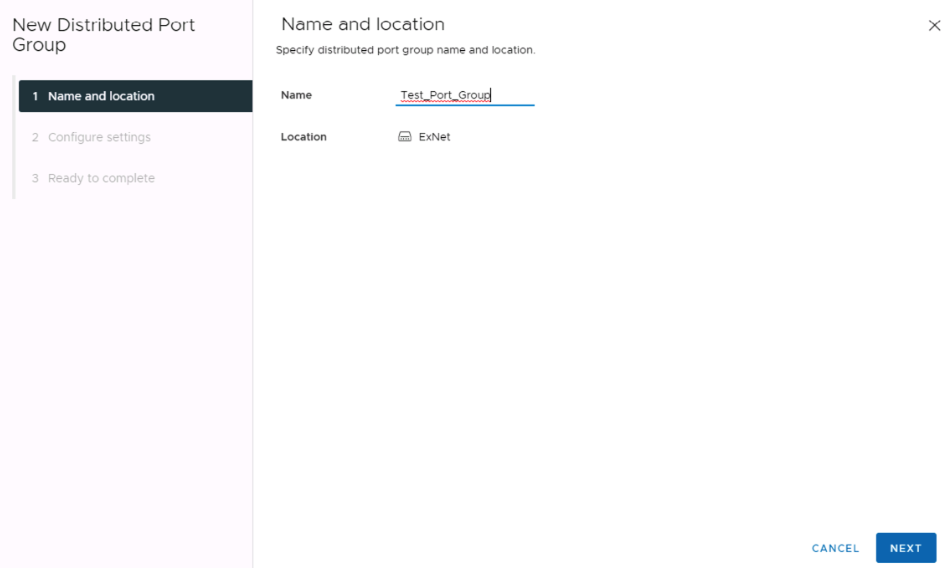
- Provide a name for the port, click Next
- Choose the VLAN type for the port group. You can choose VLAN to specify a specific VLAN ID, or None to create an untagged port group.
- If you chose VLAN in the previous step, enter the VLAN ID for the port group.
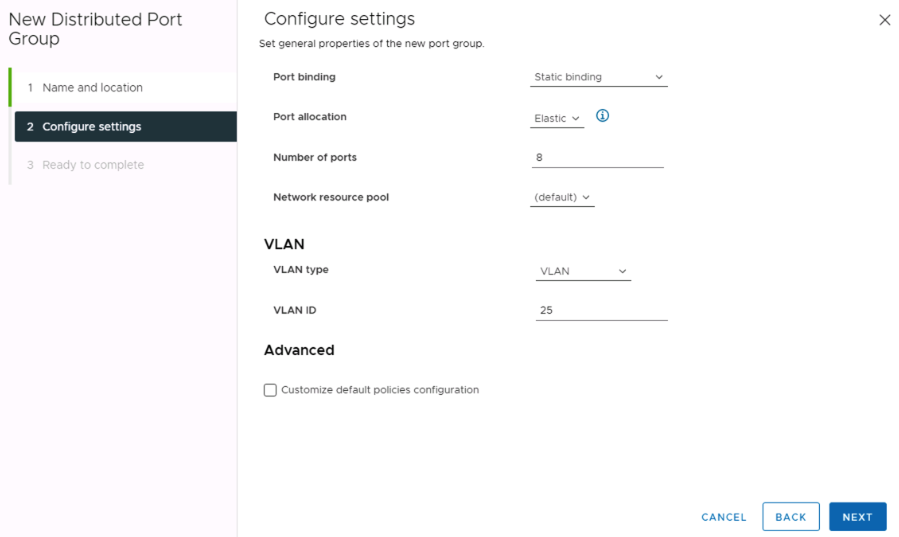
- Keep the rest of the settings as default, Click Next
- Confirm the settings, click Finish to start the port group creation
- Once the port group has been created, it will be listed under the dvSwitch in the inventory panel.
- To add virtual machines to the port group, select the virtual machine you want to add to the port group, go to its Network Adapter settings, and select the port group from the drop-down menu.
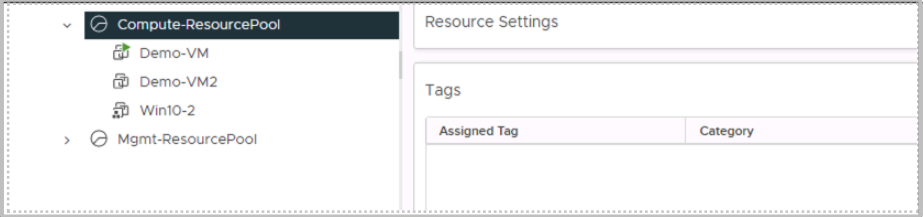
SDDC Business Resource Pools
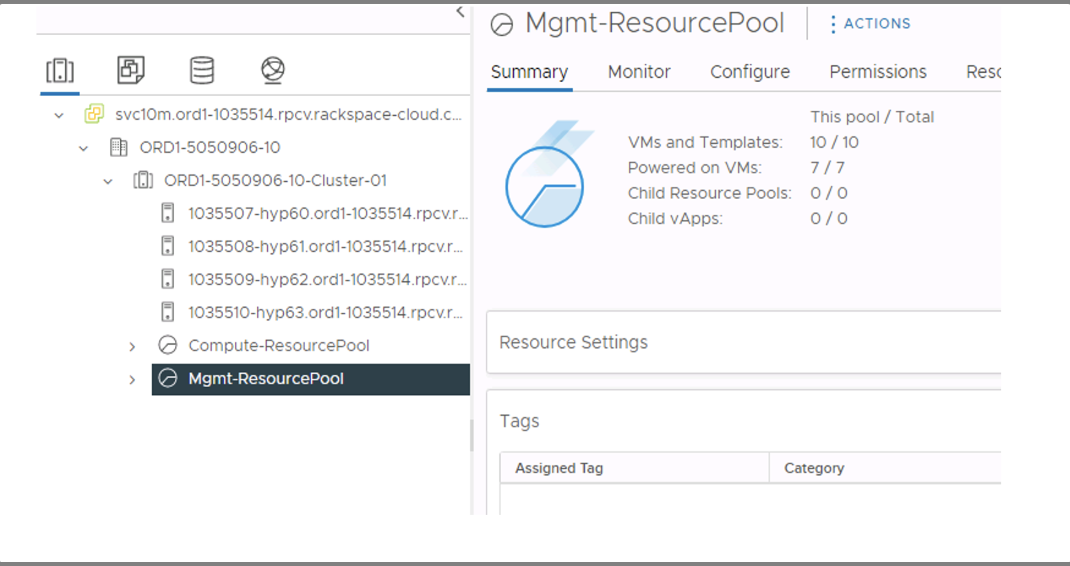
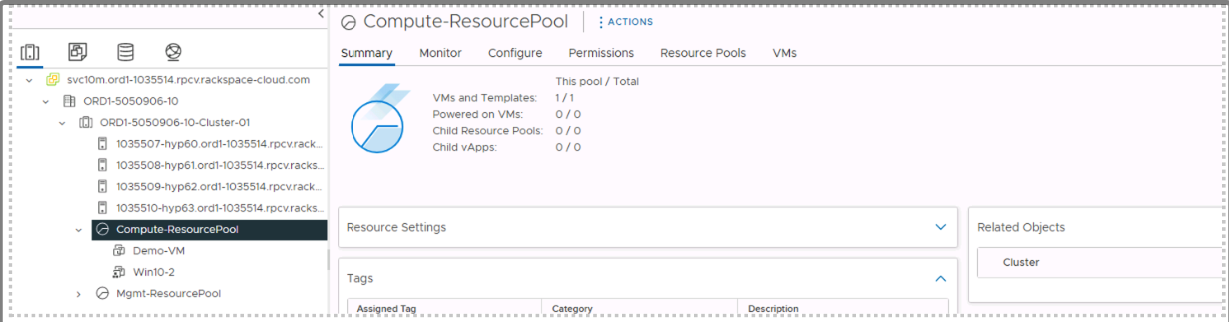
By default, the SDDC Business platform is configured with two resource pools:
- Mgmt-ResourcePool: Management resource pool that hosts all workload dedicated to the platform management. Customer has no write access to the RP.
- Compute-ResourcePool: Customer dedicated resource pool that hosts all workloads created by the customer.
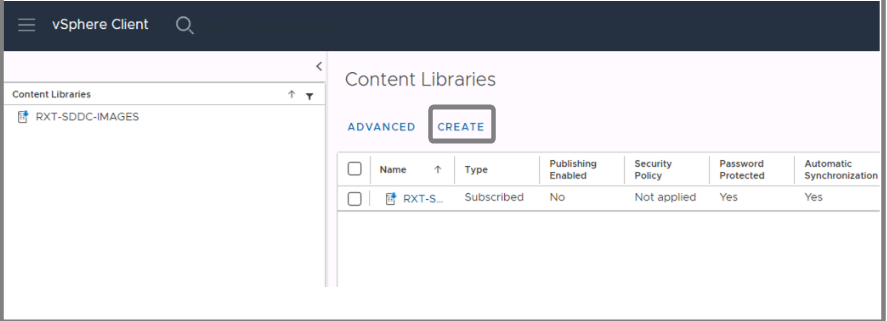
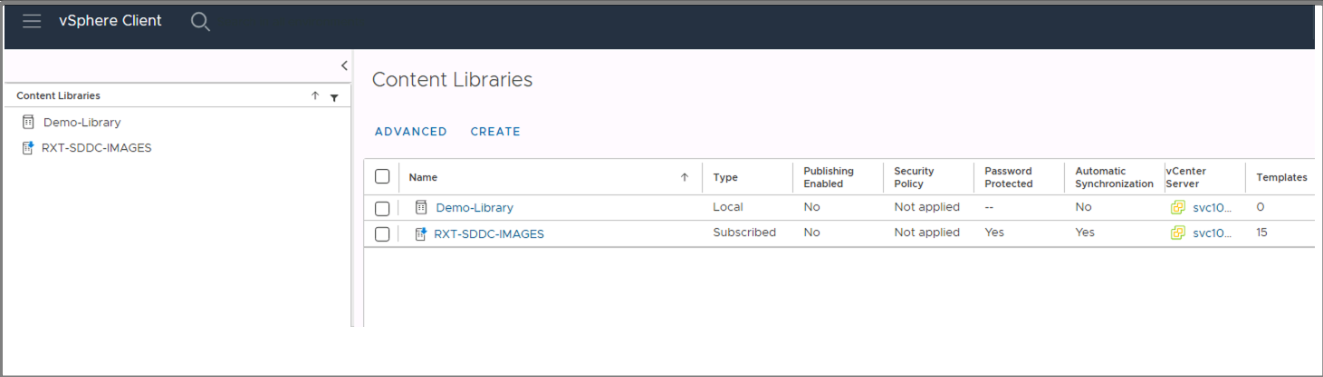
SDDC Business Content Libraries
Rackspace Provided Content Library
A pre-configured content library is provided by default and is configured at build time. The library is subscribed to Rackspace internal systems and will synchronize automatically as updates are available.
- CentOS
- Microsoft Windows Server 2016
- Microsoft Windows Server 2019
- Microsoft Windows Server 2022
- Oracle Linux 7.9
- Oracle Linux 8.3
- Red Hat Enterprise Linux 7.7
- Red Hat Enterprise Linux 8.1
- Ubuntu Linux
Customer Content Library
SDDC Business allow the creation of Content Libraries that can be used to upload customer owned templates and ISOs. Below are the steps required to create a content library within your environment.
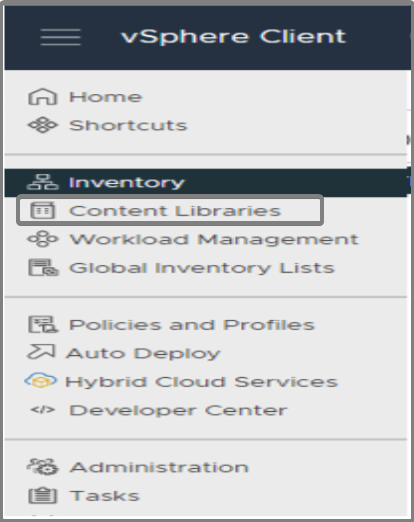
-
Click on vSphere Client.
-
Click on Content Libraries.
-
Click create.
-
Provide a name for the library, your vCenter server should be selected by default.

-
Click Next.
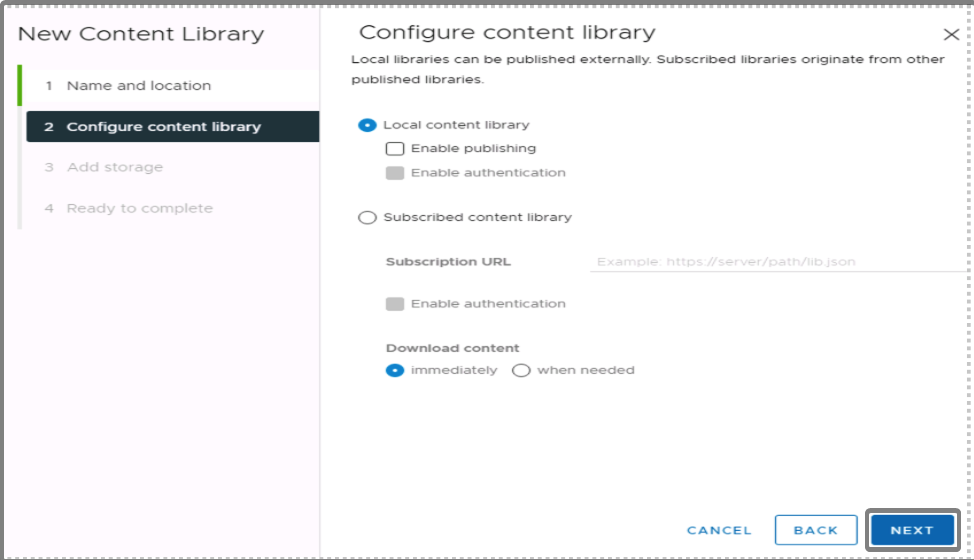
- Local content library: A local content library is accessible only in the vCenter Server instance where you create it by default.
(Optional) To make the content of the library available to other vCenter Server instances, select Enable publishing. - Local content library: A subscribed content library originates from a published content library. Use this option to take advantage of already existing content libraries.
- Download Content: Immediately
- Local content library: A local content library is accessible only in the vCenter Server instance where you create it by default.
-
Click Next.
- (Optional) On the Apply security policy page, select Apply Security Policy and select OVF default policy.
-
Click Next.
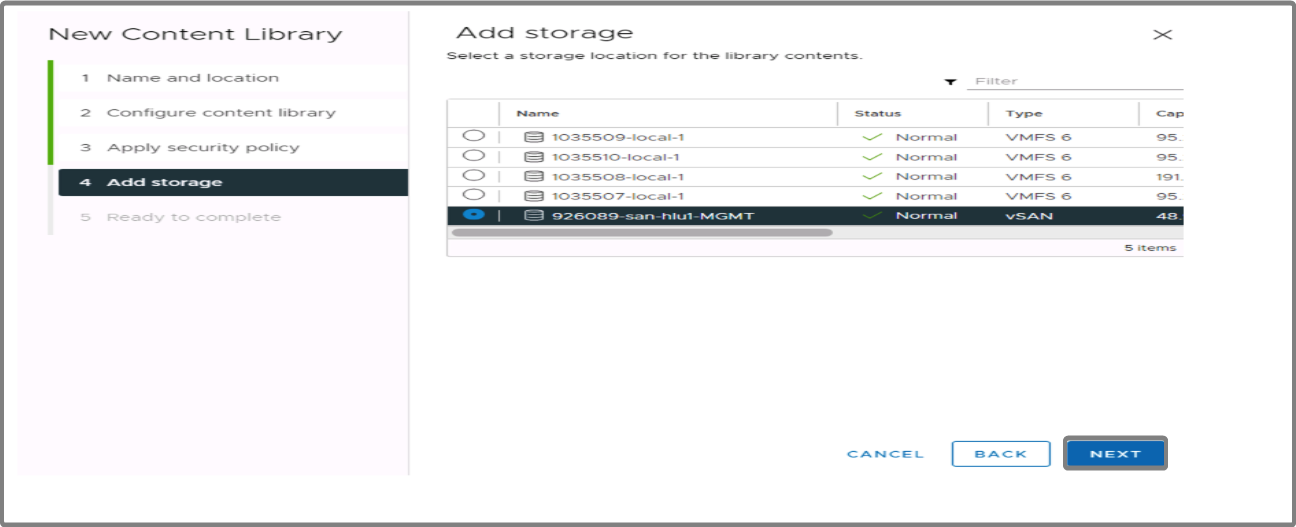
- Add storage: Select your storage LUN.
-
Click Next.
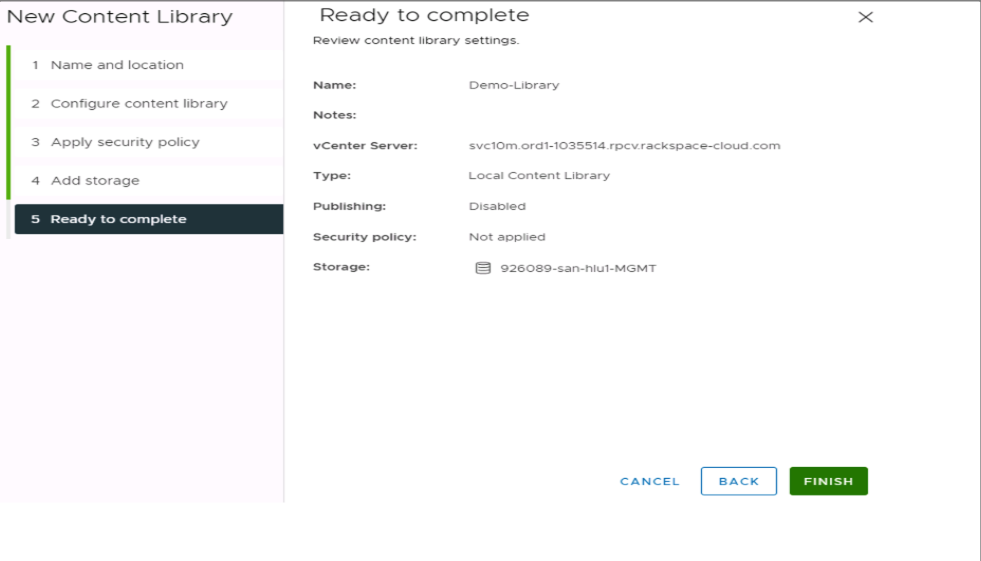
- Review the settings, click Finish to start the content library creation.

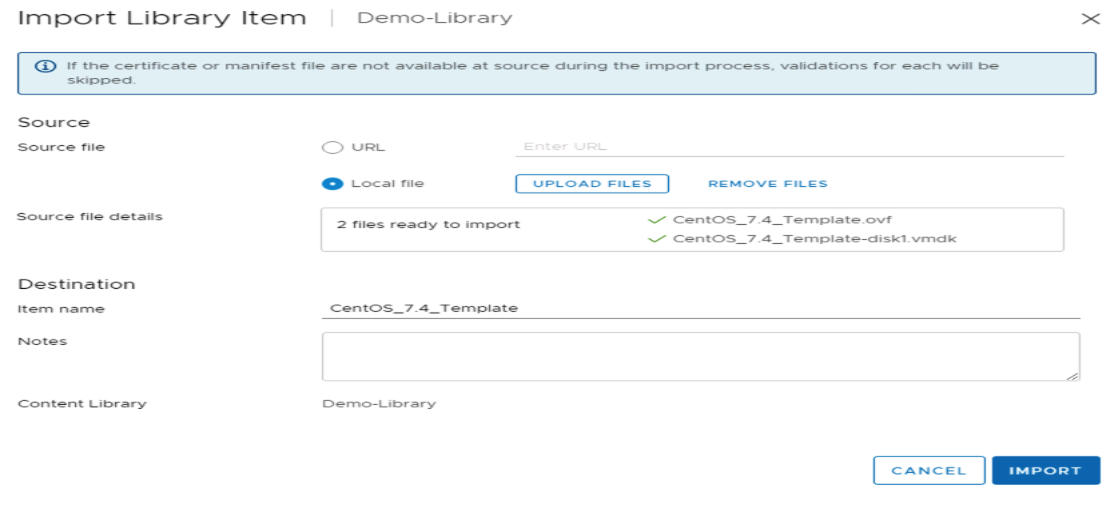
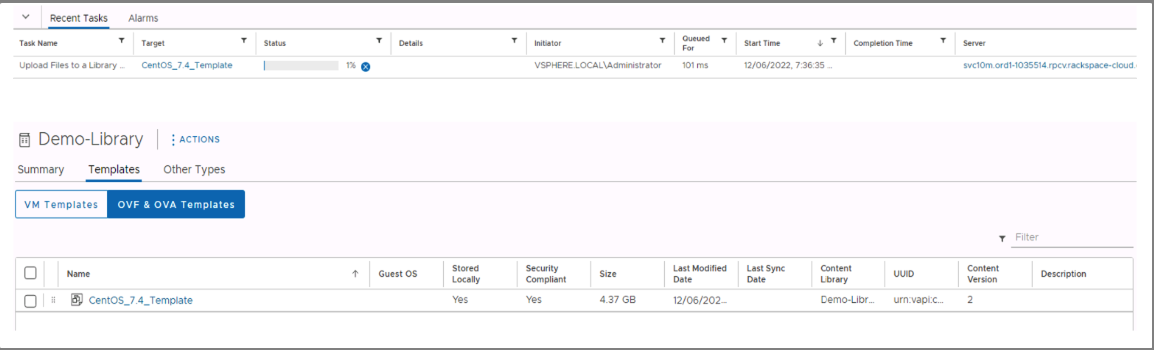
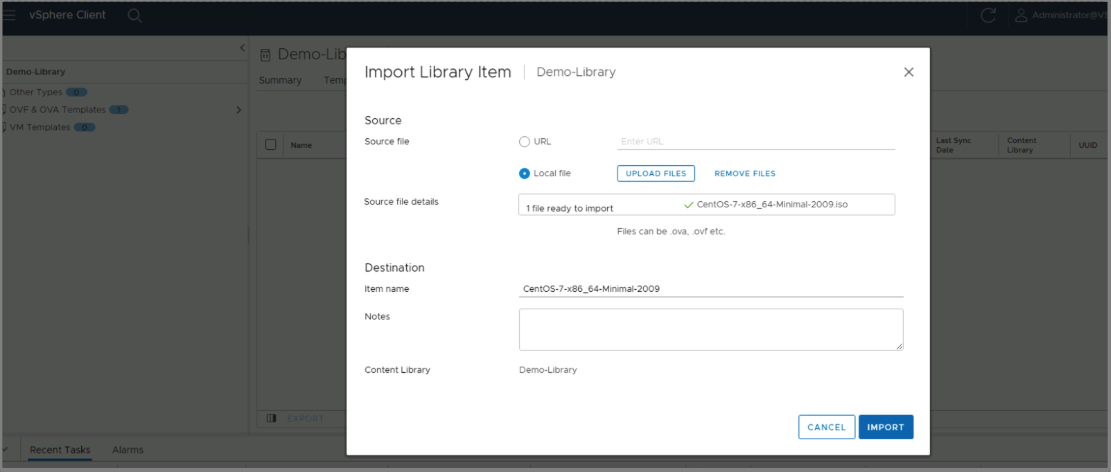
Upload Customer ImagesSDDC Business provides the ability to upload templates and media files to your content library. These files can be used to create or update virtual machines.
-
Click on your library.
-
Click on OVF & OVA Templates.
-
Click on Actions then Import item.
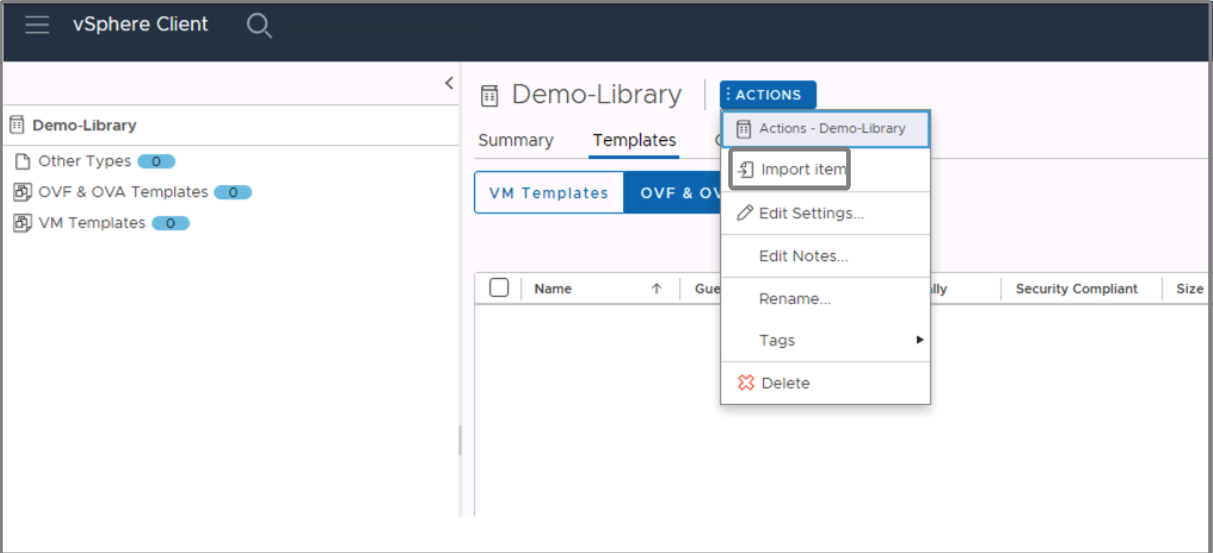
-
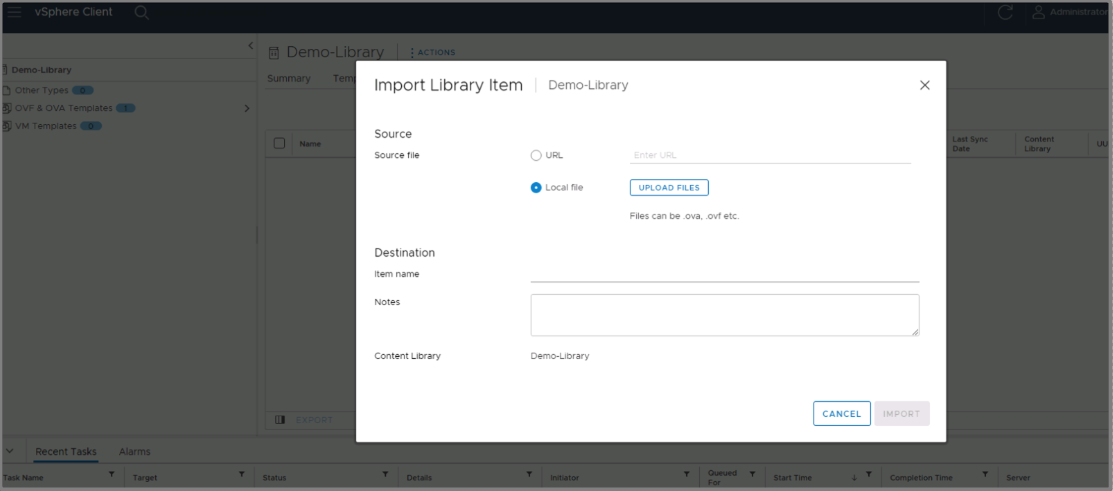
You can provide a URL where your OVA is hosted or provide the path to a local file.
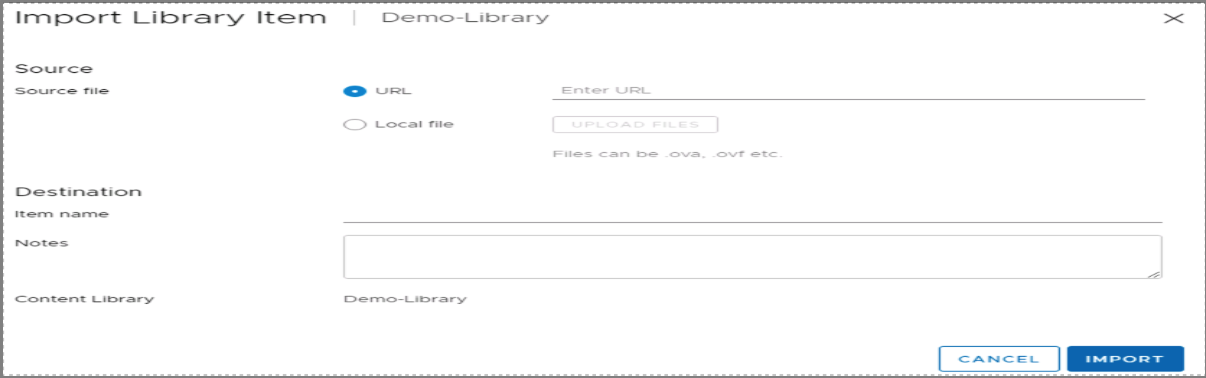
-
Provide a name for the image and confirm the content library.
-
Click Import.
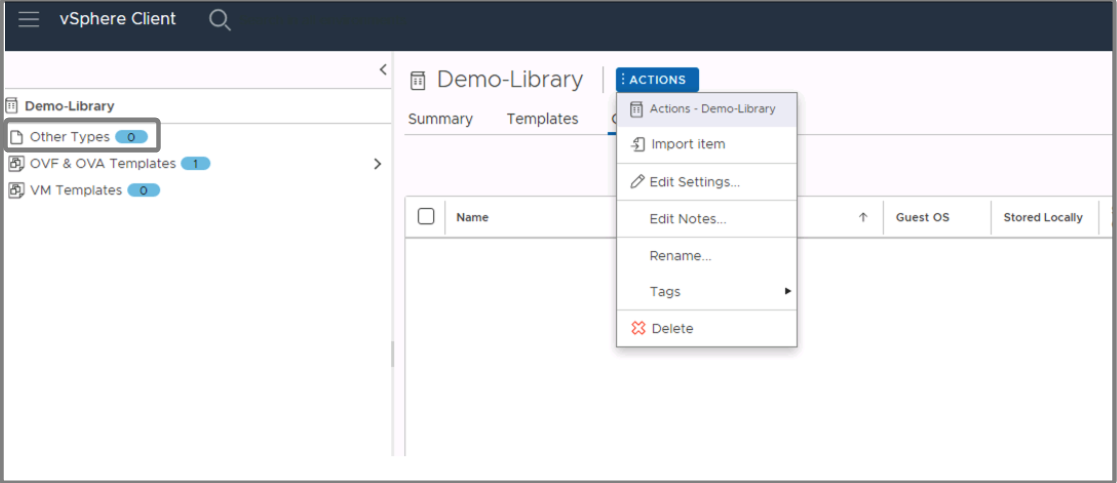
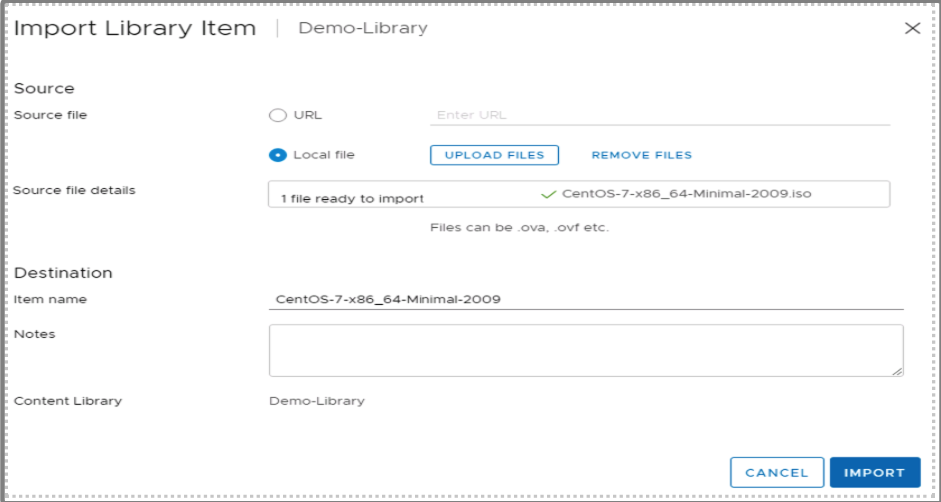
Upload An ISO to the Content Library-
Click on your Library.
-
Select Other Types.
-
Click Actions, then Import item.
-
You can provide a URL where your OVA is hosted or provide the path to a local file.
-
Click Upload files.
-
Click Import to start the upload.


-
Delete Images
- Navigate to the content library that contains the image.
- Select the image, right click, and select Delete.
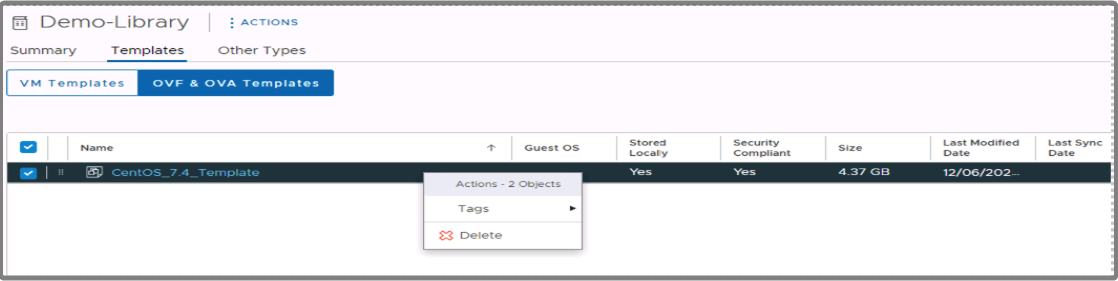
Delete Content Library
- Navigate to the content libraries.
- Select the content library to delete.
- Right click Delete.

SDDC Business Virtual Machines
Understanding VMware vCenter
VMware vCenter® is a centralized server used to manage your VM environment. Rackspace Technology Support also uses the VMware vCenter user interface to connect to and manage your ESXi hosts. SDDC Business offering provides access to VMware vCenter or a vSphere Client.
Understanding vCPU
A VM includes one or more virtual central processing units (vCPU). By allocating vCPUs to VMs, you can share physical CPUs on the hypervisor with the VMs.
Over-allocating CPU can negatively impact system performance. You should only allocate as many vCPU resources as your VM needs. If you allocate more cores than you need, you waste CPU cycles that could be used by your other VMs.
Understanding vRAM
You can allocate physical RAM on the hypervisor to the VMs as virtual RAM (vRAM). If you allocate more vRAM than is physically installed, application performance can suffer because of the techniques that ESXi uses to reclaim memory, such as memory swapping and memory ballooning. You should only allocate as many vRAM resources as your VM needs.
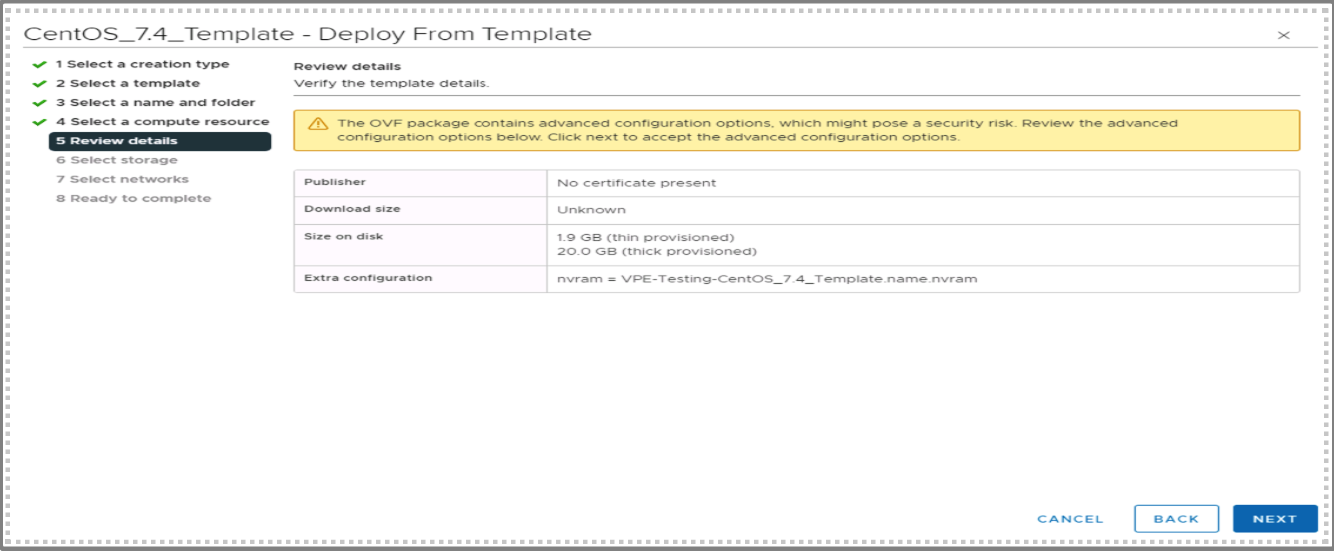
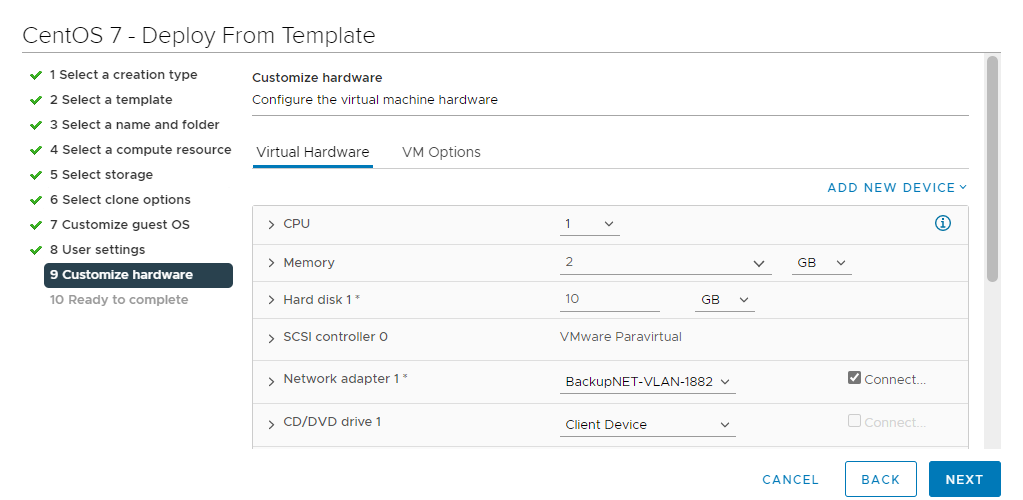
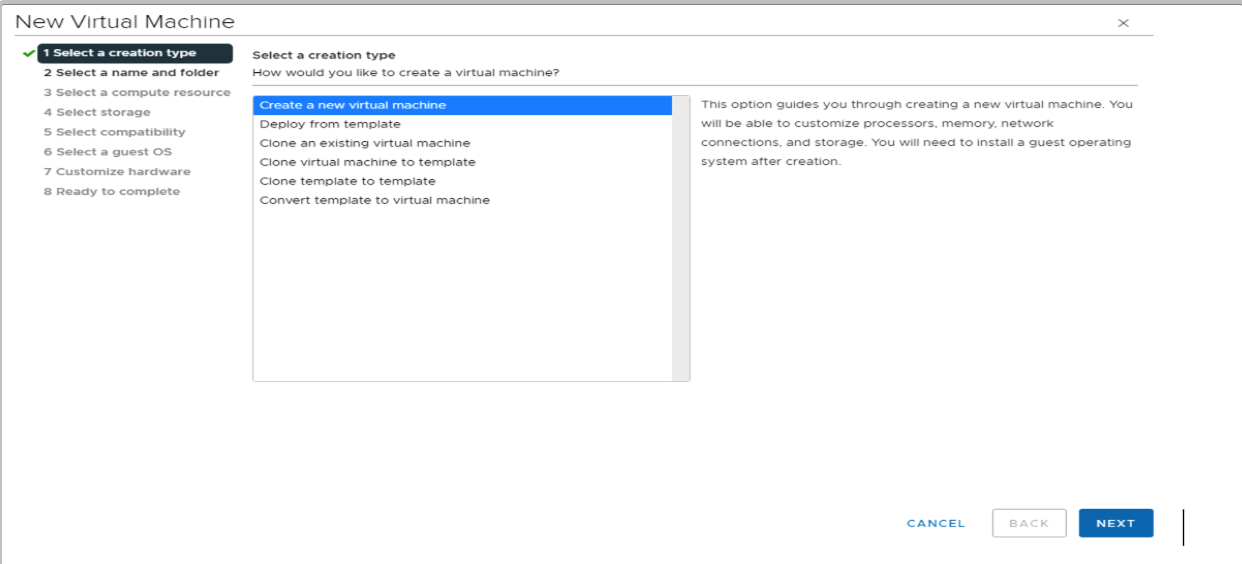
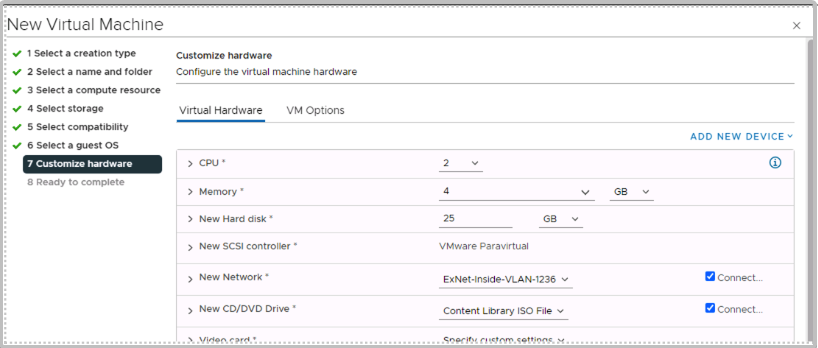
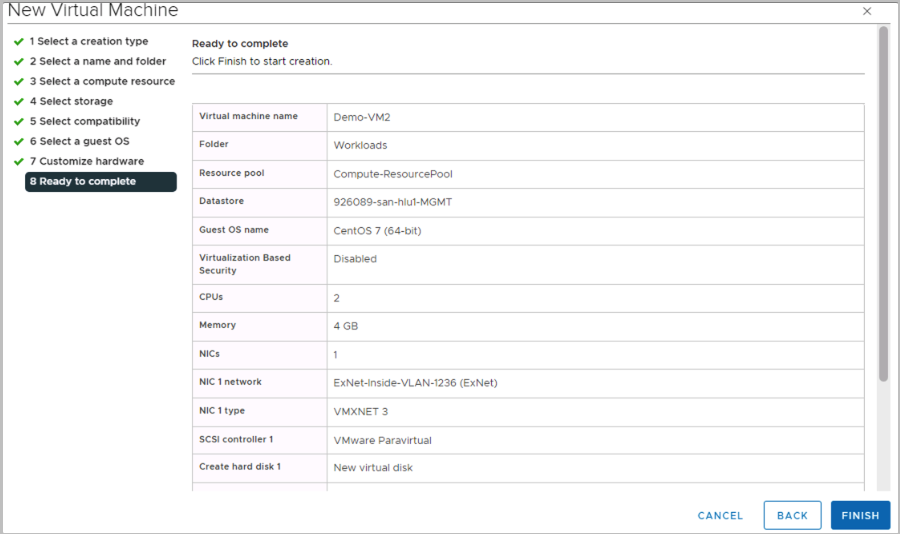
Deploy Virtual Machine from Template
-
Right click the Compute-ResourcePool resource pool.
-
Click New Virtual Machine.

-
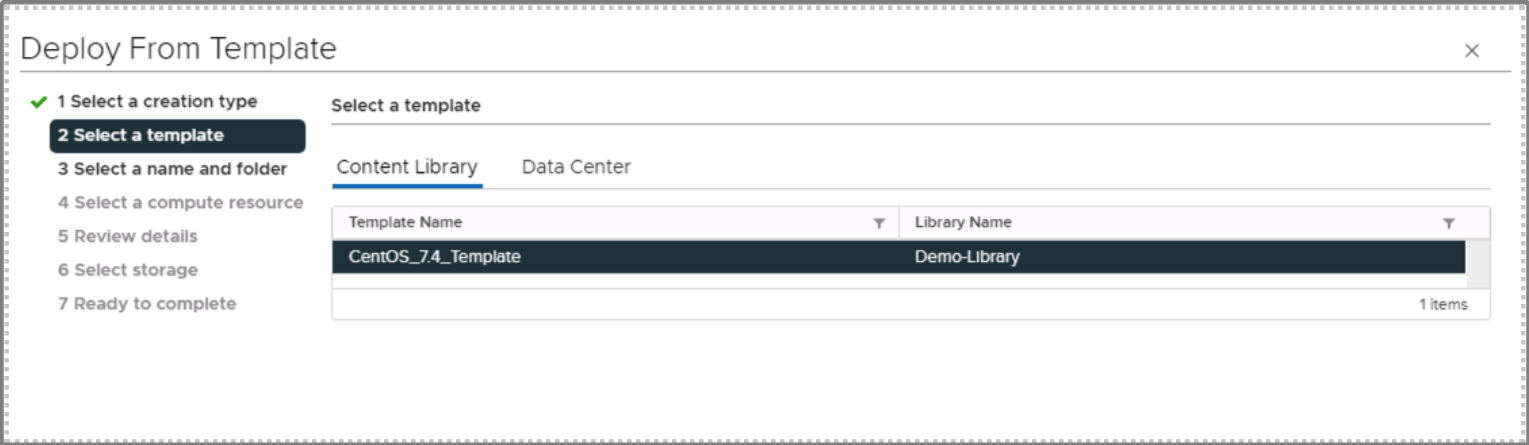
Deploy from template.
-
Choose the template.

-
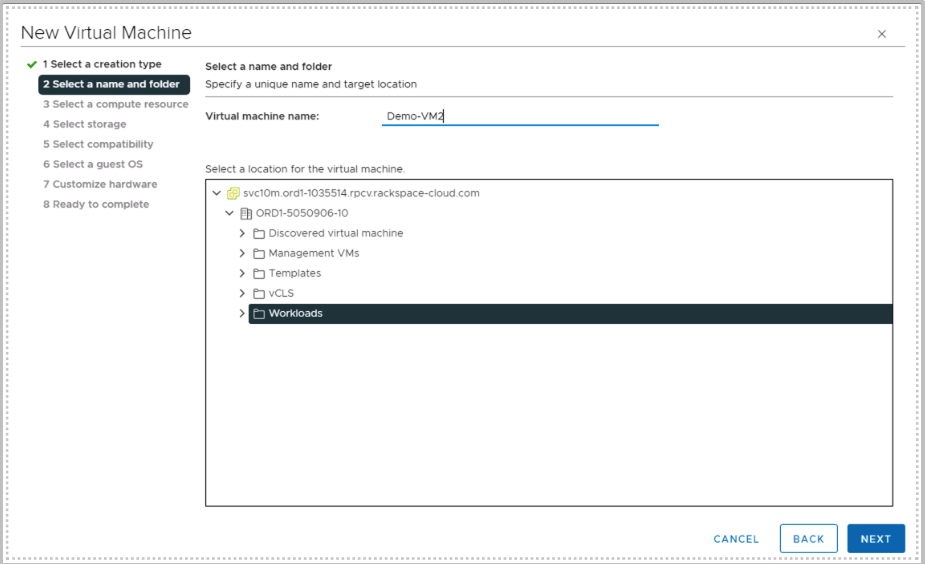
Provide a name for the Virtual Machine and choose the Workloads folder. Click Next.
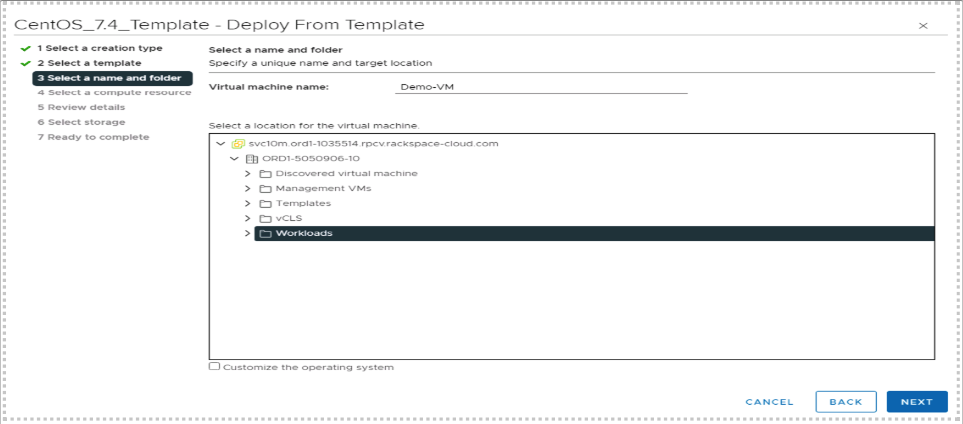
-
Ensure the Compute-ResourcePool is selected, click Next.
-
Review the details, click Next.

-
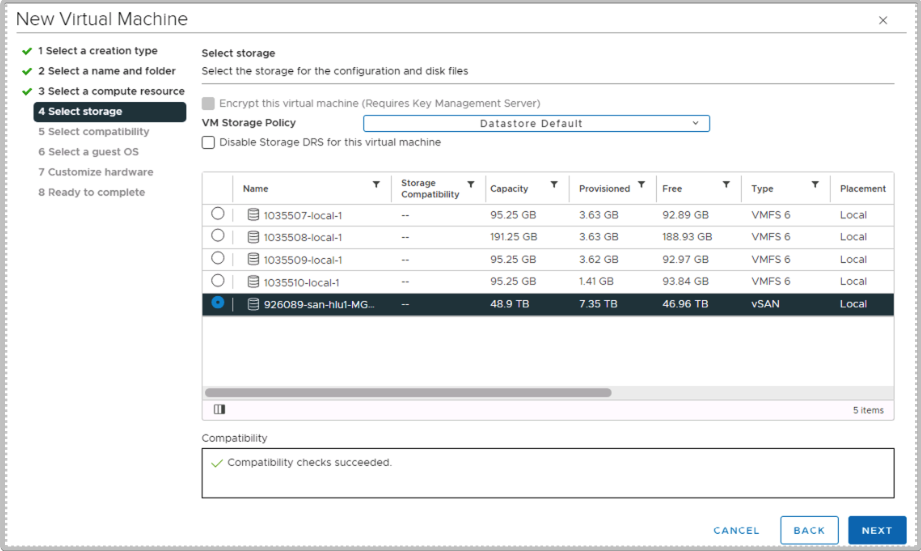
Ensure the storage LUN is selected, click Next.
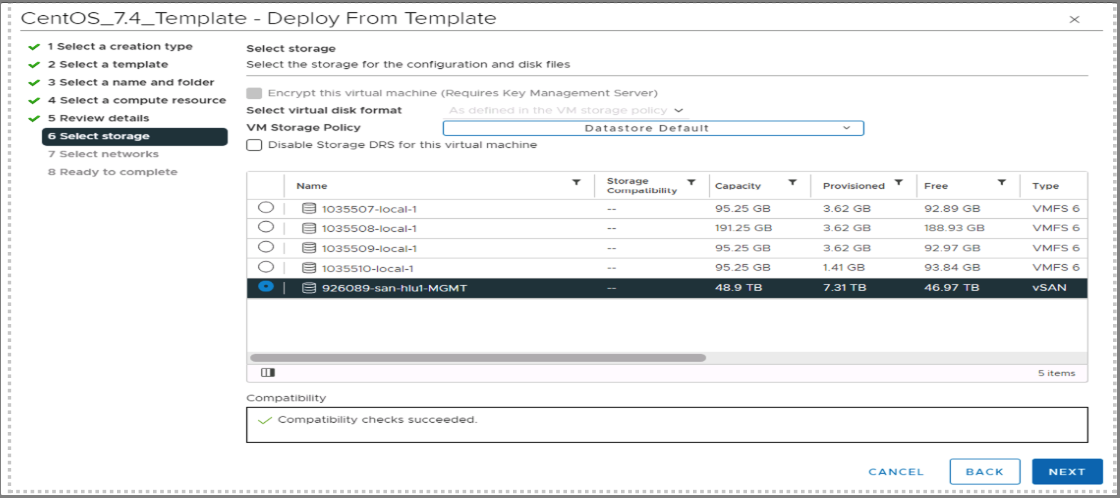
-
Select Network, click Next.

-
Review the details, click Finish to start the virtual machine deployment.
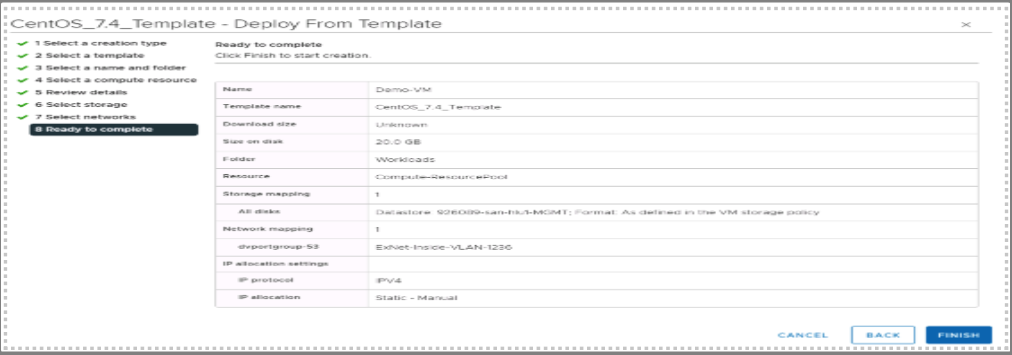

-
The VM should be visible under the Compute-ResourcePool.
-
Right click on the VM, Power > Power On to start the VM.


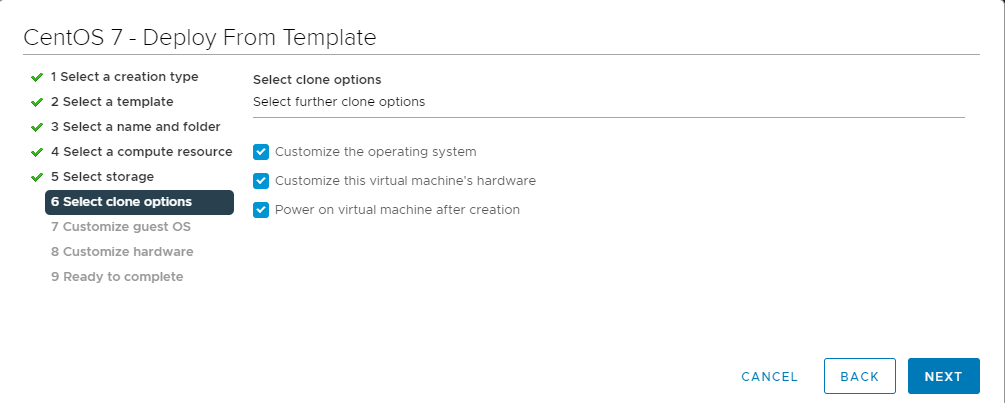
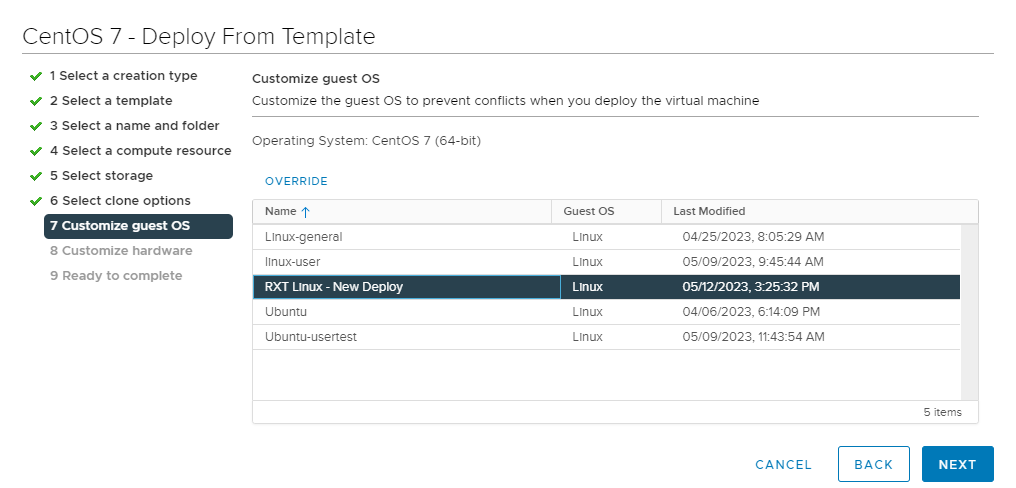
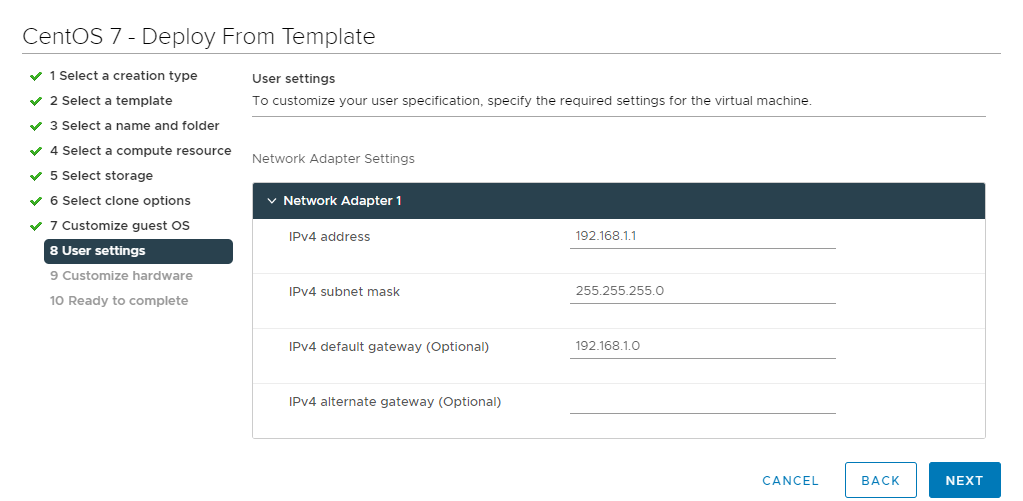
Deploy Virtual Machine Template Using OS Customization Spec
-
Right click the Compute-ResourcePool resource pool.
-
Click New Virtual Machine.

-
Deploy from template.
-
Choose the template.
-
Provide a name for the Virtual Machine and choose the Workloads folder. Click Next.

-
Ensure the Compute-ResourcePool is selected, click Next.
-
Review the details, click Next.
-
Ensure the storage LUN is selected, click Next.

-
Tick the checkboxes for Customize the operating system, Customize this virtual machine's hardware, and Power on virtual machine after creation, click Next.
-
Select 'RXT Linux - New Deploy' or 'RXT Windows - New Deploy' depending on your OS, click Next.
-
Enter your desired IP Address, Subnet Mask and Gateway information, click Next.
-
Select your desired hardware specifications and the appropriate Virtual Network for your network adapter(s), click Next.
-
Review the details, click Finish to start the virtual machine deployment.


-
The VM should be visible under the Compute-ResourcePool.

-
The VM will start and may reboot once to complete the OS customization process.
- NOTE: Do not power cycle the VM until you have retrieved your initial login credentials.
Fetching Initial Admin Credentials
The following steps will explain how to retrieve the initial admin password:
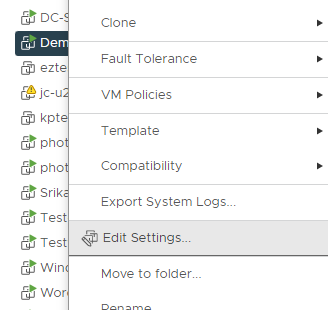
-
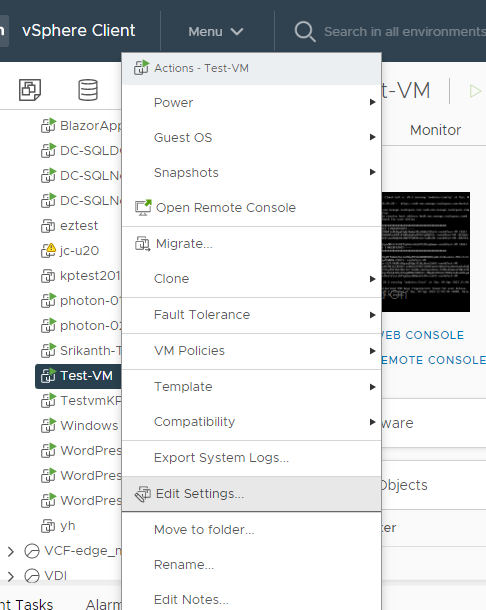
Right-click the VM in vCenter, click Edit Settings
-
Click the VM Options tab and expand Advanced
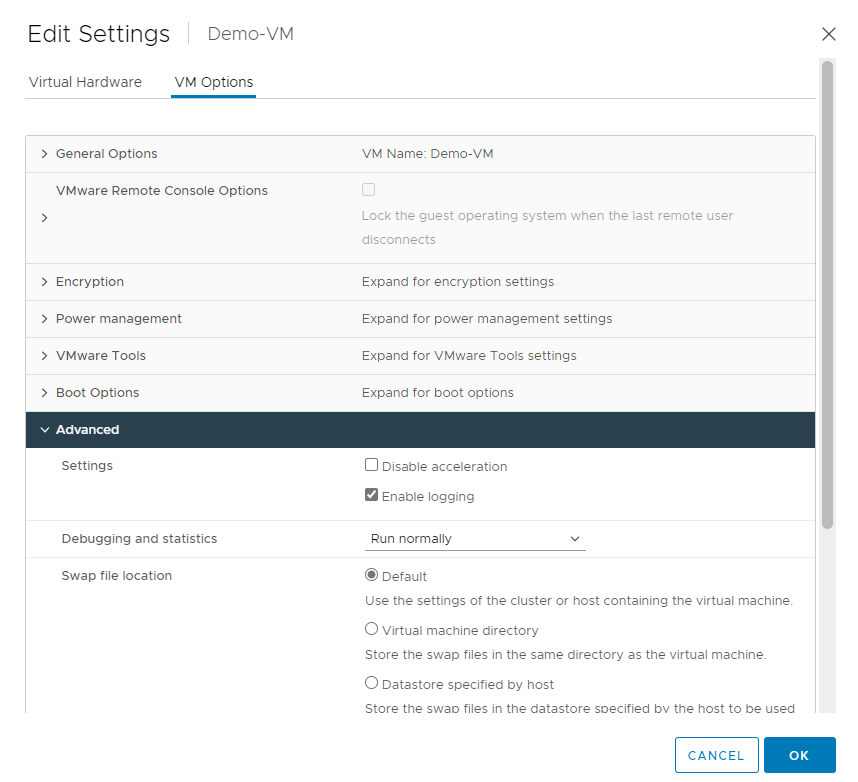
-
Scroll down and click EDIT CONFIGURATION

-
The initial admin password can be found in the value column next to 'guestinfo.custom.adminpassword'
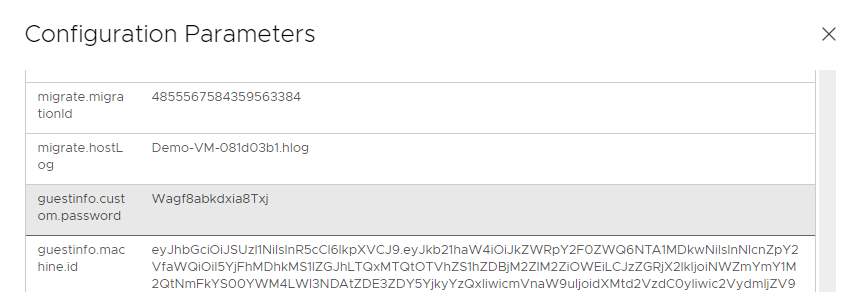
- NOTE: DO NOT Power cycle the VM (Power Off / Power On) until you have retrieved the initial admin credentials. The metadata key will disappear when you power off the VM!
Deploy Virtual Machine from ISO
-
Right click the Compute-ResourcePool resource pool.
-
Click New Virtual Machine, Click Next.
-
Provide a name for the virtual machine, select the Workloads folder, click Next.
-
Ensure the Compute-ResourcePool is selected, click Next.

-
Select your storage LUN.
-
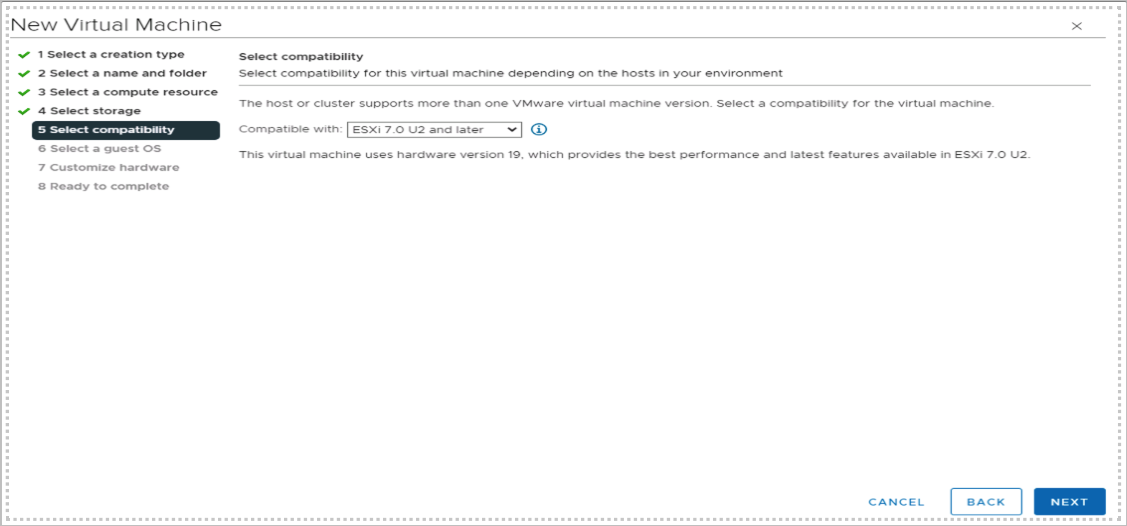
Keep the VM compatibility as default, click Next.
-
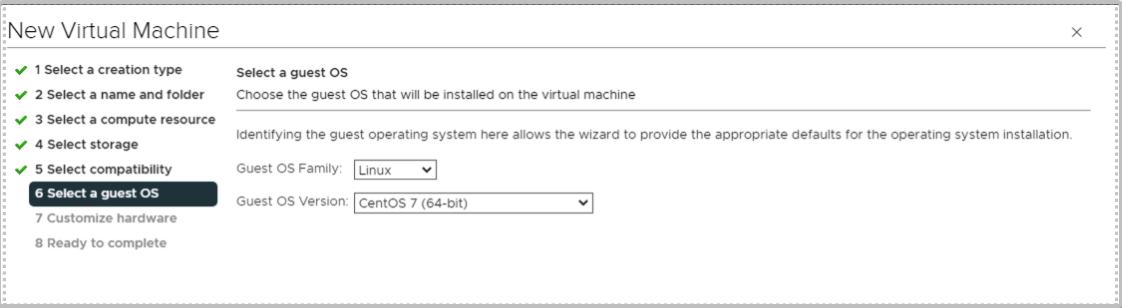
Select your Guest OS Family Windows/Linux or Other. Choose your Guest OS Version.
-
Click Next.
-
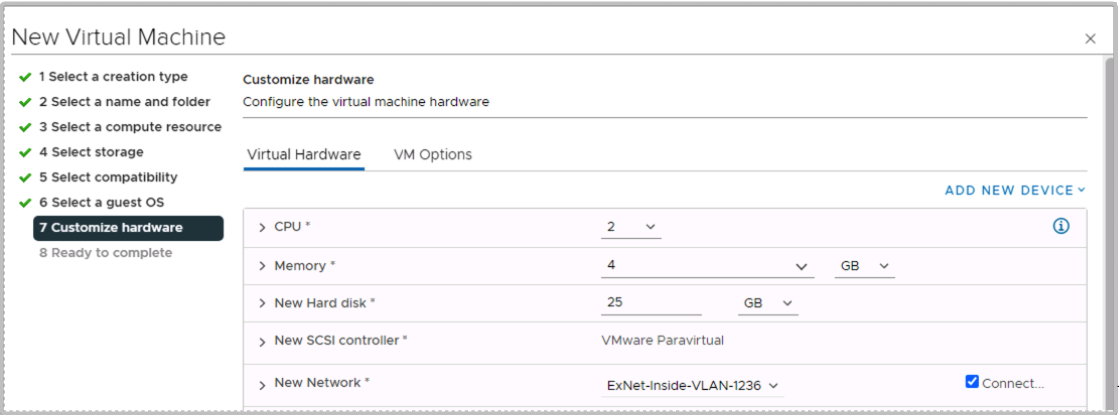
Configure your Virtual Machine CPU and Memory, size of the Hard Disk, Network segment.
-
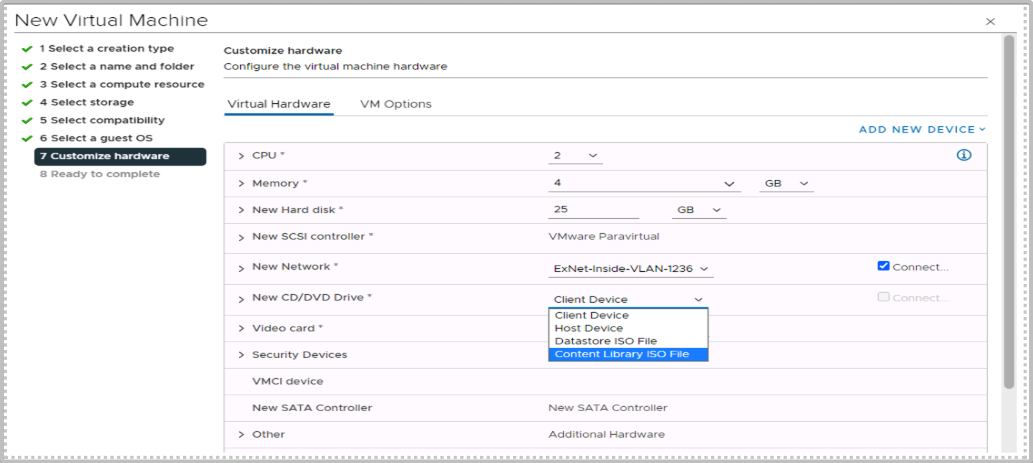
Click on the new CD/DVD Drive dropdown, select Content Library ISO File.
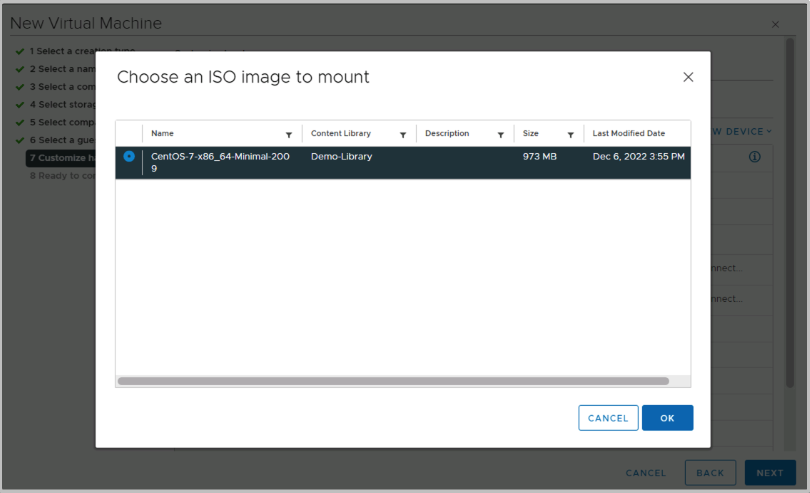
-
Select the ISO that you would like to use, click OK.
-
Ensure that the drive is connected.
-
Click Next, review your setting then click Finish to start the deployment.
-
Your Virtual machine should be visible under the Compute-ResourcePool.
-
Right click on the Virtual Machine, Power, Power On to start the Virtual Machine.
-
The Virtual Machine should boot using the ISO, the installation process can start.
VMware Tools Installation
VMware Tools is a suite of services and components that enhances the performance of the virtual machine and enable several features for better management and user interactions with guest operating system.
Prerequisite
- Powered on virtual machine with a running operating system.
- A user with administrative privileges.
Windows VMware Tools Install
-
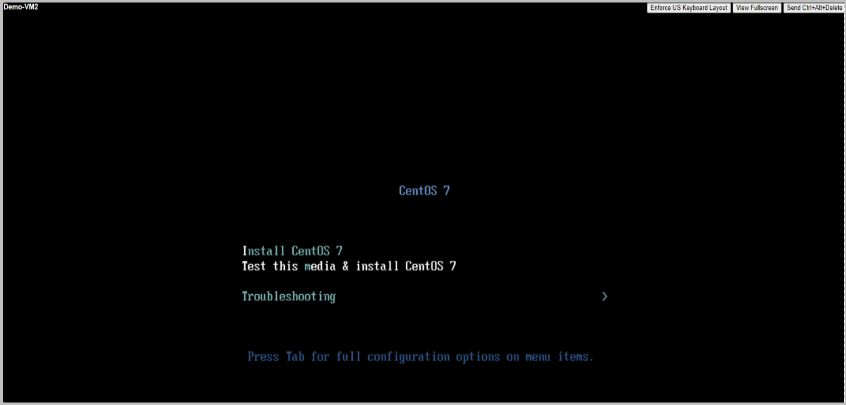
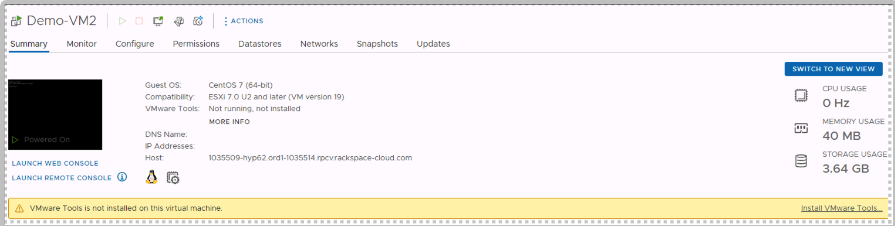
VMs without VMware Tools installed, will show a message on the console.
-
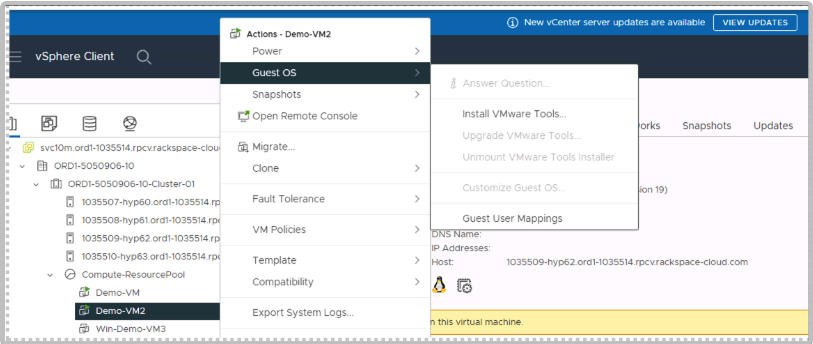
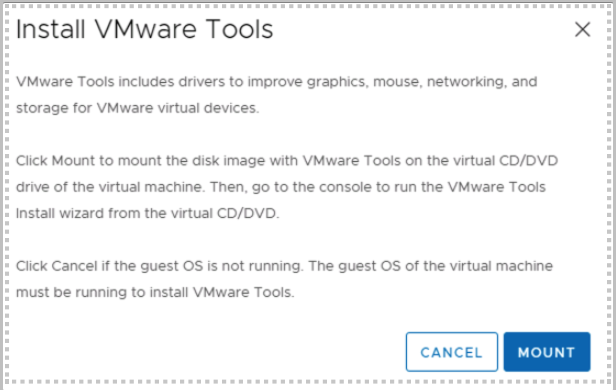
Click on install vmware Tools on the message or right click on the VM, click Install vmware Tools.
-
Click Mount, this will trigger the vmware Tools install process.


-
Click Run setup64.exe.
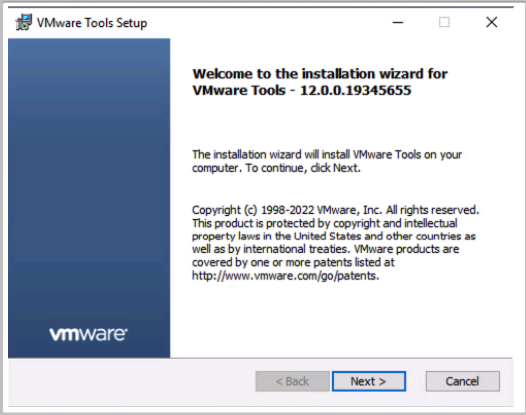
-
Click Next.
-
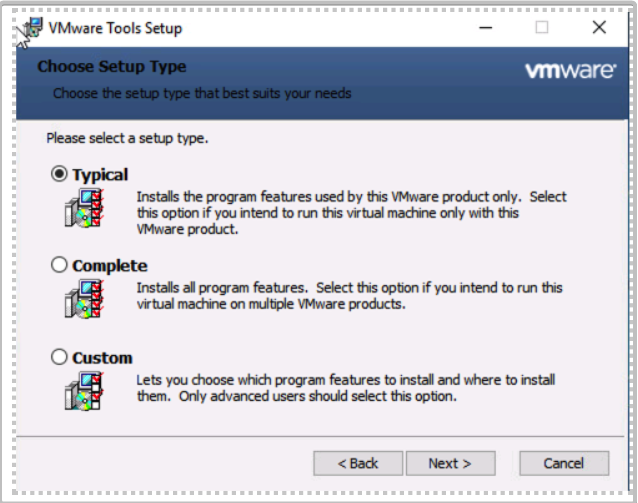
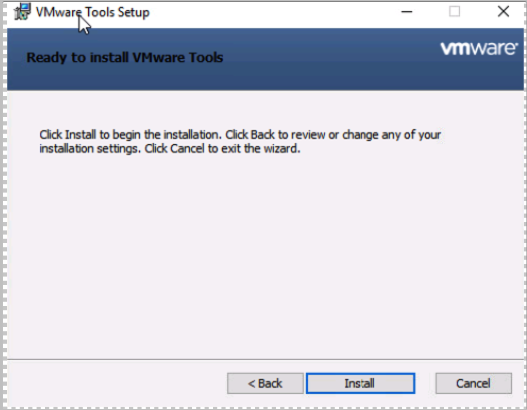
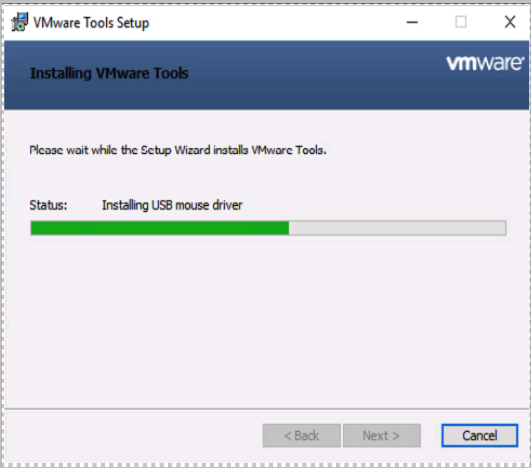
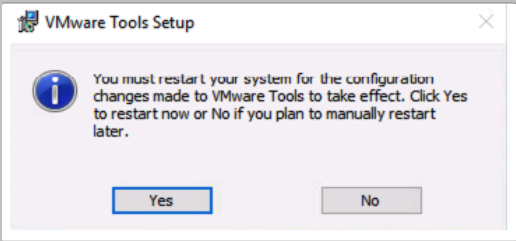
Choose Typical, click Next, click Install to begin the install.
-
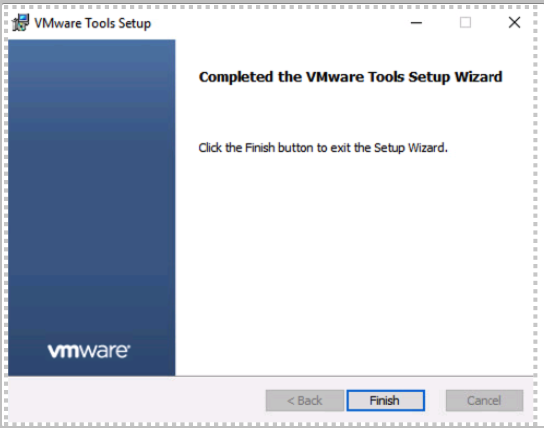
Click Finish to complete the install. Please reboot your Virtual Machine.
-
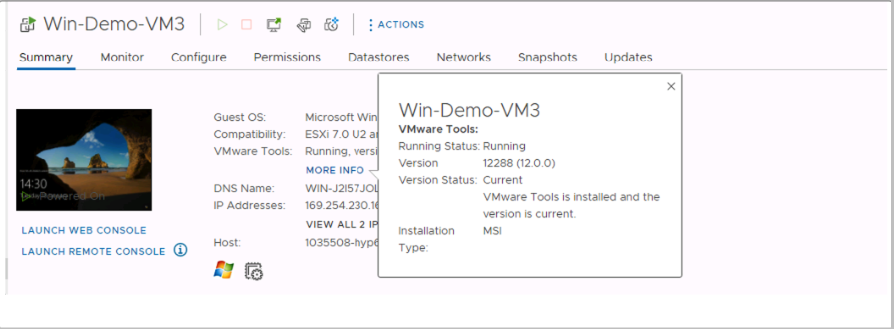
The vmware tools should now show as current and running.
Linux vmware Tools Install
Note: If you are running a GUI interface, open a command shell.
-
Right click VM in the virtual machine menu, then click Guest > Install/Upgrade vmware Tools. Click Mount.
-
Create a Mount Point
mkdir/mnt/cdrom -
Mount the CDROM
mount/dev/cdrom/mnt/cdrom
-
Copy the tar file
cp/mnt/cdrom/vmwareTools-version.tar.gz /tmp/
-
Change to the tmp directory and extract the files
tar -zxvf vmwareTools-version.tar.gz -
Change to the vmware-tools-distrib directory and run the vmware-install.pl.


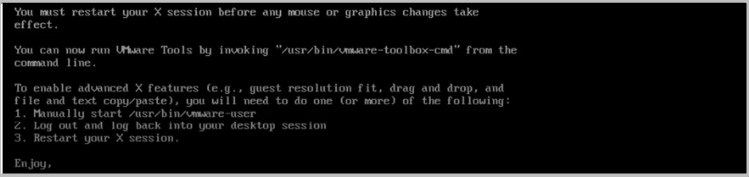
Install now complete.
Request a Public IP
To request a public IP for your workload. Please reach out to support teams by raising a ServiceDesk ticket.
Working With Tags
Your VMware vCenter Server provides a feature called Tags that allows you to organize and categorize your virtual resources, such as virtual machines, templates, and virtual appliances. Tags can be used to group resources based on different criteria, such as department, application, or environment.
You can create and manage tags using the vSphere Web Client, which is the primary user interface for vCenter Server. To create a new tag, you can go to the Tags section of the vSphere Web Client and click on the “New Tag” button. You’ll then be prompted to enter a name and description for the tag, and to choose a category. You can also assign an icon to the tag to help differentiate it from other tags.
Once you’ve created a tag, you can apply it to one or more virtual resources. For example, you can go to the “Virtual Machines” section of the vSphere Web Client and select one or more virtual machines, then click on the “Actions” button and select “Assign Tag”. You’ll then be prompted to select the tag that you want to assign to the virtual machine(s).
You can also use the vSphere API to create and manage tags programmatically. The vSphere API provides a set of services and methods for creating, retrieving, updating, and deleting tags, as well as for working with other vCenter Server objects, such as virtual machines and datacenters. You can use one of the vSphere SDKs, such as the vSphere Management SDK, to interact with the vSphere API and automate various tasks related to vCenter Server.
You can also find vCenter tag automation using PowerCLI which is a PowerShell interface for managing vSphere environments. You can use PowerCLI to automate various tasks related to vCenter Server, including creating, modifying and deleting tags.
Creating a Tag Category
-
In your vCenter, click on Tags and Customer Attributes.
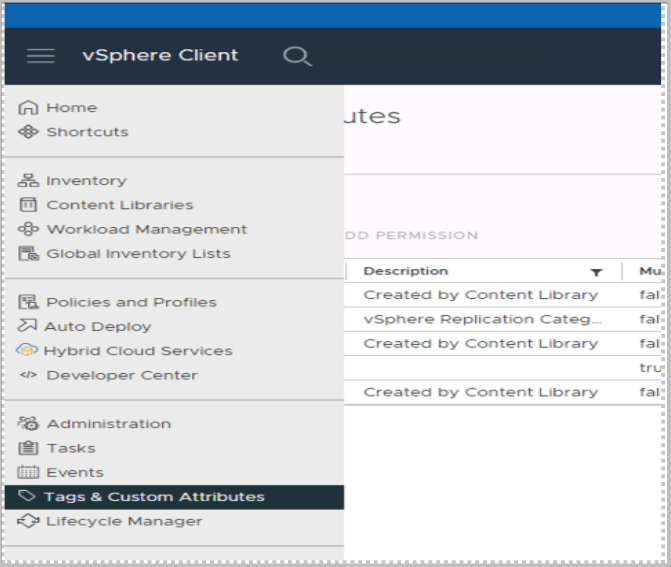
-
Click on Categories, New.
-
Provide a name, tags per object, and select the objects that the tag can be associated with.
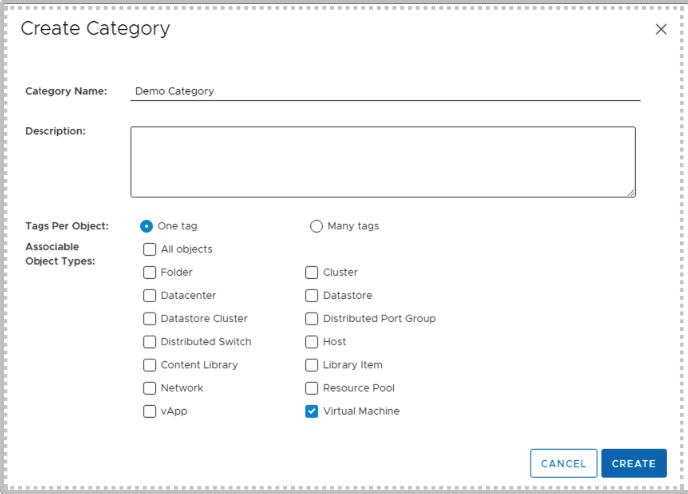
-
Click create.

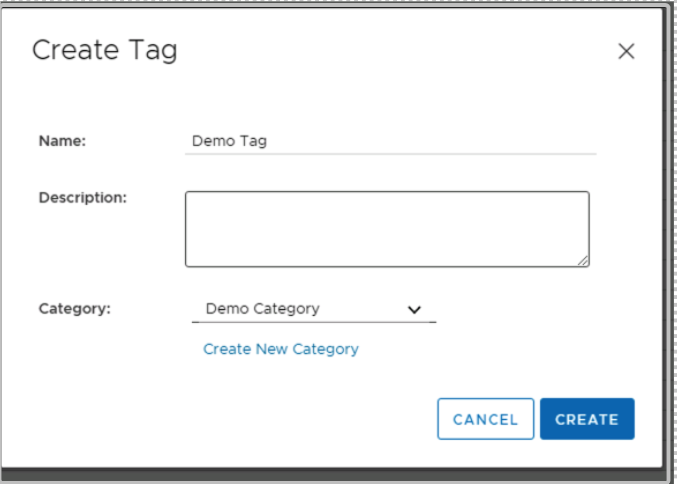
Creating a Tag
-
In your vCenter, click on Tags and Customer Attributes.

-
Click on Tags > New.
-
Provide a name, description and choose the tag category.

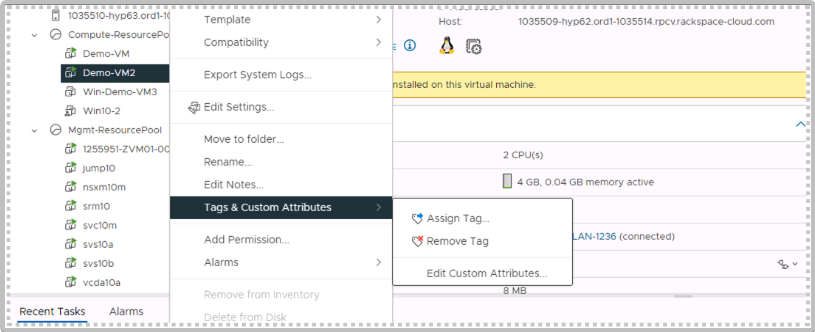
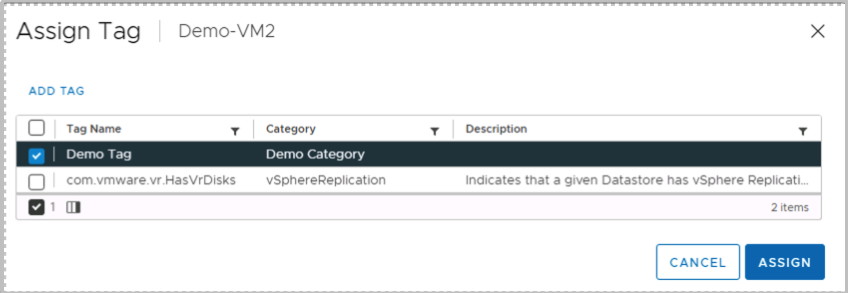
Assign a Tag
In our example, we will be assigning the demo tag to a VM.
-
Right click your VM, Tags & Custom Attributes, Assign Tag.
-
Choose the tag, click Assign.
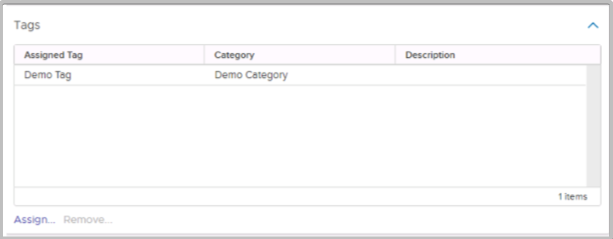
-
In the summary page of the VM, the tag will now show under tags.
How To Manage Virtual Machines and Settings
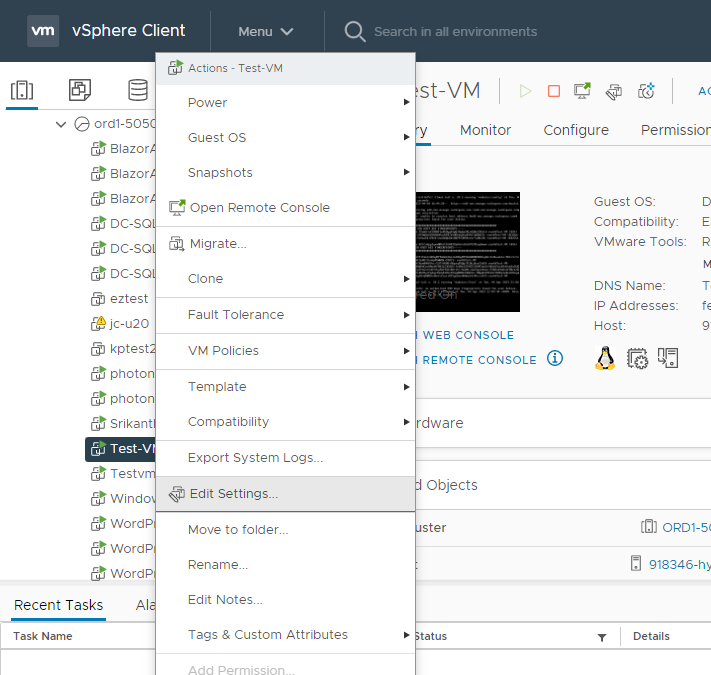
Changing a Virtual Network Interface Card Segment
-
Open the VMware vSphere Client or the VMware vSphere Web Client, and connect to the vCenter Server.
-
Right click on the Virtual Machine, click Edit Settings

-
Click on Browse to list all available portgroups

-
Choose the portgroup, click OK
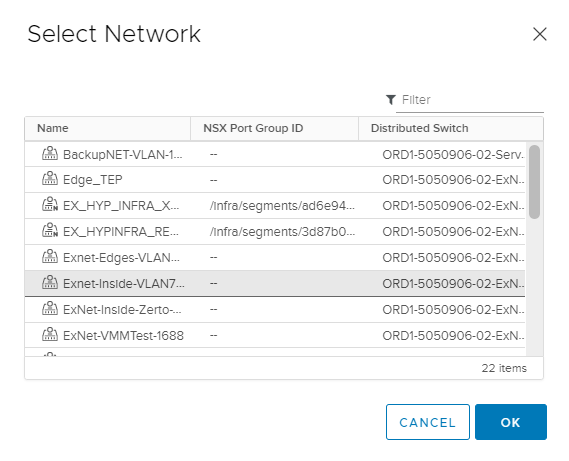
-
Click OK to save change.

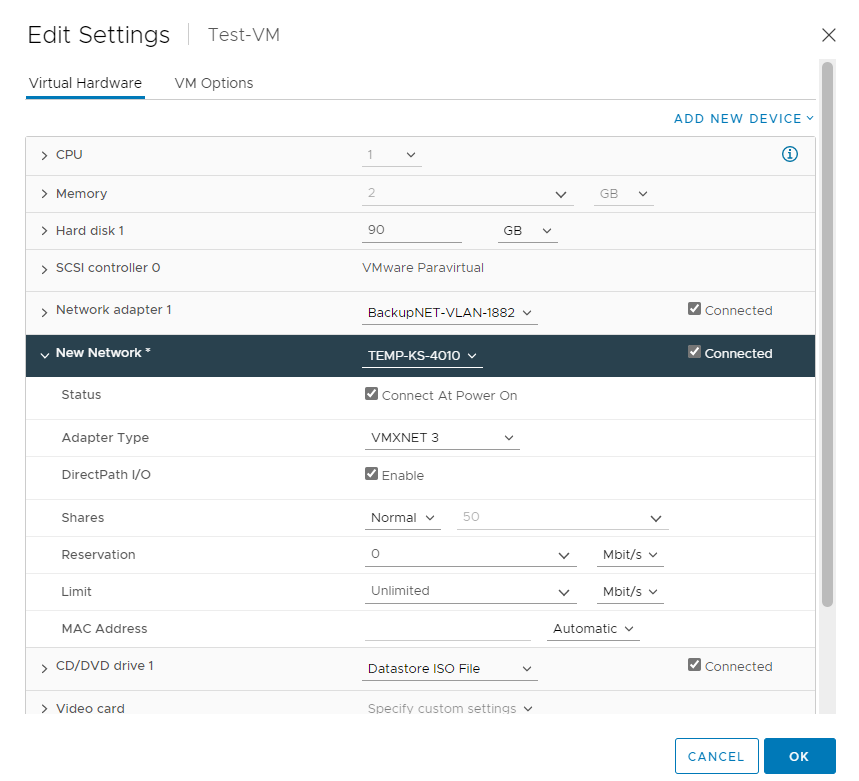
Adding a Virtual Network Interface Card
-
Open the VMware vSphere Client or the VMware vSphere Web Client, and connect to the vCenter Server.
-
Right click the virtual machine, choose Edit Settings

-
Click ADD NEW DEVICE, choose Network Adapter
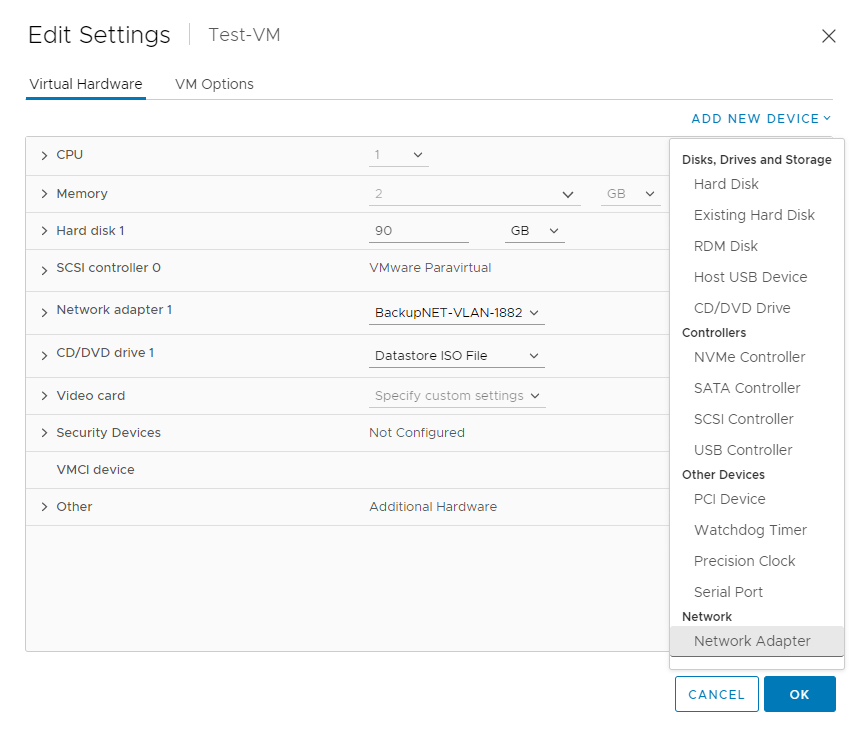
-
Choose the portgroup that you would like the vNIC to connect to, ensure Connect At Power On is selected and the adapter type is VMXNET3.
-
Click OK to save configuration.
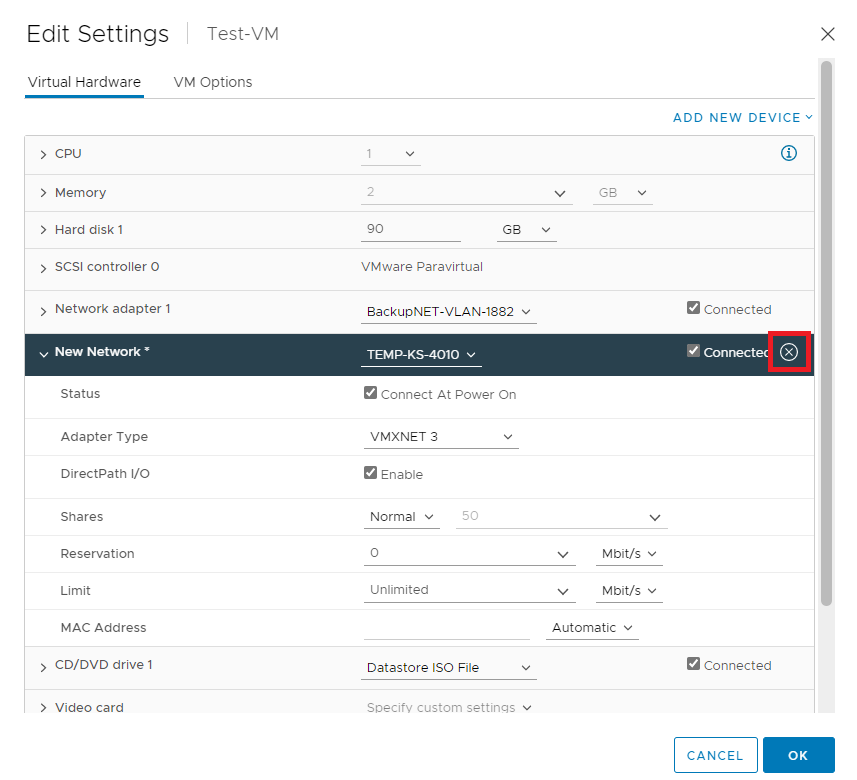
Removing a Virtual Network Interface Card
-
Open the VMware vSphere Client or the VMware vSphere Web Client, and connect to the vCenter Server.
-
Right click on the Virtual Machine, click Edit Settings
-
Highlight the vNIC, click the X to the right of the vNIC
-
Click OK to save the new configuration.
Please Note:
-
You cannot remove NICs from an active virtual machine on which no operating system is installed.
-
The vSphere Client might report that the NIC has been removed, but you continue to see it attached to the virtual machine.
Removing NICs from an Active Virtual Machine with a Guest Operating System Installed
-
You can remove a NIC from an active virtual machine, but it might not be reported to the vSphere Client for some time. If you click Edit Settings for the virtual machine, you might see the removed NIC listed even after the task is complete. The Edit Settings dialog box for the virtual machine does not immediately display the removed NIC.
-
You might also see the NIC attached to the virtual machine if the guest operating system of the virtual machine does not support hot removal of NICs.
-
To work around this, Power off the VM, if possible, before removing the vNIC.
Modifying Virtual CPU and Memory Settings
-
Open the VMware vSphere Client or the VMware vSphere Web Client, and connect to the vCenter Server.
-
Assess overall availability of requested resources by highlighting the Resource Pool and referencing the CPU and Memory stats on the Summary tab.

-
Right click the virtual machine, click Edit Settings

Please note that the VM will need to be shutdown if CPU Hot Add and Memory Hot Plug are not enabled
-
Amend CPU and/or Memory based on requirements, click OK to confirm the change.
-
If the VM was powered off, start the VM and ensure that it boots successfully.
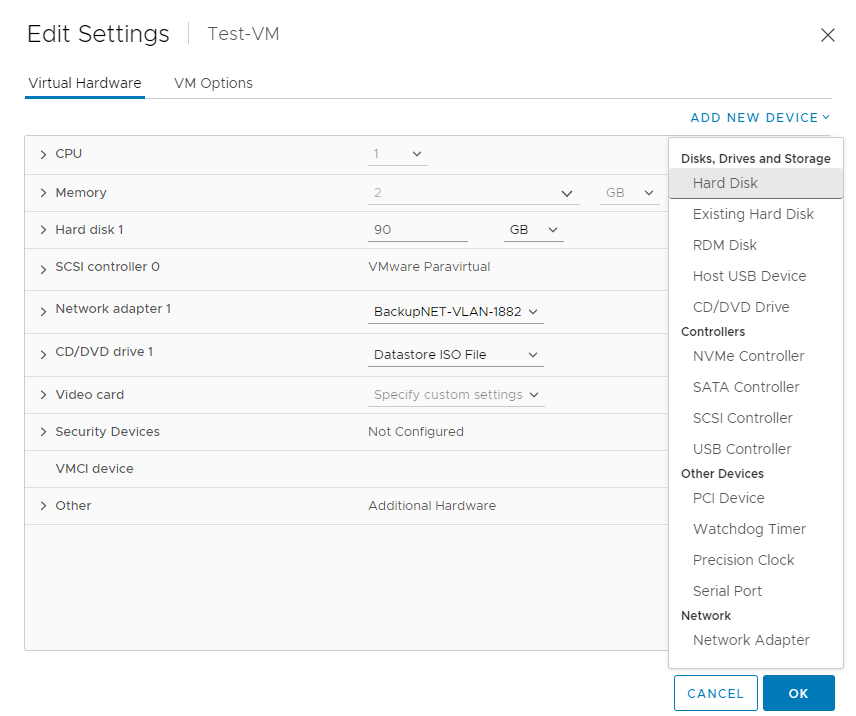
Adding a Virtual Disk
-
Open the VMware vSphere Client or the VMware vSphere Web Client, and connect to the vCenter Server that manages the virtual machine you want to add the vdisk to.
-
In the inventory panel, select the virtual machine you want to add the vdisk to.
-
Right-click on the virtual machine and select Edit Settings from the context menu. This will open the virtual machine's settings dialog box.

-
In the virtual machine's settings dialog box, click on the Add New Device button to add a new Hard Drive to the virtual machine.
-
Select Hard Disk and click OK to continue.
-
Specify the disk configuration. Unless otherwise specified, the Location will default to the same datastore that the Virtual Machine is currently using for its .vmx file. This can be confirmed on the VM Options tab - VM Working Location.
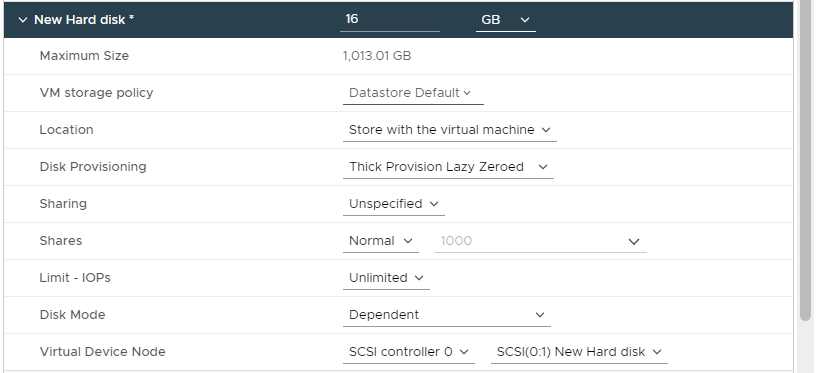
The additional settings will likely be default, depending on use case:
VM Storage Policy
Use the drop-down box to select a Storage Policy. VSAN Storage Policies are used to align storage with application demands of virtual machines. It provides a storage policy framework that serves as a single unified control panel across a broad range of data services and storage solutions. Policies should already exist in order to assign a disk to them.
If Storage Polices are not in use, leave the setting as Datastore Default.
Disk Provisioning
- Thin:
Virtual disks do not reserve space on the VMFS filesystem or on the back-end storage. They only consume blocks when data is written to disk from within the Guest OS. The amount of actual space consumed by the VMDK starts out small, but grows in size as the Guest OS commits more I/O to disk, up to a maximum size set at VMDK creation time.- Thick Lazy Zeroed:
Virtual disks reserve space on the VMFS filesystem but disk blocks are only used on the back-end array when they get written to inside in the Guest OS.- Thick Eager Zeroed:
Virtual disks have all space allocated and wiped clean of any previous contents on the physical media at creation time. May take longer during creation compared to other formats. The entire disk space is reserved and unavailable for use by other virtual machines.
Review the vdisk settings and click OK to save the virtual machine's settings. Ensure that the change has been applied successfully.
-
Power on the virtual machine, if it's not already powered on.
-
In the guest operating system of the virtual machine, use disk management tools to partition and format the new vdisk as needed.
Expanding a Virtual Disk
-
Open the VMware vSphere Client or the VMware vSphere Web Client, and connect to the vCenter Server that manages the virtual machine you want to add the vdisk to.
-
Available disk space can be checked in vCenter.
-
Highlight virtual Data Center, click on Datastore Icon
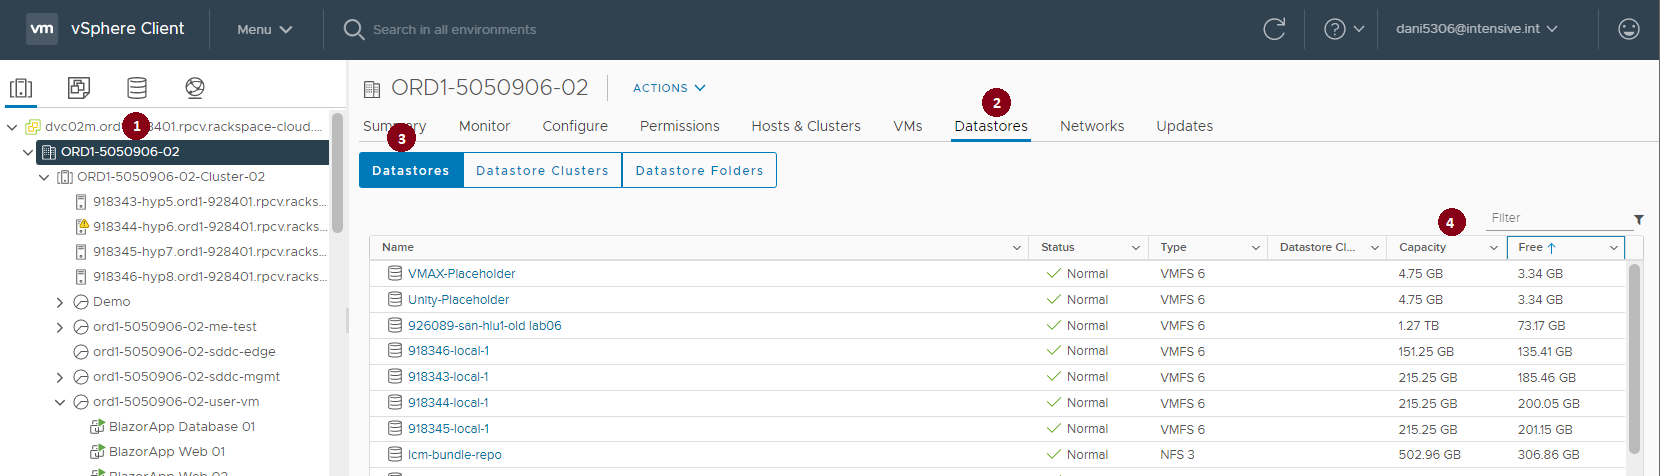
-
Current Maximum available space on the selected datastore is also shown in the Edit Settings dialogue for a VM.
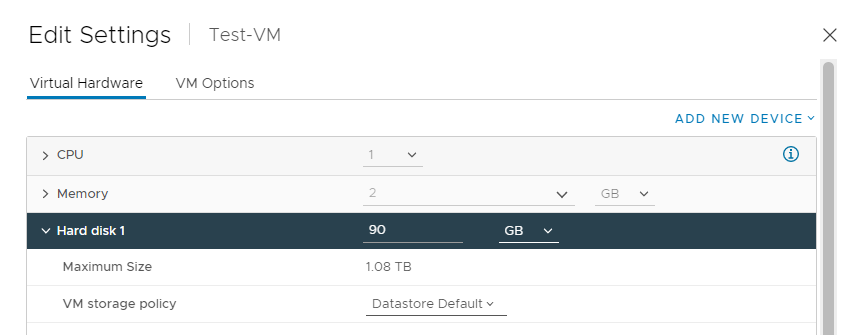
-
In the inventory panel, select the virtual machine you want to reconfigure.
-
Right-click on the virtual machine and select Edit Settings from the context menu. This will open the virtual machine's settings dialog box.
-
Identify the vDisk for expansion with the Hard disk #, such as Hard disk 1. You can use the Virtual Device Node values to help identify the correct vDisk with the OS if needed.

-
Select the vDisk that needs to be expanded. Please ensure that the datastore has free capacity. The raw remaining space on the current datastore is shown as Maximum Size. It is recommended to keep 15% reserve space on all VM datastores for VMware functions.
-
Amend the disk size based on requirements, press OK to save the new settings.

-
Ensure that the change has been applied successfully.
Deleting a Virtual Disk
-
Open the VMware vSphere Client or the VMware vSphere Web Client, and connect to the vCenter Server that manages the virtual machine you want to remove the vdisk from.
-
In the inventory panel, select the virtual machine you want to remove the vdisk from.
-
Right-click on the virtual machine and select Edit Settings from the context menu. This will open the virtual machine's settings dialog box.

-
In the virtual machine's settings dialog box, An X icon will appear on the right side of the selected line. Click on the X icon to remove disk. Please note that you can also select the Delete Files from datastore if desired.

-
Click OK to save new configuration.
-
Ensure that the change has been applied successfully.
Performing a vMotion
vMotion is a VMware feature that provides the ability to migrate virtual machines between hosts without interrupting the service provided by the virtual machine.
-
Open the VMware vSphere Client or the VMware vSphere Web Client, and connect to the vCenter Server.
-
Right click the virtual machine, click Migrate.
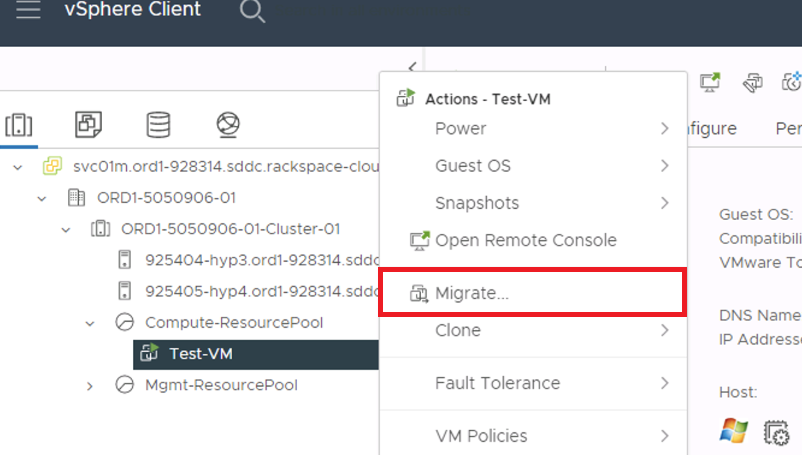
-
Below is a brief overview of the options presented:
- Change compute resource only:
Moving a virtual machine, but not its storage, to another compute resource, such as a host, cluster, resource pool. You can move the virtual machine to another compute resource by using cold or hot migration. If you change the compute resource of a powered on virtual machine, you use vSphere vMotion.- Change storage only:
Moving a virtual machine and its storage, including virtual disks, configuration files, or a combination of these, to a new datastore on the same host. You can change the datastore of a virtual machine by using cold or hot migration. If you move a powered on virtual machine and its storage to a new datastore, you use Storage vMotion.- Change both compute resource and storage:
Moving a virtual machine to another host and at the same time moving its disk or virtual machine folder to another datastore. You can change the host and datastore simultaneously by using cold or hot migration.- Cross vCenter Server Export:
The ability to move virtual machines to a vCenter server outside of the current SSO domain.
-
Choose option one to change the compute only for the test virtual machine.

-
Click Next, choose the hypervisor you would like to move the virtual machine to.
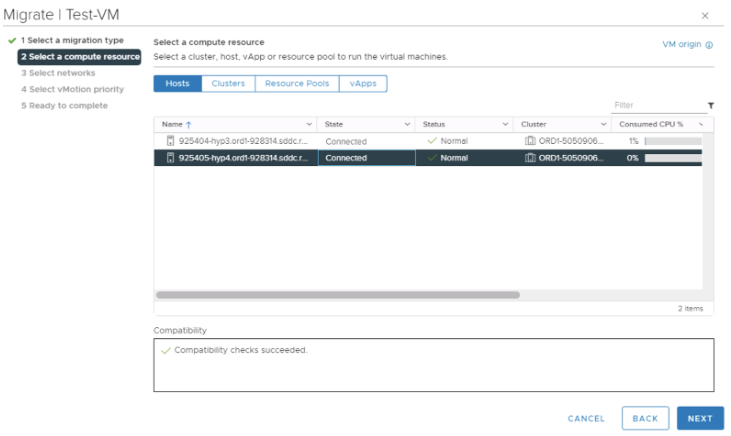
-
Choose the network for the virtual machine, click Next.
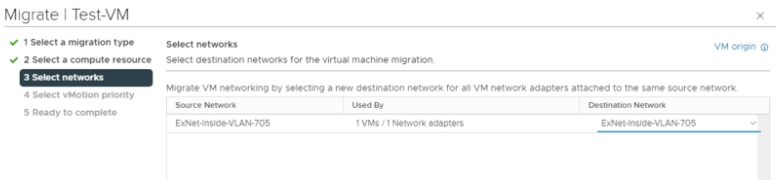
-
Keep the default option, click Next.
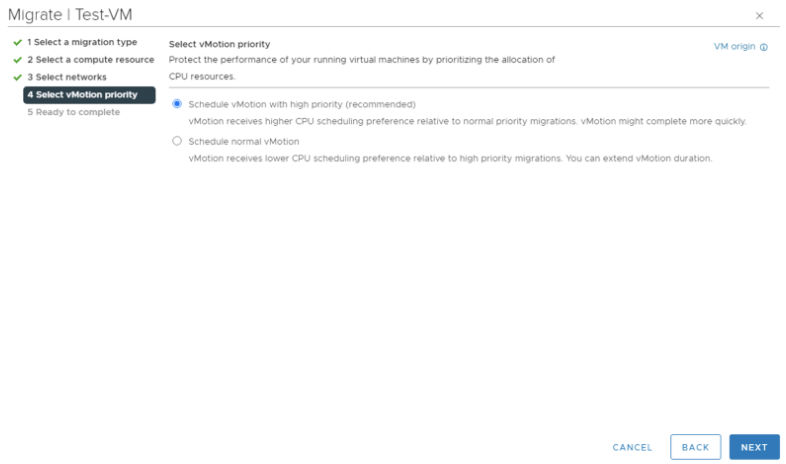
-
Review your settings, click Finish to start the vMotion.
-
Ensure that the vMotion has successfully completed.

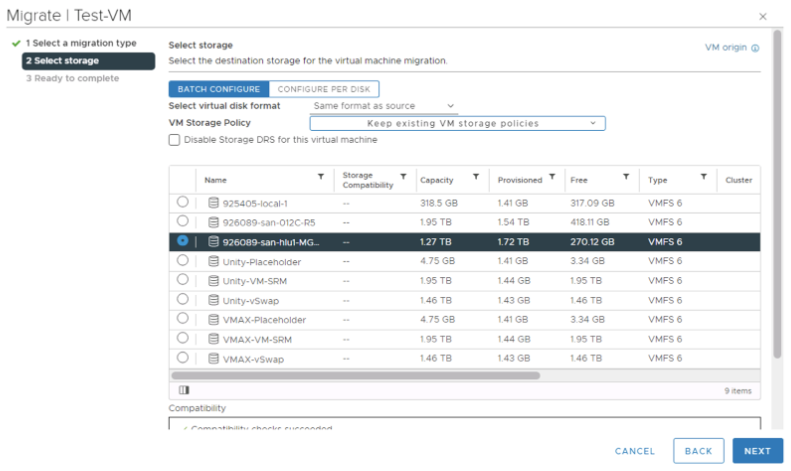
Performing a Storage vMotion
Storage vMotion is Storage vMotion is a component of VMware vSphere that allows the live migration of a running virtual machine's (VM) file system from one storage system to another, with no downtime for the VM or service disruption for end users.
-
Open the VMware vSphere Client or the VMware vSphere Web Client, and connect to the vCenter Server.
-
Right click the virtual machine, click Migrate.

-
Below are a brief overview of the options presented:
- Change compute resource only:
Moving a virtual machine, but not its storage, to another compute resource, such as a host, cluster, resource pool. You can move the virtual machine to another compute resource by using cold or hot migration. If you change the compute resource of a powered on virtual machine, you use vSphere vMotion.- Change storage only:
Moving a virtual machine and its storage, including virtual disks, configuration files, or a combination of these, to a new datastore on the same host. You can change the datastore of a virtual machine by using cold or hot migration. If you move a powered on virtual machine and its storage to a new datastore, you use Storage vMotion.- Change both compute resource and storage:
Moving a virtual machine to another host and at the same time moving its disk or virtual machine folder to another datastore. You can change the host and datastore simultaneously by using cold or hot migration.- Cross vCenter Server Export:
The ability to move virtual machines to a vCenter server outside of the current SSO domain.
-
Select Change storage only, click Next
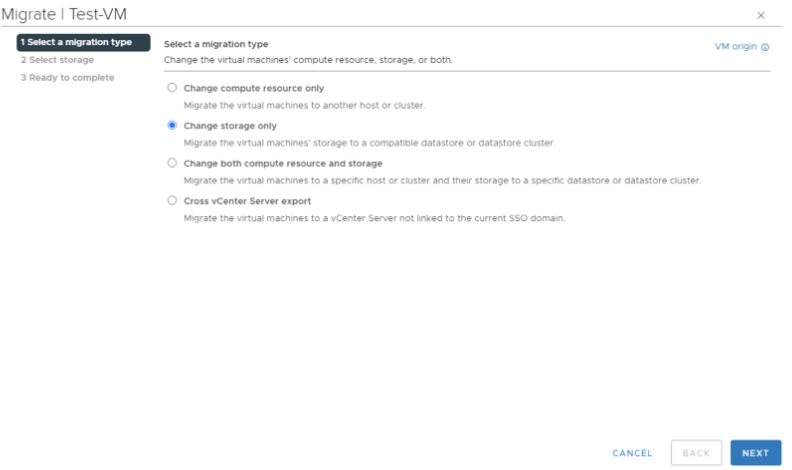
-
Select the target datastore, click Next
-
Review the settings, click Next to start the storage vmotion
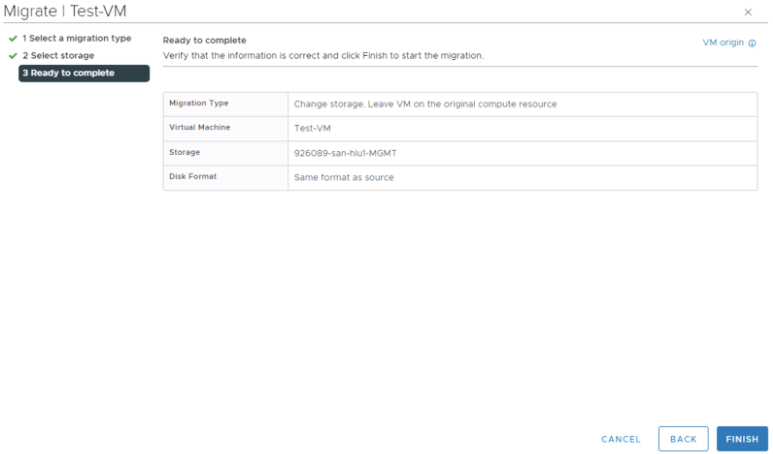
-
Ensure that the storage vmotion has successfully completed

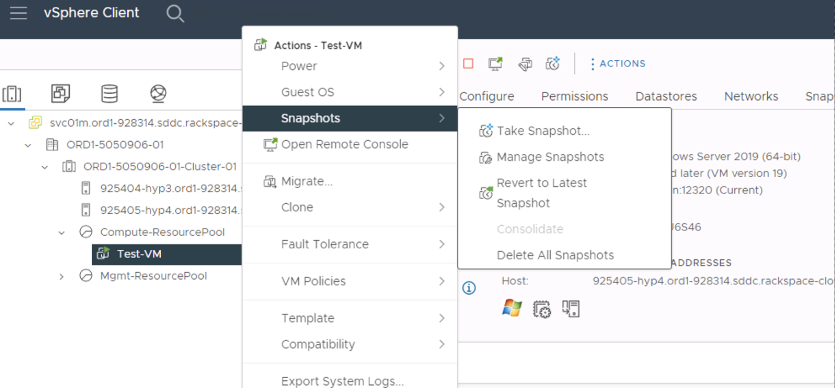
Creating a Snapshot
-
Open the VMware vSphere Client or the VMware vSphere Web Client, and connect to the vCenter Server.
-
Right-click the virtual machine, select Snapshots, click Take Snapshot
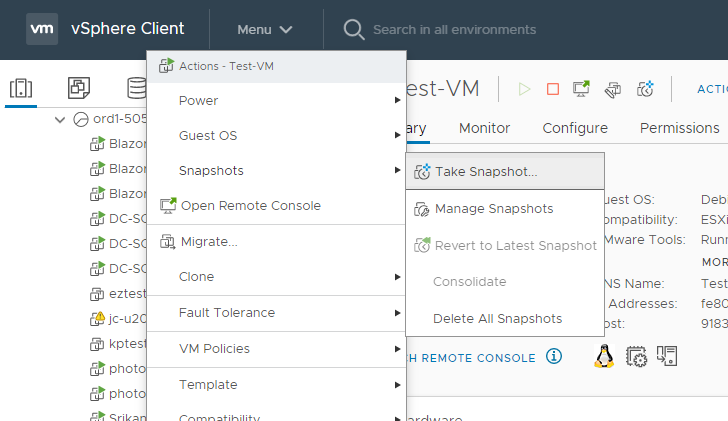
-
Name your snapshot. Choose if you would like to include the virtual machine memory or Quiesce guest file system(requires VM tools).
-
Click Create.
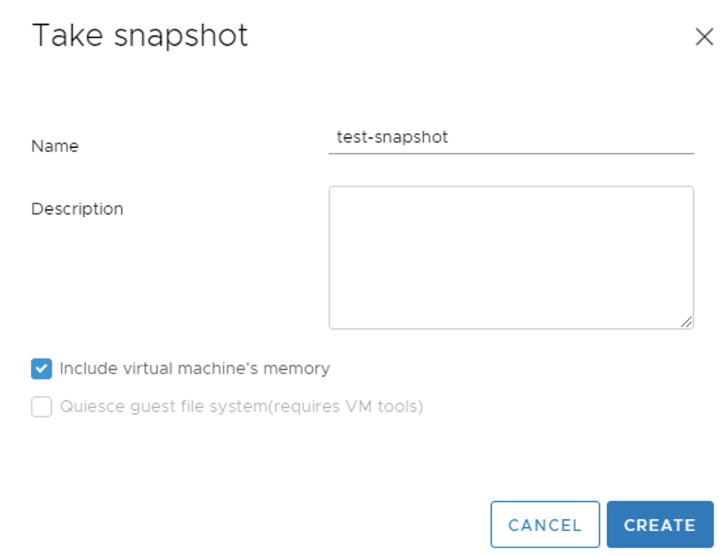
-
Monitor the snapshot creation.

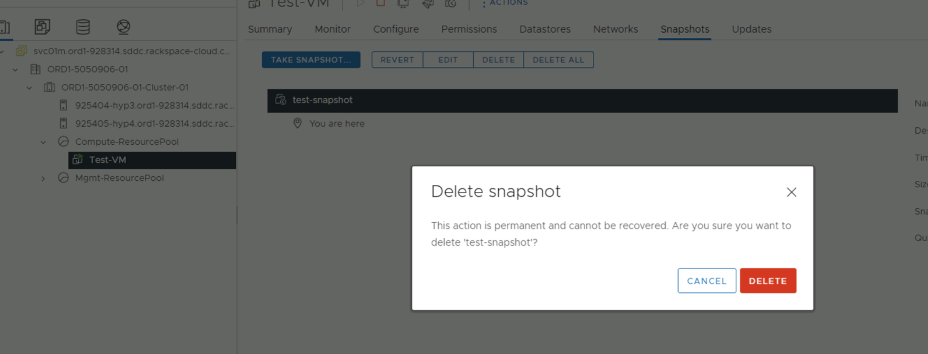
Managing and Deleting Snapshots
-
Open the VMware vSphere Client or the VMware vSphere Web Client, and connect to the vCenter Server.
-
Right-click the virtual machine, select Snapshots, click Manage Snapshots
-
You can revert, edit, and delete snapshots.
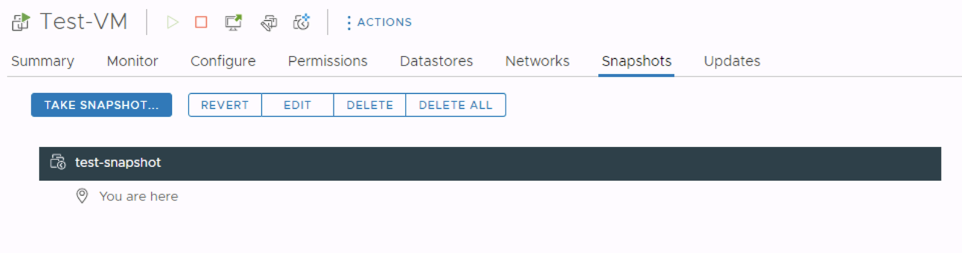
-
To delete a snapshot, highlight the snapshot, click Delete
-
To revert to a snapshot, highlight the snapshot, click Revert.
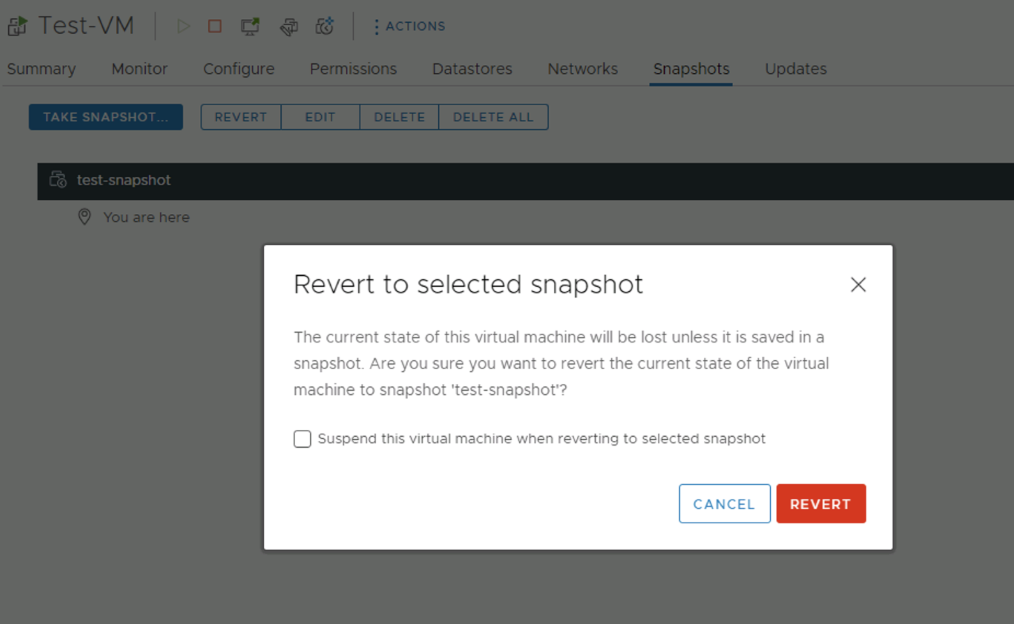
Please note that you can suspend the virtual machine when reverting to an existing snapshot.
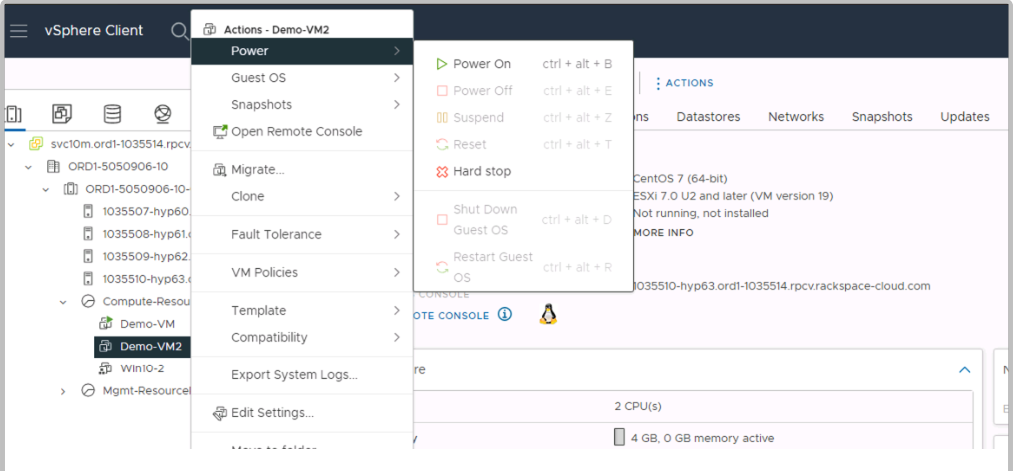
Shutting Down a Virtual Machine
-
Open the VMware vSphere Client or the VMware vSphere Web Client, and connect to the vCenter Server.
-
Right click the virtual machine, click on Power and Shutdown Guest OS
Rebooting a Virtual Machine
-
Open the VMware vSphere Client or the VMware vSphere Web Client, and connect to the vCenter Server.
-
Right click the virtual machine, click Power then Restart Guest OS

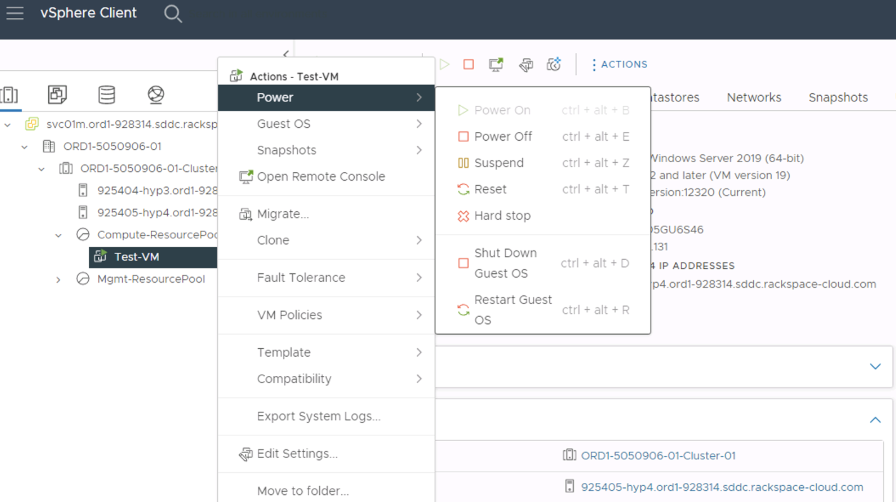
Renaming a Virtual Machine
-
Open the VMware vSphere Client or the VMware vSphere Web Client, and connect to the vCenter Server.
-
Right-click the virtual machine you wish to rename, click Rename
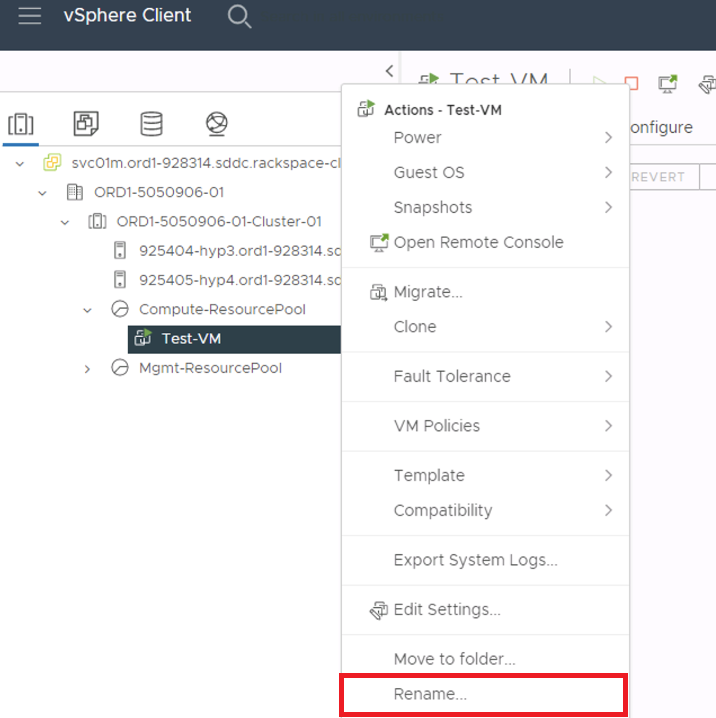
-
Enter the new name in to the box. Click OK to save the new configuration.
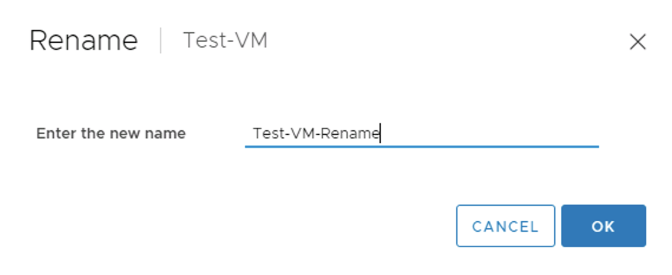
-
Change the hostname within the OS as necessary. Renaming the VM in vcenter does not change the hostname within the OS.
SDDC Business StorageThis section explains the following storage concepts that are important to understand when you use SDDC Business.
Please note: vSAN is not supported as storage for SDDC Business. SDDC Business can consume shared block/file and dedicated block/file storage.
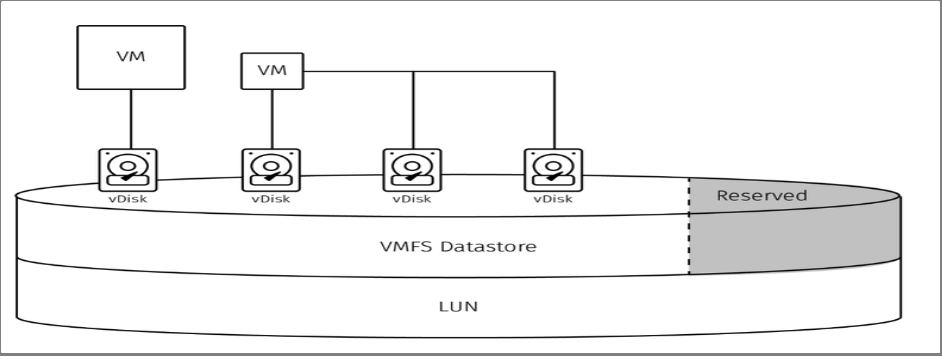
- Logical Unit Number (LUN): A LUN identifies a storage device. In the context of VMware, a LUN provides a foundation for a VMware filesystem (VMFS) datastore, or you can use it as an RDM (Raw Device Mapping).
- Datastore: A datastore is a volume formatted with a VMFS. You can create a VMFS datastore on top of a LUN or on a local RAID array. A VMFS datastore contains log files or files that comprise VMs.
- vDisk: A vDisk is a virtual disk. A Guest OS in the VM uses a vDisk in the same way it would use a physical disk but represents the vDisk as a vmdk file on a VMFS datastore.
The following graphic illustrates VMs that are connected to vDisks of different sizes. The vDisks reside on a VMFS datastore with some of the datastore space reserved. The datastore is formatted on top of a LUN.
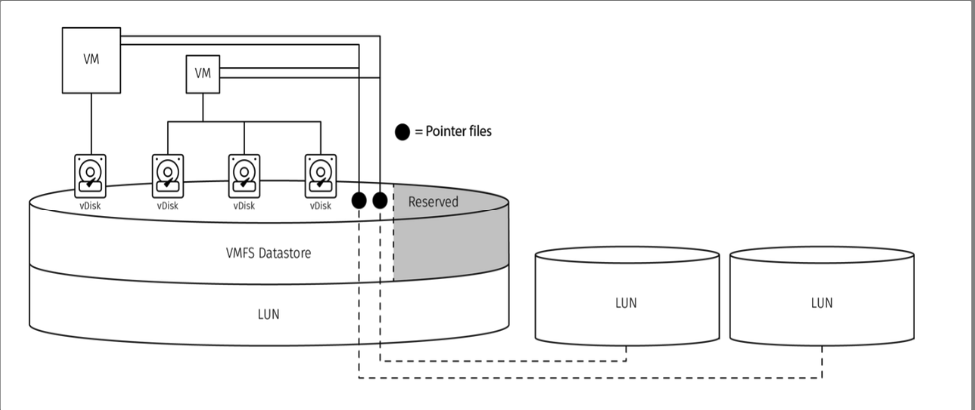
Raw Device Mapping: Raw Device Mapping (RDM) is a type of storage configuration where a LUN is mounted to the VM directly, bypassing the datastore layer. Bypassing the datastore layer means that the Guest OS in the VM can issue Small Computer System Interface (SCSI) commands directly to the LUN. This configuration is most commonly used with Microsoft clustering. However, using RDMs means you cannot use features such as snapshots or VM-level backups. Other operations, such as storage vMotion, might also become more complex.
The following image illustrates two clustered VMs using their own vDisks and sharing two raw device LUNs. The pointer files, which reside on the VMFS Datastores alongside the vDisks, act as a proxy between the LUNs and the VMs.
Virtual Machine Snapshots
A snapshot represents a point-in-time state of the VM. Snapshots are useful if you suspect a short-term rollback might be needed, such as before starting a software upgrade on your VM.
When you take a VM snapshot, a delta file is created for each vDisk, and all changes moving forward are written to the delta files. This operation happens in the background and is not exposed to the Guest OS.
The delta files can grow rapidly and without your awareness. If the delta files fill the datastore, your VM might pause, which can result in unexpected downtime. Monitor the free space on your datastores and delete all unneeded snapshots.
- Note:
- As snapshot files grow, it can affect all virtual machines on the hypervisor. For this reason, we recommend keeping a snapshot for no longer than two days. Depending on the circumstances, you can delete snapshots within hours or days after being taken. When you delete the snapshot, the changes stored in the delta files are merged back onto the original vDisks. This operation can take a long time. You can also revert (roll back) to a snapshot, in which case the changes in the delta files are discarded.
- Do not use a snapshot as a VM backup. VM replication is a better alternative for making and restoring backups.
Expand LUNs
If you have requested that we expand your vDisk or you have added VMs, we might recommend or require that you expand your shared storage. Expanding a LUN comes with an additional cost. After expanding the LUN, we often expand the partition located on top of the LUN. Most commonly, the partition is a VMFS datastore, or in the case of an RDM LUN, a partition in the Guest OS.
To request that we expand a LUN, contact your Rackspace Technology account team and provide the following information:
- Datastore name (if the LUN is formatted as a VMFS datastore) or partition letter (if the LUN is presented as an RDM).
- The gross amount or net usable amount of space you want to add.

Shrink Storage
We cannot shrink LUNs, datastores, RDMs, local RAID disks, or vDisks. However, we might be able to help you migrate your environment to smaller datastores, LUNs, or vDisks.
If you are underutilizing space and want to downsize (this is an uncommon requirement), contact your Rackspace Technology account team and provide the following information:
- The smaller size of storage you want.
- The name of the VM you want us to migrate.
Storage Reccomendation
We recommend that environments have a certain percentage of each VMFS datastore free at all times. The datastore overhead percentage depends on the total capacity of each datastore.
Refer to the following minimum recommended datastore overhead values:
- For datastores with capacity up to 2048 GB, the overhead is 15%.
- For datastores with capacity between 2049 GB and 4096 GB, the overhead is 10%.
- For datastores with capacity greater than 4096 GB, the overhead is 7%.
We recommend datastore overhead for the following reasons:
- Some files and features (for example, snapshots, including snapshots made automatically by VM recovery) might consume datastore space rapidly and without your awareness.
- If a datastore runs out of free space, it can cause downtime. A VM’s performance can be negatively impacted when the datastore is critically low on space.
- Certain VMware features, such as snapshots, might no longer function without sufficient datastore space.
- Powered-on VMs have a vSwap file equivalent in size to the amount of vRAM assigned to the VM. For example, a VM with 128 GB of RAM has a 128 GB vSwap file. vSwap files only exist for VMs that are powered on. Powering on a VM or increasing the amount of vRAM in your VM consumes additional space on the datastore.
- A VM might not power on due to insufficient space on the datastore.
- All VM log files are stored within the VM container folder on the datastore. A typical log file is a few MB in size; however, log files can grow to a few GB in size depending on VM activity and DRS migrations.
SDDC Busines Roles and Permissions
vCenter Roles and Permissions
To implement the separation of customer and Rackspace duties in SDDC Business, Rackspace uses built-in and custom roles in the vCenter Server. Rackspace assigns you a maximum permission role (customer role) and any lesser privileged roles that you request for specific users or groups.
Customers have permissions to create, delete, and manage VMs within their private cloud. Rackspace manages and maintains the ESXi hosts, the vCenter Server, Jump and SVS servers, and additional management VMs as required by the SDDC Business solution. Customers therefore have limited permissions on hosts and management servers.
Specific resource pools and folders are created to house customer created VMs and ensure separation from management VMs. In support of this separation, customers are granted permissions to create, delete, and manage VMs in the Compute-ResourcePool resource pool and in the Workloads and Templates virtual machine folders.
If required for organisational or resource management purposes, customers can create new resource pools below the Compute-ResourcePool and new folders below the Workloads and Templates VMs folders.
The following permission sets are predefined in the vCenter Server:
- Customer Access
- VM Power User
- VM User
- Read Only
Customer Access permission set is a product of permissions applied to two sets of roles. A lower permission set is enforced at the root of the inventory tree, and a higher permission set is applied at the resource pool level of the inventory tree.
The following table shows which vCenter Server permissions are available to each role.
| Permission | Customer Access | VM Power User | VM User | Read Only |
|---|---|---|---|---|
| Alarms | Full Access | No Access | No Access | No Access |
| Datastores | Limited Access | Limited Access | No Access | No Access |
| Network | Limited Access | No Access | No Access | No Access |
| Performance | Full Access | No Access | No Access | No Access |
| Resource | Full Access | No Access | No Access | No Access |
| ScheduledTask | Full Access | Full Access | Full Access | No Access |
| Tasks | Full Access | Full Access | Full Access | No Access |
| vApp | Full Access | Full Access | No Access | No Access |
| Virtual Machine | Full Access | Full Access | Limited Access | No Access |
| Datacenter | Limited Access | Full Access | Limited Access | No Access |
| Global | Limited Access | Limited Access | Limited Access | No Access |
| Host | Limited Access | No Access | No Access | No Access |
| Sessions | Limited Access | No Access | No Access | No Access |
| Storage Views | Limited Access | No Access | No Access | No Access |
| Datastore cluster | Full Access | No Access | No Access | No Access |
| Distributed virtual switch | No Access | No Access | No Access | No Access |
| Distributed virtual port group | No Access | No Access | No Access | No Access |
| ESX agent manager | No Access | No Access | No Access | No Access |
| Extension | No Access | No Access | No Access | No Access |
| vCenter inventory service | No Access | No Access | No Access | No Access |
| vSphere update manager | No Access | No Access | No Access | No Access |
| VRM policy | No Access | No Access | No Access | No Access |
| vService | No Access | No Access | No Access | No Access |
| vSphere Tagging | Full Access | No Access | No Access | No Access |
Authentication Methods
SDDC Business customers have two choices for vCenter authentication:
- Rackspace-provided Active Directory service
- Customer-provided Active Directory service
By default Rackspace is added to every SDDC Business environment at build time. This is to allow our support staff to assist our customer and for day two operations
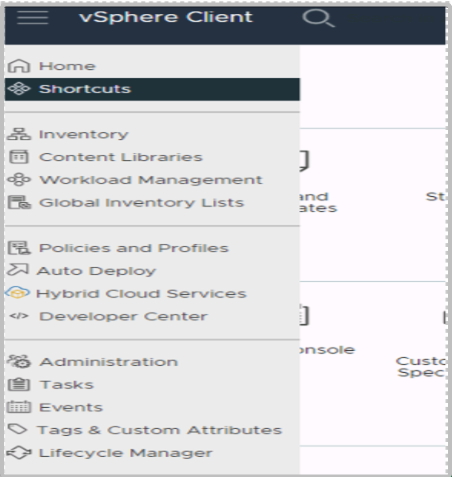
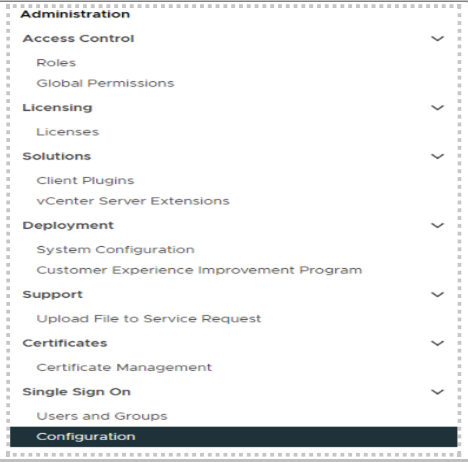
To check the current authentication sources, click on the vSphere Client menu then click on Administration.
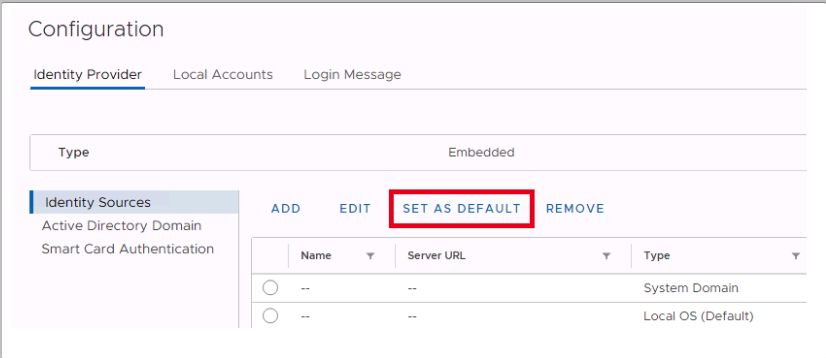
Click on configuration.
To add your Active Directory as an Identity source please raise a request with our support, the below information is required.
| Configuration Item | Description |
|---|---|
| Name | Label for identification |
| Base DN for users | The Distinguished Name (DN) of the starting point for directory server searches. |
| Base distinguished name for Groups | The Distinguished Name (DN) of the starting point for directory server searches. |
| Domain Name | Your domain name. Example: “domain.local” |
| Domain Alias | Your NetBIOS name. Example: “Domain” |
| Username | Domain user with at least browse privileges. Example: “[email protected]” |
| Primary Server URL | ldap://ipaddress:3268 |
| Secondary Server URL (Optional) | ldap://ipaddress:3268 |
Secondary Server URL (Optional) | ldap://ipaddress:3268 |
Maintain Your SDDC Environment
To reduce the risk of certain change requests, Rackspace Technology or customers can recommend that certain functions occur in a scheduled maintenance. These scheduled maintenances ensure that the following are available to the customer:
- Reserved Rackspace Technology resources to complete the defined tasks of the maintenance.
- Documented maintenance preparation and quality checks from all departments involved in the maintenance.
- Defined length of maintenance to accomplish the defined tasks.
- Documented rollback plan in the event of unforeseen circumstances during execution.
Because we cannot confirm the full scope of a maintenance until we completeall quality checks, Rackspace Technology schedules only after all quality checks have passed.
Because we base the maintenance calendar scheduling on availability of all teams involved, we accept reservations on a first-come, first-served basis. However, if this maintenance is urgent or if there is a limited timeline in which to execute it, contact your account team to see if we can accommodate your need.
vSphere Clusters
A VMware vSphere cluster is a collection of ESXi hypervisors that work together. vSphere cluster members pool their resources with a single VM that draws resources from one hypervisor at a time. All cluster members have either identical, or, in some cases similar, configurations.
By default, and to further benefit from the clustered setup, Rackspace Technology enables a Distributed Resource Scheduler and High Availability.
You can use vSphere portal to see the ESXi hosts that form a part of a vSphere cluster. If you have multiple vSphere clusters, you can see all of the clusters. Understanding the ESXi hosts that comprise a vSphere cluster is useful when you ask us to make changes to multiple ESXi hosts. Instead of providing us with he names of all hosts in the cluster, you can simply give us the vSphere cluster name.
To see vSphere clusters and members:
-
Log in to your environment.
-
Expand your vCenter and your virtual data center.

Distributed Resource SchedulerDistributed Resource Scheduler (DRS) monitors the workload between hypervisors, and you can configure it to move VMs between ESXi hosts and address any imbalance automatically.
DRS operates in the following three modes:
- Fully automated (default, recommended): When you power on a VM, DRS moves running VMs and automatically selects the most suitable host.
- Partially automated: DRS automatically selects the most suitable host when you power on a VM but only provides recommendations to migrate running VMs.
- Manual: DRS provides recommendations for the initial placement of VMsand recommendations for running VMs but does not automatically migrate running VMs.
Because the vSphere Cluster uses workload to determine the placement of the VMs, the placement of VMs can appear random and not associated with your business requirements. To control VM placement, you can ask us to configure DRS rules.
Consider the following DRS rules categories:
- VM-VM Affinity: Keep VMs together. Use this affinity setting if VMs perform best when they run on the same host.
- VM-VM Anti-affinity: Keep VMs separate and prevent them from running on the same host. If you have two web servers running on the same host, and the host fails, both web servers go down.
- VM-Host rules: Host rules apply to a group of VMs and a group of hosts. Each group must include at least one member. Use the following options to define a VM-Host rule:
- A group of VMs should run on a group of hosts. This approach limits some VMs to run only on a set of hosts. You might want this option due to a specific hardware (for example, greater capability) advantage on those hosts. However, the rule is ignored when you place eligible hosts in maintenance mode and during an HA restart.
- A group of VMs must run on a group of hosts. VMs do not automatically migrate when you place all eligible hosts in maintenance mode. In addition, if no hosts in the defined group are available, HA might not restart the VMs.
- A group of VMs should not run on a group of hosts. This rule is similar to the first VM-host rule, except that this rule defines the group of hosts that some VMs should avoid. For example, VMs are not placed in a group of hosts that are defined as part of the rule.
- A group of VMs must not run on a group of hosts. The VMs avoid the specified hosts at all costs, even during an HA failover event.
High Availability
High Availability provides failover protection against hardware and operating system outages within your virtualized environment. High Availability allows you to:
- Monitor VMware vSphere hosts and virtual machines to detect hardware and guest operating system failures.
- Restart virtual machines on other vSphere hosts in the cluster without manual intervention when a server outage is detected.
- Reduce application downtime by automatically restarting virtual machines upon detection of an operating system failure.
Licensing
All VMware licensing for RPC-VMware must be purchased from Rackspace. VMware licenses for SDDC Business are installed during provisioning.
Windows OS Licensing: You can provide your own Windows OS licenses or purchase a Windows Data Center license from Rackspace. If you purchase host-based OS licensing from Rackspace, it can be activated with the Rackspace Key Management Server (KMS). The Rackspace KMS server is accessible only by systems hosted with Rackspace. Contact your Rackspace Account Management team for more information.
Red Hat OS Licensing: You can provide your own Red Hat Enterprise Linux (RHEL) OS licenses or purchase a RHEL host-based license from Rackspace. If you purchase host-based OS licensing from Rackspace, it can be activated with the Rackspace Red Hat Network (RHN) server. The Rackspace RHN server is accessible only by systems hosted with Rackspace. Contact your Rackspace Account Management team for more information.
Applications Licensing: The customer must provide all application licensing.
ESXi-Patching
Subject to technical eligibility, or if you are running or at risk of running an unsupported ESXi version, we might proactively upgrade your hypervisor to a newer ESXi version. If we plan to proactively upgrade you, we notify you in accordance with the Dedicated Hosting Terms and Conditions.
We also work with you to perform VMware ESXi upgrades at your request or to address critical vulnerabilities.
Because your VMware Server Virtualization configuration can vary, we recommend reaching out to your account team to discuss upgrade options that best suit your environment and needs.
Upgrades
We offer major ESXi version upgrades for your ESXi hosts and minor patches, such as bug fixes and security updates. Depending on your configuration, upgrading your ESXi host might require downtime for some VMs. The upgrade might also negatively impact VM performance. Because system performance can be negatively impacted, we usually upgrade ESXi hosts during a planned maintenance window.
To upgrade your ESXi version, open a Rackspace Technology ticket and request an upgrade. If your environment is eligible for an automated upgrade, we contact you via a ticket and proceed with the upgrade.
If your ESXi version is close to or beyond the end-of-support date, we open a ticket and notify you that you should upgrade. If you do not respond to that ticket, and if your environment is eligible to be updated without shutting down VMs, we inform you of our plan and perform the upgrade.
Hardware Maintenance
Subject to compatibility, terms, and cost, we can perform routine hardware maintenance tasks on your hypervisor chassis, including upgrading firmware, managing the local RAID array, and replacing the battery.
To request maintenance, contact your Rackspace Technology account team. We complete chassis-related work during a planned maintenance window.
Capacity Planning
As your business grows and you add or expand your VMs, you might need to add more hypervisors to meet the demand.
- Does the environment run well, or do you need additional physical resources to keep up with demand from the VMs?
- What would happen if a hypervisor goes down?
- What would happen if a hypervisor undergoes maintenance?
SDDC Business Monitoring
The platform infrastructure is monitored by existing Rackspace Monitoring solution. Nimbus for ESXi and Cloud Monitoring for vCenter and Backup.
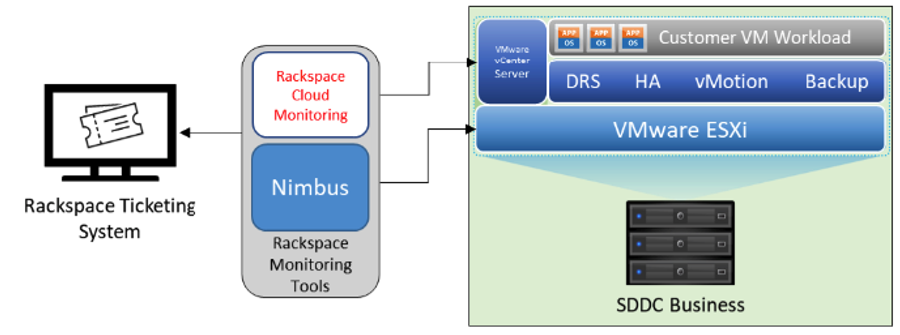
SDDC Business Management Devices Backup
SDDC Business management components are backed up daily using an image-based backup solution and/or by using VMware-provided backup mechanisms for individual components.
Note: Backups for VMs that the customer creates are not provided unless the optional Data Protection Service is purchased.
About vSphere Alarms
vSphere Alarms are a feature of VMware's vSphere virtualization platform that can help administrators proactively manage their virtual environment. These alarms are designed to monitor various aspects of the virtual infrastructure and notify administrators when certain conditions are met.
Here are some key points about vSphere Alarms:
- vSphere alarms are based on user-defined thresholds and rules. Administrators can create alarms to monitor different types of events, such as host hardware failures, datastore space usage, virtual machine CPU usage, and more.
- Alarms can be triggered by a variety of conditions, including specific events, performance thresholds, and status changes. When an alarm is triggered, vSphere will generate an alert that can be sent to administrators via email or other notification methods.
- Administrators can configure the severity level of alarms, which determines the urgency of the notification. For example, a critical alarm might indicate an imminent hardware failure, while a warning alarm might indicate a less urgent issue that requires attention.
- vSphere Alarms can be customized to meet the specific needs of an organization. Administrators can create alarms based on individual virtual machines, hosts, clusters, or datastores, and can configure different notification settings for each alarm.
- vSphere Alarms can help administrators detect and resolve issues before they cause downtime or other problems. By monitoring the virtual infrastructure and proactively responding to alerts, administrators can ensure that the environment is running smoothly and efficiently
- vSphere 7 alarms that are created at higher levels in the vSphere hierarchy will be propagated to the underlying objects at lower levels where applicable.
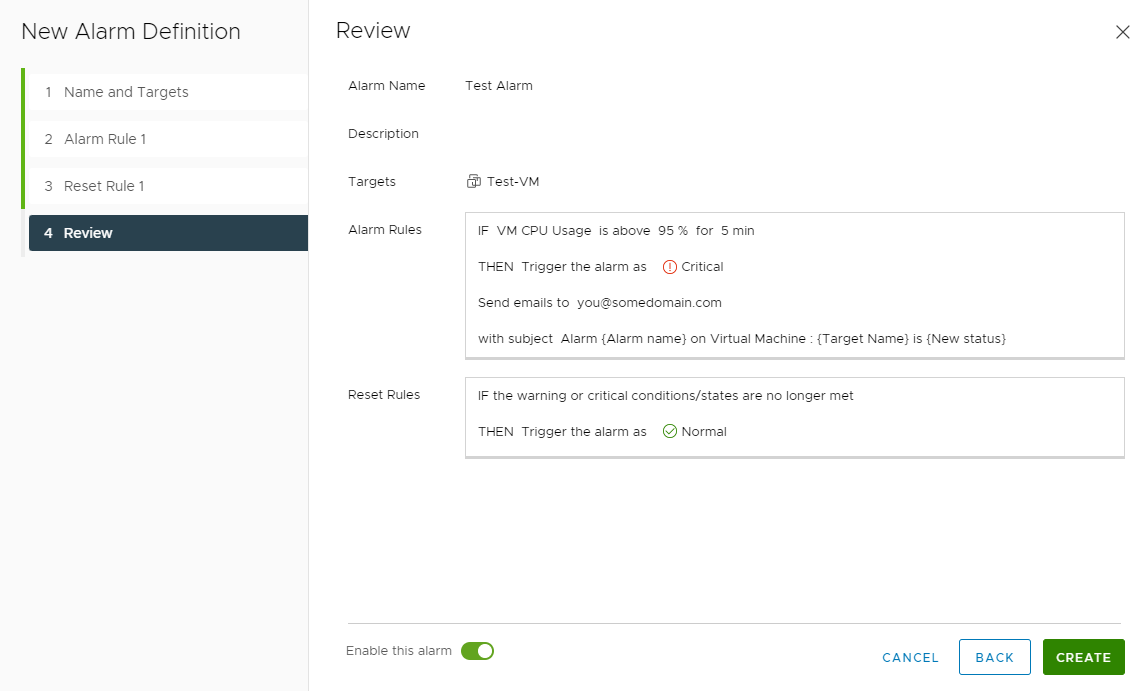
Creating a vSphere Alarm
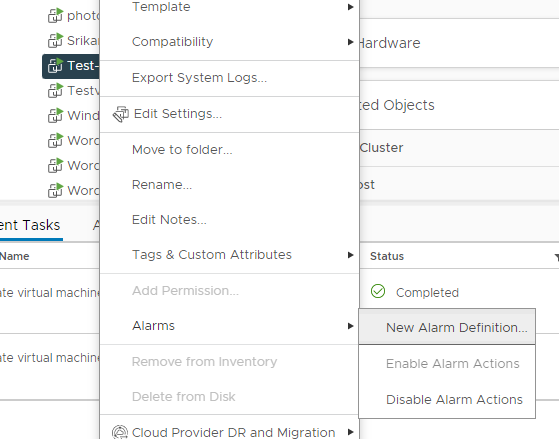
- Open the VMware vSphere Client or the VMware vSphere Web Client, and connect to the vCenter Server.
- In the vSphere client, select an object in the inventory pane and navigate to Alarms, New Alarm Definition.
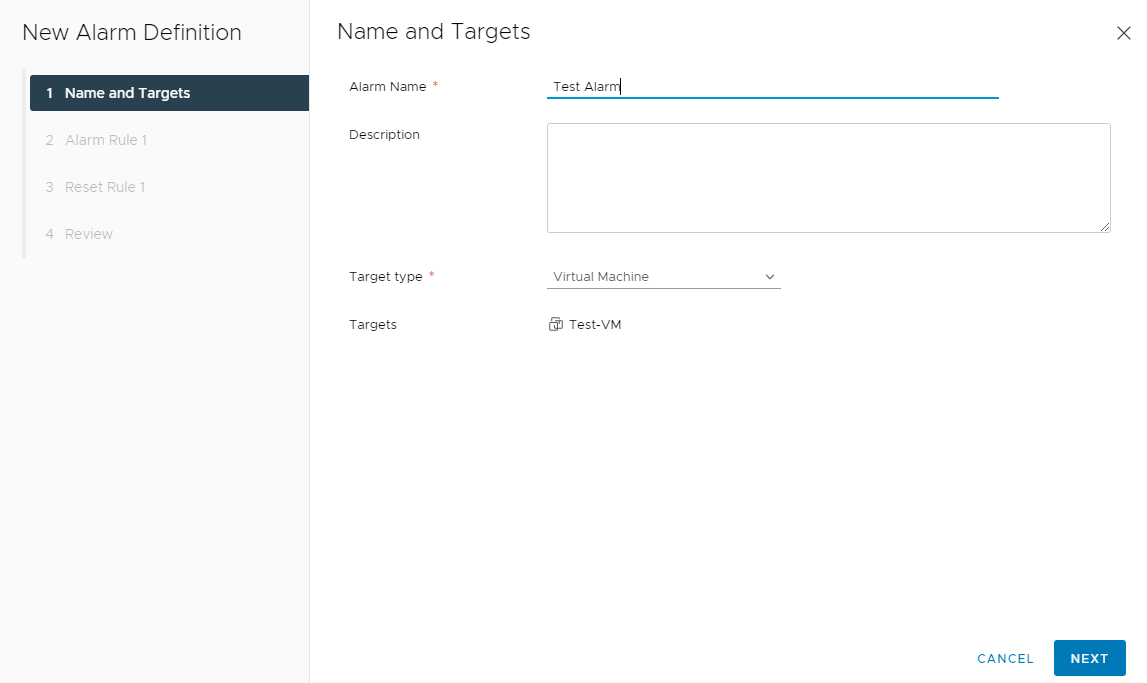
- Provide a name for the alarm, a description, and a target type. Click Next
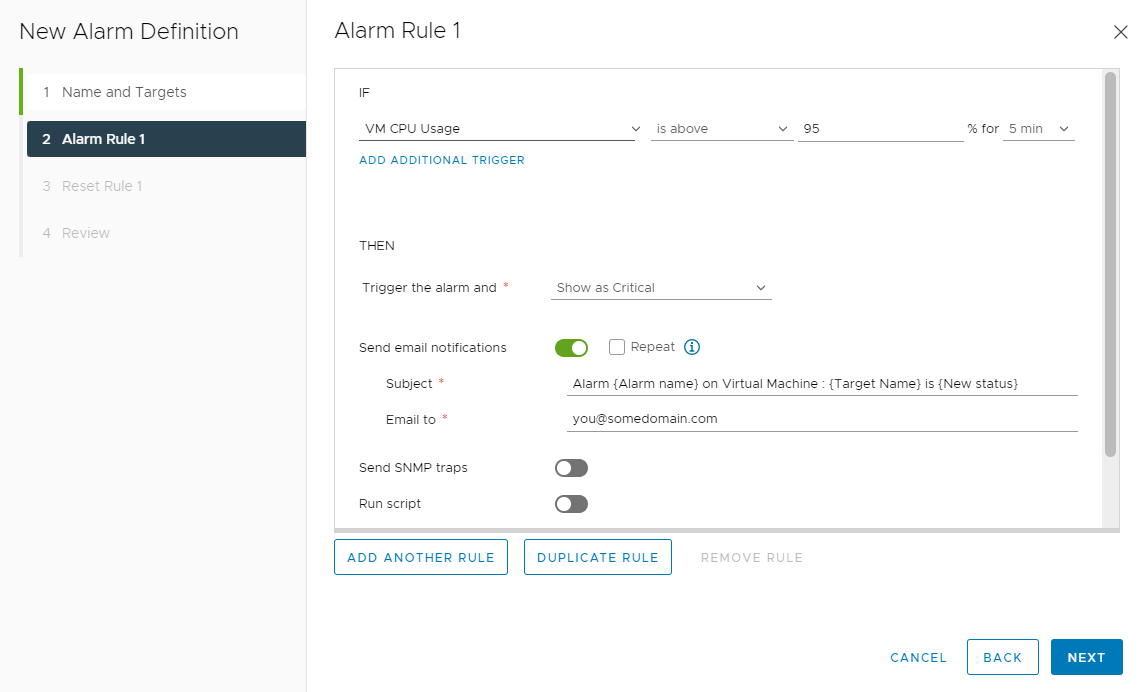
- Define the alarm rules as desired. Click Next
- Set the desired actions for alarm reset. Click Next
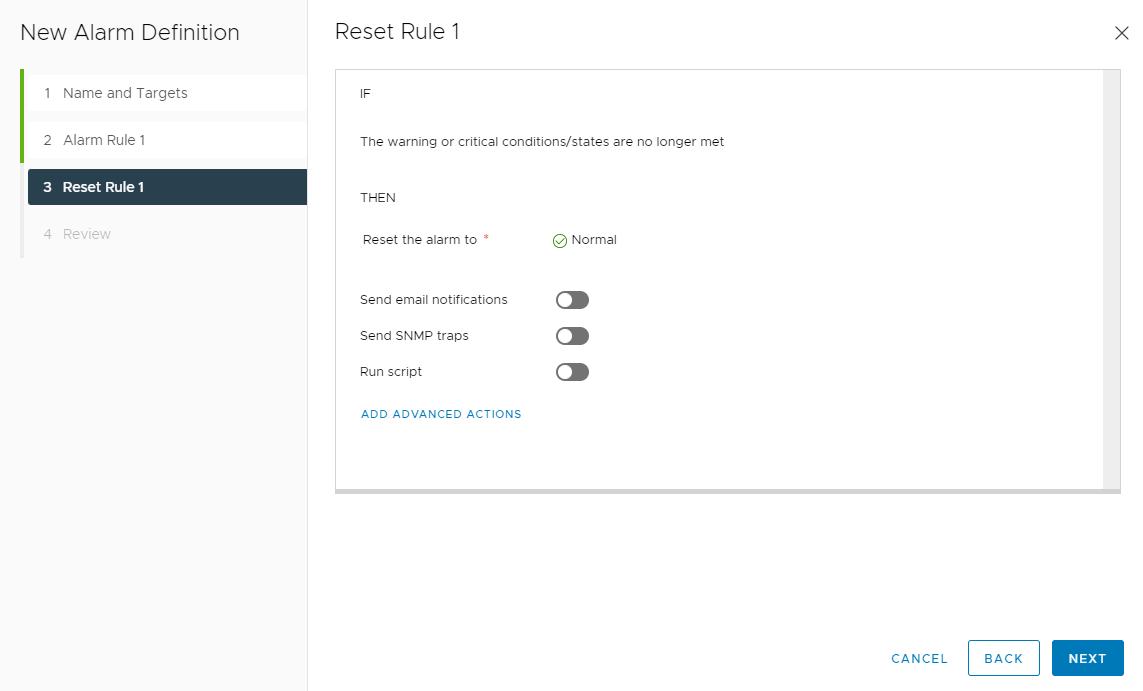
- Review the alarm definition and click Create.
Updated 2 months ago