Okta
The information in this section provides the steps for setting up Okta® as a Security Assertion Markup Language (SAML) provider for Rackspace Identity Federation. While the defaults might work in many situations, consult the Okta documentation for any implementation-specific details.
Prerequisites
You need the following things to set up Okta:
- Administrator access to your organization’s Okta account.
- The information at Rackspace Federation configuration details.
Configure Rackspace Federation at Okta
This section includes instructions that use the Classic UI setting in Okta.
Follow these steps to set up SAML integration with Okta to work with Rackspace Identity Federation:
- Log in to your organization’s Okta account by using your organization’s sign-in page.
- Click Applications located on the top ribbon.
- On the next screen, click the Add Application button.
- Next, click the Create New Application button.
- From within the Configure a New Application Integration pop-up window, select Web from the Platform options and SAML 2.0 from the Sign on method options.
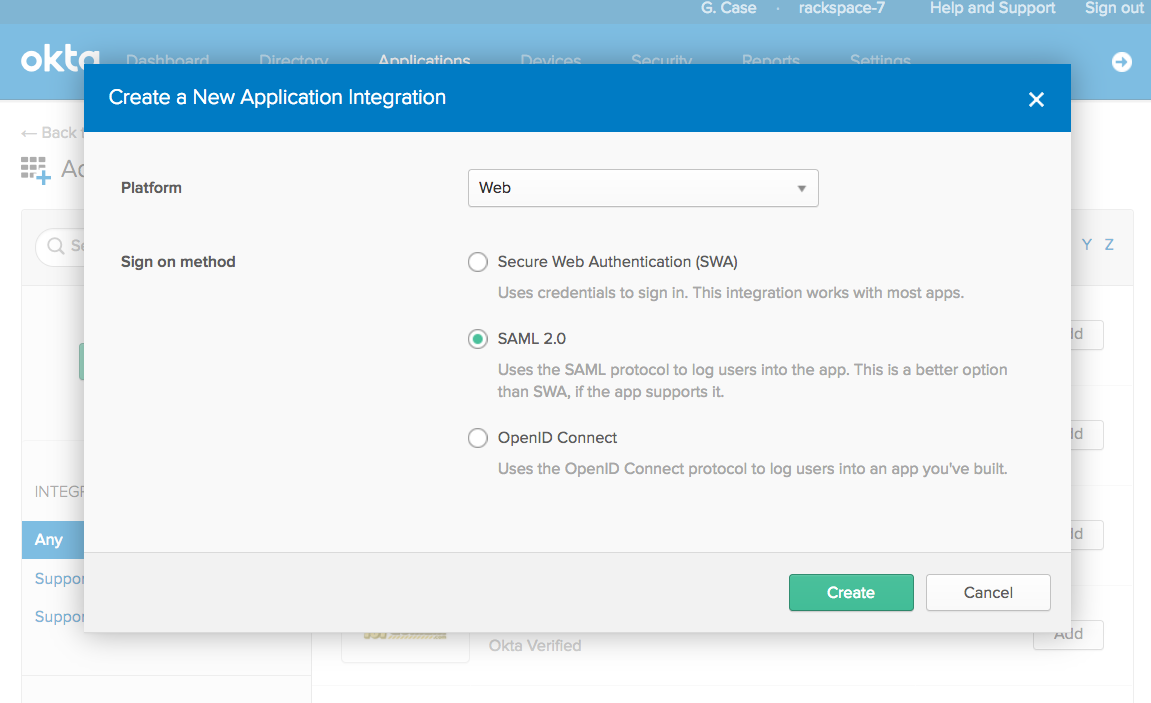
- On the General Settings page, fill in the App name with whatever you want users to see when using the application and then click Next.
- Fill in the requested SAML information with the Rackspace Federation configuration details.
The default values are shown in the following list:
| Attribute | Value |
|---|---|
| Assertion Consumer Service (“Single Sign On URL”) | https://login.rackspace.com/federate/acs |
| EntityID (“Audience”) | https://login.rackspace.com |
| Application username | Email (recommended) |
- On the same screen, proceed to the section labeled Attribute Statements and enter the following values:
| Name | Name format | Value |
|---|---|---|
| Unspecified | user.email |
- In the same section, click the Add Another button and enter the following values:
| Name | Name format | Value |
|---|---|---|
| expire | Unspecified | PT4H (user is logged out after four hours). See the expiration section for additional details. |
-
Optionally, you can choose to add groups created in Okta to map to those you plan to map to Rackspace permissions later. Do this by performing the following steps:
a. In the section Group Attribute Statements (Optional), enter a name for the group attribute statement in the Name field.
b. Leave Name format set to Unspecified.
c. Choose a Filter option and enter the necessary details. For example, if you want to include all the user’s groups that have the word
rackspacein your SAML assertions, add a field with an appropriate name likegroups, and select a regex filter with the value.*rackspace.*. -
Click Next. You can fill out the next page however you prefer and then click Finish.
You have successfully added Rackspace Federation to your Okta account.
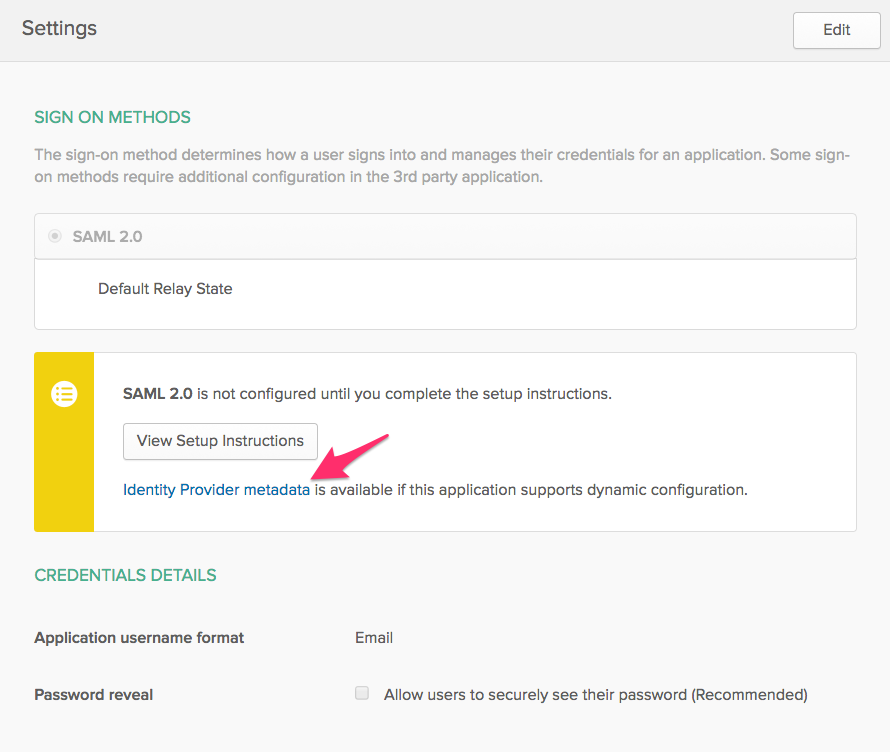
Okta metadata
Before leaving this page, download your Okta Identity Provider metadata by going to the new SAML application settings and going to the Sign On section. Click the Identity Provider metadata link to download the XML file. This file is necessary to configure your Identity Provider with Rackspace. The file should be metadata.xml.
If the file does not download with the .xml extension, be sure to rename the file with the .xml extension before uploading at Rackspace.
Next steps
After you have added Rackspace Federation as an application at Okta, you should add Okta as an Identity Provider at Rackspace by using one of the following methods:
- Add an Identity Provider in the Control Panel.
- Add an Identity Provider in the MyRack Portal.
- Add an Identity Provider by using the API by providing basic information about the Identity Provider.
Optional settings
Unless specified in the instructions above, all other Okta settings are optional. For further detail on all Okta SAML configuration options, see the Okta documentation site.
Attribute mapping for Okta
Mapping users at Okta to permissions at Rackspace is necessary to ensure your users have access to the applications and permissions that they need.
Mapping Okta groups to Rackspace
Assigning permissions based on groups is an efficient way to ensure you assign permissions properly to multiple users. You can use existing Okta groups or create Rackspace specific groups at Okta.
To send Okta group information to Rackspace, you can configure the Group Attribute Statements in your SAML application by completing the following steps:
- Log in to your organization’s Okta account by using your organization’s sign-in page.
- Click Applications located on the top ribbon.
- Click your Rackspace Federation application. If you have not yet set this up, see instructions in the Configure Rackspace Federation at Okta section.
- Click the General tab for the application.
- Scroll down to SAML settings section and click the Edit button. Skip the first page of the SAML wizard by clicking Next.
- In the section Group Attribute Statements (Optional), enter a name for the group attribute statement in the Name field.
- Leave Name format set to Unspecified.
- Choose a Filter option and enter the necessary details. For example, if you want to include all the user’s groups that have the word
rackspacein your SAML assertions, add a field with an appropriate name likegroups, and select a regex filter with the value.*rackspace.*. - Click Next then click Finish.
Mapping Rackspace permissions to Okta groups
This section details how to map Okta groups to specific Rackspace attribute mapping policies. Attribute mapping policies determine the Rackspace roles and permissions assigned to Okta groups.
Update your Rackspace YAML (.yml) attribute mapping policy by using the following steps:
- Log in to the Rackspace Customer Portal.
- In the upper right area of the navigation bar, select Account > User Management from the drop-down menu. Alternately, browse directly to the User Management page in the Rackspace Account Management Control Panel.
- In the sub-navigation bar, select Identity Federation.
- Edit your Identity provider by clicking the name of the provider.
- Scroll down to the Attribute Policy Mapping section.
- Download the
.ymlfile and make any applicable edits. See the next section for an attribute policy mapping example.ymlconfiguration. - Click the Update button and upload the updated
.ymlfile.
Attribute policy mapping example
The following example shows a Rackspace YAML (.yml) attribute mapping policy that you can use when you configure your identity provider with Rackspace. This example assumes that you have a group named rackspace-billing with users that you want to access Rackspace billing services by using the billing:admin Rackspace role. See Rackspace Cloud roles reference for a full list of all Rackspace roles.
Notes:
- Change the
groupsspecified in the example to match your configured Okta groups. - Any YAML group name must match your Okta group name exactly.
- At a minimum, remember to update the example’s
domainvalue to your Identity domain on the Identity Provider details page. - Validate that any values mapped to
emailandexpireare properly specified for your specific SAML attributes or assertions. For example, in the following example policy,emailis set by using the path ("{Pt}") syntax in the Attribute Mapping Policy language to point to theNameIDattribute in the SAML assertion.
mapping:
  version: RAX-1
  rules:
    - local:
        faws:
          groups:
            multiValue: true
            value:
              - "{Ats(groups)}"
        user:
          domain: "your_domain_id_goes_here"
          # Update to your Identity Domain from the Identity Provider details page
          email: "{Pt(/saml2p:Response/saml2:Assertion/saml2:Subject/saml2:NameID)}"
          expire: PT4H
          # This would configure a maximum session duration of four hours,
          # you may wish to set this to a SAML provided value
          name: "{D}"
          # This value matches to the SAML attribute "name" by default.
          roles:
            - "{0}"
      remote:
        - multiValue: true
          path: |
              (
                if (mapping:get-attributes('groups')='rackspace-billing')
                then    'billing:admin' else ()
              )
          # Substitute these example groups with your own groups.
See Required SAML attributes and mapping example for a detailed breakdown of each section of the YAML configuration.
Be sure to validate and modify the following items in your policy Attribute Mapping Policy:
- The Okta groups that users belong to and to which you want to map specific Rackspace permissions
- The
expirevalue/path - The
emailvalue/path
For more examples and a complete guide to the Attribute Mapping Policy language, see the Appendix: Attribute Mapping Policy Reference.
Updated 5 months ago