KaaS Developers
Rackspace Kubernetes-as-a-Service
Last updated: Feb 11, 2022
Release: v6.0.2
This section is intended for software developers who contribute to the Rackspace KaaS development. This section describes the specifics of building a KaaS environment for development purposes, as well as the processes and policies around submitting pull requests (PR), deploying KaaS managed services, and working with upstream versions of KaaS components.
- Preface
- Managed services
- Forking Kubernetes
- Using custom Terraform providers
- Terraform Boot Sequence
- Manage logging resources
- Set up Prometheus for monitoring
- Configuring a demo application for monitoring
- Troubleshooting
- Configure a MaaS agent
- Using the Container Linux Update Operator
- CircleCI configuration and setup
- Tags and labels
- Modify the KaaS job configuration
- KaaS release pipeline
- Jira issues overview
- Document history and additional information
- Disclaimer
Preface
Rackspace offers 24x7x365 support for Rackspace Kubernetes-as-a-Service (KaaS). To learn about support for your cloud or to take advantage of our training offerings, open a support ticket or contact your Account Manager.
Managed services
This section is intended for software developers and site reliability engineers (SRE) who need to learn internal specifics and deploy KaaS managed services in a testing or development environment.
KaaS Control Panel
The Control Panel is no longer available as of version 3.0.x. Most functions are replaced by the Kubernetes Access Manager (KAM).
Kubernetes Auth
This service provides standardized authentication and authorization for Kubernetes clusters.
Kubernetes clusters can be configured to use webhook token authentication and webhook authorization to rely on a third-party service like this one to authenticate API users with a bearer token, and also to determine whether a given user has permission to perform a given action on the cluster. These two decisions are made independently, via separate, discrete requests from Kubernetes.
This service can also be used to provide authentication and authorization for other cluster services that need it, but which do not derive their authentication from Kubernetes.
Building the service
Build the service as a Docker image with the following command:
make build
Configuring the service
Most of the configuration options for the service are contained in a single YAML file. config-example.yaml <config-example.yaml> __ contains a template for the configuration file.
- Copy the blank template
config-example.yamlto another location, likeconfig.yaml. - Populate all the fields in
config.yamlas necessary for your environment. - Provide the path to your config file when running the application. For example,
--config-file config.yaml.
Runtime flags
-config-file string    Path to a YAML-formatted file that contains configuration options for the service (default "config.yaml").
-log-level int         The minimum severity of log messages to output. 1 is least verbose, 9 is most verbose (default 4).
Concepts
The following concepts help your understanding of Kubernetes Auth.
Users
This service keeps a local store of user records, each of which has a local UUID and a string that is used to identify the user with a particular identity backend. For a Keystone backend that string is the user’s ID (not their username, which could change), and for LDAP that string is the user’s CN or UID.
All other identifying information about a user, such as their actual username and group/role membership, is only stored in the identity back-end and is retrieved at the time of authentication.
Tokens
Tokens are randomly-generated strings that are linked to a single user and facilitate their authentication. Tokens expire after one year; in the future, this might be configurable.
Kubernetes users
One of the primary purposes of this service is to normalize user information from a variety of identity back-ends for use with the Kubernetes API. Kubernetes represents users like this:
{
  "username": "[email protected]",
  "uid": "500",
  "groups": ["group-a", "group-b"],
  "extra": {
    "arbitrary-thing": ["arbitrary-thing-a", "arbitrary-thing-b"]
  }
}
Of significant note is the groups field, with which Kubernetes RBAC decisions are typically made.
Common HTTP endpoints
Not all API operations are listed here. See theAPI specificationfor a complete description of the API.
POST /authenticate/token
Used to authenticate users who provide tokens. The token should be included in a request body like this:
{
  "apiVersion": "authentication.k8s.io/v1beta1",
  "kind": "TokenReview",
  "spec": {
    "token": "957d9a043338db525121cf492377c94c972b4abcfd099169da98bcc02a5fe3f0"
  }
}
This service attempts to look up a user that corresponds to the token provided, and return a payload with a TokenReviewStatus, which includes boolean indicating whether authentication was successful and (optionally, if successful) identifying information about the user who was authenticated, as shown in the following example:
{
  "apiVersion": "authentication.k8s.io/v1beta1",
  "kind": "TokenReview",
  "status": {
    "authenticated": true,
    "user": {
      "username": "[email protected]",
      "groups": ["some-group"]
    }
  }
}
If authentication failed, authenticated is false, the user property does not exist, and an error property exists in its place:
{
  "apiVersion": "authentication.k8s.io/v1beta1",
  "kind": "TokenReview",
  "status": {
    "authenticated": false,
    "error": "No token found"
  }
}
GET /users
Headers:
- Required: x-auth-token
Returns a list of users:
[
  {
    "id": "a133af84-2ae3-413a-930e-887df6950d65",
    "username": "[email protected]"
  }
]
POST /users
Headers:
- Required: x-auth-token
Creates a new user.
Request
{
  "username": "[email protected]"
}
Response
{
  "id": "a133af84-2ae3-413a-930e-887df6950d65",
  "username": "[email protected]"
}
GET /tokens
Headers:
- Required: x-auth-token
Returns a list of tokens:
[
  {
    "id": "7e770f43-ba96-4ac9-b877-506da6c2ee05",
    "token": "957d9a043338db525121cf492377c94c972b4abcfd099169da98bcc02a5fe3f0",
    "user_id": "a133af84-2ae3-413a-930e-887df6950d65",
    "description": "sample token",
    "expiry": "2018-08-03T11:09:51.396053Z"
  }
]
POST /tokens
Headers:
- Required: x-auth-token
Creates a new token. The only required request input is a user ID.
Request
{
  "user_id": "a133af84-2ae3-413a-930e-887df6950d65"
}
Response
{
  "id": "7e770f43-ba96-4ac9-b877-506da6c2ee05",
  "token": "957d9a043338db525121cf492377c94c972b4abcfd099169da98bcc02a5fe3f0",
  "user_id": "a133af84-2ae3-413a-930e-887df6950d65",
  "description": "sample token",
  "expiry": "2018-08-03T11:09:51.39605315-05:00"
}
GET /clusters
Headers:
- Required: x-auth-token
Parameters:
- Optional:
?name=<name>filters returned clusters by the “name” column.
Retrieves a list of clusters for which kubernetes-auth manages authentication.
Request
curl -H "x-auth-token: ${TOKEN}" https://kubernetes-auth/clusters?name=namedcluster
Response
[
  {
    "id": "d096291e-4e3e-4ac4-899e-8f53ffe298c1",
    "name": "namedcluster",
    "master": "",
    "node": "",
    "kubeconfig":
      "apiVersion: v1\nclusters:\n- cluster:\n  server: https://master.kubernetes-cluster.local:6443",
    "created": "2018-01-01T12:34:56Z"
  }
]
Headers
x-auth-token
Required for all admin operations.
The admin token is set using the -admin-token flag on server start up. See Runtime flags.
Example
Run the service, create a user, create a token, and authenticate with the token.
$ K8S_AUTH_URL=http://localhost:8080
$ K8S_AUTH_ADMIN_TOKEN=foo
$ [email protected]

$ curl -s -X POST ${K8S_AUTH_URL}/users \
    -H "x-auth-token: ${K8S_AUTH_ADMIN_TOKEN}" \
    -d '{"username": "'"${K8S_AUTH_USERNAME}"'"}'
{
    "id": "e166d8ee-9026-4a7d-ac3b-a1c017b5037a",
    "username": "[email protected]"
}

$ K8S_AUTH_USER_ID=$(curl -s ${K8S_AUTH_URL}/users \
    -H "x-auth-token: ${K8S_AUTH_ADMIN_TOKEN}" | \
    jq -r '.[] | select(.username=="'"${K8S_AUTH_USERNAME}"'").id')

$ curl -s -X POST ${K8S_AUTH_URL}/tokens \
    -H "x-auth-token: ${K8S_AUTH_ADMIN_TOKEN}" \
    -d '{"user_id": "'"${K8S_AUTH_USER_ID}"'"}'
{
    "id": "2cd2d42d-c017-44be-b505-d3a1ab2ecc00",
    "token": "545804ca52f5406e018cedcea3b4ea3fd55d3e656033bdd5165d6247a3fcbf20",
    "user_id": "e166d8ee-9026-4a7d-ac3b-a1c017b5037a",
    "description": "",
    "expiry": "2018-10-04T16:35:37.583234212Z"
}

$ K8S_AUTH_USER_TOKEN=$(curl -s ${K8S_AUTH_URL}/tokens \
    -H "x-auth-token: ${K8S_AUTH_ADMIN_TOKEN}" | \
    jq -r '.[] | select(.user_id=="'"${K8S_AUTH_USER_ID}"'").token')

$ curl -s -X POST ${K8S_AUTH_URL}/authenticate/token \
    -d '{"spec": {"token": "'"${K8S_AUTH_USER_TOKEN}"'"}}'
{
    "apiVersion": "authentication.k8s.io/v1beta1",
    "kind": "TokenReview",
    "status": {
        "authenticated": true,
        "user": {
            "username": "[email protected]",
            "uid": "500",
            "groups": ["All Users"]
        }
    }
}
Database migrations
We use mattes/migrate to handle database migrations. All “up” migrations are run every time the application starts.
Migrations are stored in ./migrations, each with a format like <timestamp>_<name>.<up|down>.sql. You can create new migration files with the following script:
touch migrations/$(date "+%s")_test.{up,down}.sql
Then populate the created files (both up and down) with the necessary SQL statements to perform the migration.
Identity back-end
We’ll need to support LDAP most likely, and maybe Keystone or some sort of SAML endpoint. It is Not clear exactly what customers want or need.
Forking Kubernetes
In order to control our own release cycle and reduce external dependencies, we will fork the kubernetes/kubernetes repository.
Reasoning
Currently we rely on several third-party dependencies in our development and release cycles. Because we are tied to these upstream release cycles, often we can not move quickly in releasing critical bug fixes or new feature work. Instead, we should be in control of when and what we release, especially as we begin to onboard more customers who will expect expedited fixes to production systems.
Our reliance on CoreOS’s release cycle is a good example of the current problem. In releases 0.4 and 0.5, we identified Persistent Volume stability as a core priority for the release, and after identifying several upstream bugs (see here and here), we worked with upstream members to patch the OpenStack volume drivers. This patch was available in Kubernetes v1.7.4, but CoreOS’s hyperkube image at that time only supported v1.7.3. After asking if they could cut a new release, we were informed that CoreOS has its own monthly release cadence and that they don’t do ad hoc releases. This effectively blocks us for:
- up to 4 weeks if our change is cherry picked into a patch version but not yet in a CoreOS hyperkube release
- up to 3 months if our change is not cherry picked into a patch version
Both are significant times to for high priority bugs to be fixed. This is untenable moving forward.
How forking would work
- We fork
kubernetes/kubernetestorcbops/kubernetes. - We host a new public Docker image in
quay.io/rackspace/hyperkube. - We document (first draft below) how to deploy a custom hyperkube image.
It’s been asked why we are forking kubernetes/kubernetes rather than cores/kubernetes since we’ve used the latter in the past. Our preference is to align with the upstream Kubernetes community, rather a specific third-party vendor. Furthermore, the CoreOS fork offers no substantial delta to our binaries. To better understand this delta, see a comparison of their fork with kubernetes/kubernetes and you realise that by v1.8.0 they have almost converged themselves.
Policy 1: Bug fixes
This section describes the criteria for deploying custom hyperkube images to our stable RPC environment. Such images are patched with our own bug fixes and are meant to unblock us during a development cycle.
This is the new workflow for a bug fix:
- Identify the bug and submit a GitHub issue to
kubernetes/kubernetes - After your issue has been triaged and maintainers deem it a valid bug, start writing a fix
- Submit your PR for review and get it merged
- Ask the release manager to cherry pick your commit into the next patch version
- If nobody else on the team has already rolled out custom bug fixes since the latest patch version of Kubernetes, you will need to rebase our fork onto upstream’s latest patch version branch. For example if the target release is
v1.7.4, the corresponding branch to on which to apply your patches in https://github.com/rackerlabs/kaas would berelease-1.7.4. If this branch doesn’t exist yet, you can create it by runninggit fetch && git checkout -b release-1.7.4 v1.7.4. - Rather than push changes directly to https://github.com/rackerlabs/kaas, you should follow the normal PR process to ensure visibility from other team members into the changes you are making.
- After merging into the rcbops release branch, you should tag the git repo at the merge ref with a tag that looks like
<upstream-release-tag>_rackspace+<patch-increment> - Build a new hyperkube image with docker tag that takes the form
quay.io/rackspace/hyperkube:<upstream-release-tag>_rackspace.<patch-increment>. Some examples:quay.io/rackspace/hyperkube:v1.7.4_rackspace.0for the initial set of patches against an upstream tag.quay.io/rackspace/hyperkube:v1.7.4_rackspace.1patches subsequent to the intial set should get an incremental “patch increment”quay.io/rackspace/hyperkube:v1.9.6_rackspace.0
- Deploy this custom hyperkube image (see below)
If the release manager has elected to cherry pick your changeset onto the next patch version of Kubernetes, and there exist no other patches in our fork which were not cherry picked, you can deploy the upstream hyperkube binary as soon as it’s available in favour of our patched fork. This cannot be done if there exists any commits in our fork that for whatever reason were not chosen for cherry picking, because deploying the upstream binary will override these changes.
The key takeaways here are:
- We are still relying on upstream maintainers to review, merge, and cherry pick our changes.
- We only deploy commits that have been merged upstream.
- We only deploy commits that are not eligible for cherry picking. The first choice is always using upstream cherry picks and our fork as a last resort.
Policy 2: Releases
At the end of every development cycle after v1 has been released, the preference is to only rely on upstream binaries rather than our patched binaries.
The only time it is acceptable to use a patched fork in a release is if:
- the fixed bug is critical and needs to be rolled out in the next release. This is a management decision.
- our merged commit is not eligible for cherry picking and there exists a long delta between our release and the next upstream minor release. Waiting 2-3 months is not deemed suitable. Again, this is a management decision.
If a patched version is released, it should only ever be considered a short-term fix before our commit is merged to master upstream. Convergence is always the priority.
This policy will not be enforced on pre-GA releases (anything before v1.0.0).
Guide to Building Custom Hyperkube Images
This section describes how to build a custom hyperkube and deploy it with kubernetes-installer.
Build Kubernetes Binaries
# Assuming that this is the first hyperkube we are building based on the
# 'v1.10.5' tag.
export TAG=v1.10.5
export INCREMENT=0
git clone [email protected]:rcbops/kubernetes --branch master

cd kubernetes
git fetch --tags
git checkout -b fix-1.9.6 v1.9.6

# Make changes, fix things, then build kubernetes binaries, don't run tests.
KUBE_BUILD_PLATFORMS="linux/amd64" KUBE_GIT_VERSION="${TAG}+rackspace.${INCREMENT}" make quick-release
Build Hyperkube Docker Image
Note that it is probably a good idea to use a throwaway tag (hence the “rc” in the VERSION string below) name to initially test your changes to avoid the possibility of destructively overwriting an existing tag in our kubernetes docker repository.
# VERSION is used by Makefile in the hyperkube directory
export VERSION="${TAG}_rackspace.${INCREMENT}-rc1"

cd cluster/images/hyperkube
make ARCH=amd64 VERSION=${VERSION} REGISTRY=quay.io/rackspace

docker tag quay.io/rackspace/hyperkube-amd64:${VERSION} quay.io/rackspace/hyperkube:${VERSION}
docker push quay.io/rackspace/hyperkube:${VERSION}
After the release candidate has been verified, create the release tag and push.
export VERSION="${TAG}_rackspace.${INCREMENT}"
docker tag quay.io/rackspace/hyperkube-amd64:${VERSION} quay.io/rackspace/hyperkube:${VERSION}
docker push quay.io/rackspace/hyperkube:${VERSION}
Use Custom Hyperkube Docker Image with kubernetes-installer
kubernetes-installerEdit your bootstrap or cluster config and set the following value (only relevant config values shown for clarity)
tectonic:
  containerImages:
    hyperkube:
      name: quay.io/rackspace/hyperkube
      tag: ${VERSION}
Build a cluster:
make rpc-kubernetes
One the cluster is up and running, verify that the kubernetes version running on your nodes is what it should be:
kubectl get nodes
NAME                            STATUS    ROLES     AGE       VERSION
wwarren-test-cluster-master-0   Ready     master    1m        v1.9.6-3+91e660f6300120
wwarren-test-cluster-master-1   Ready     master    1m        v1.9.6-3+91e660f6300120
wwarren-test-cluster-master-2   Ready     master    1m        v1.9.6-3+91e660f6300120
wwarren-test-cluster-worker-0   Ready     node      1m        v1.9.6-3+91e660f6300120
wwarren-test-cluster-worker-1   Ready     node      2m        v1.9.6-3+91e660f6300120
wwarren-test-cluster-worker-2   Ready     node      1m        v1.9.6-3+91e660f6300120
In this example, you can see that kubernetes identifies its version as v1.9.6-3+91e660f6300120 which has the form <tag>-<num>+<sha> where <tag> refers to the the tag onto which <num> commits have been added with <sha> identifying the latest of those patches.
Because of this version format, which is obtained using git describe, it’s generally a good idea to always build kubernetes binaries with all changes you have in progress committed to ensure you always know exactly what is in a given build by comparing the kubectl get nodes output with what’s in your git history.
Releasing a Custom Hyperkube Docker Image
Once you have identified a fix that you want to commit to, follow these steps:
- Submit PR to appropriate branch in https://github.com/rcbops/kubernetes git repo.
- Have someone from the team look at and approve your PR, even if no one on the team has full context; it’s more about acknowledging that it is happening than getting insightful review.
- Tag the https://github.com/rcbops/kubernetes git repo, where INCREMENT is the next available integer on this series of tags:
git tag ${TAG}_rackspace+${INCREMENT}
- Push the new tag to the https://github.com/rcbops/kubernetes git repo.
git push [email protected]:rcbops/kubernetes ${TAG}_rackspace+${INCREMENT}
- Build the binaries and docker image according to previous instructions if you don’t already have a suitable candidate for release; push the image to the quay.io repository.
- This time use the same string to tag the docker image that you just used to tag the git repo; this will help to reduce confusion when comparing what is specified in the cluster config and what shows up in the
kubectl get nodesoutput.
- This time use the same string to tag the docker image that you just used to tag the git repo; this will help to reduce confusion when comparing what is specified in the cluster config and what shows up in the
- Submit PR updating the hyperkube image name:tag in https://github.com/rackerlabs/kaas
NOTE the slight difference between the format for the git tags and the docker tags in this workflow with the following examples:
- Docker tag:
v1.9.6_rackspace.0 - Git tag:
v1.9.6+rackspace.0
This difference is necessary because git describe is used to produce the version string stored internally in kubernetes binaries and prometheus (and possibly other services) will fail to start with a _ in that position and docker tag rejects a + in that position.
Using custom Terraform providers
WARNING: These steps are for development only. Any release should incorporate Terraform providers released upstream.
Step 1. Set the version of the provider
In Terraform, custom providers always have the version ‘0.0.0’. You need to set this version for your cloud provider. For example, for the OpenStack provider, this information is stored in tectonic-installer/platforms/openstack/neutron/main.tf.
Search for the following lines:
provider "openstack" {
  version = "0.0.0"
}
Step 2. Enable the custom build
Add the following line to the end of hack/install-deps-go.sh:
rm ~/.terraform.d/plugins/terraform-provider-openstack* && PROVIDER_NAME="openstack" SHA="9e489836150daf229e6cfa807bea874c2af00107" hack/install-custom-provider.sh
PROVIDER_NAMEis the provider that you want to built.SHAis the commit number in the provider’s GitHub repository.
Step 3. Install Kubernetes
Deploy a Kubernetes cluster by running the make rpc-kubernetes command.
Terraform Boot Sequence
- Create a private network.
- Create security groups, attach them to new network ports on the private network.
- Create 3 controller VMs, 3 worker VMs, and 3 etcd VM using the CoreOS Stable image attached the private network ports.
- Create and attach new floating IPs for each Kubernetes master node.
- Ignition profiles for each machine passed as userdata, create the
kubelet-wrapperservice as defined by the Terraform plan, and install the SSH key. - Terraform waits for the servers to boot and then uses SSH to copy a
bootkubeconfiguration to the controllers and runsbootkube.
Manage logging resources
Logging is handled by the Elasticsearch, FluentD, and Kibana (EFK) stack deployed to the rackspace-system namespace. This implementation is highly-available (HA) with 3 Elasticsearch containers. To make a deployment highly-available, set the replica count of Elasticsearch containers to n or more and change discovery.zen.minimum_master_nodes in es-configmap.yaml to (n/2)+1.
Execute all commands in this section from the mk8s/tools/installer/deployments/stable/logging/ directory.
To create the logging resources:
$ kubectl apply -f .
To view the Kibana dashboard in a web browser:
$ open http://<IngressControllerIP>:30080/logs
To delete the resources:
$ kubectl delete -f .
Set up Prometheus for monitoring
Rackspace KaaS automatically deploys a Prometheus resource, the Prometheus Operator, and the Grafana dashboard in the rackspace-system namespace.
See the Prometheus Operator README for additional details.
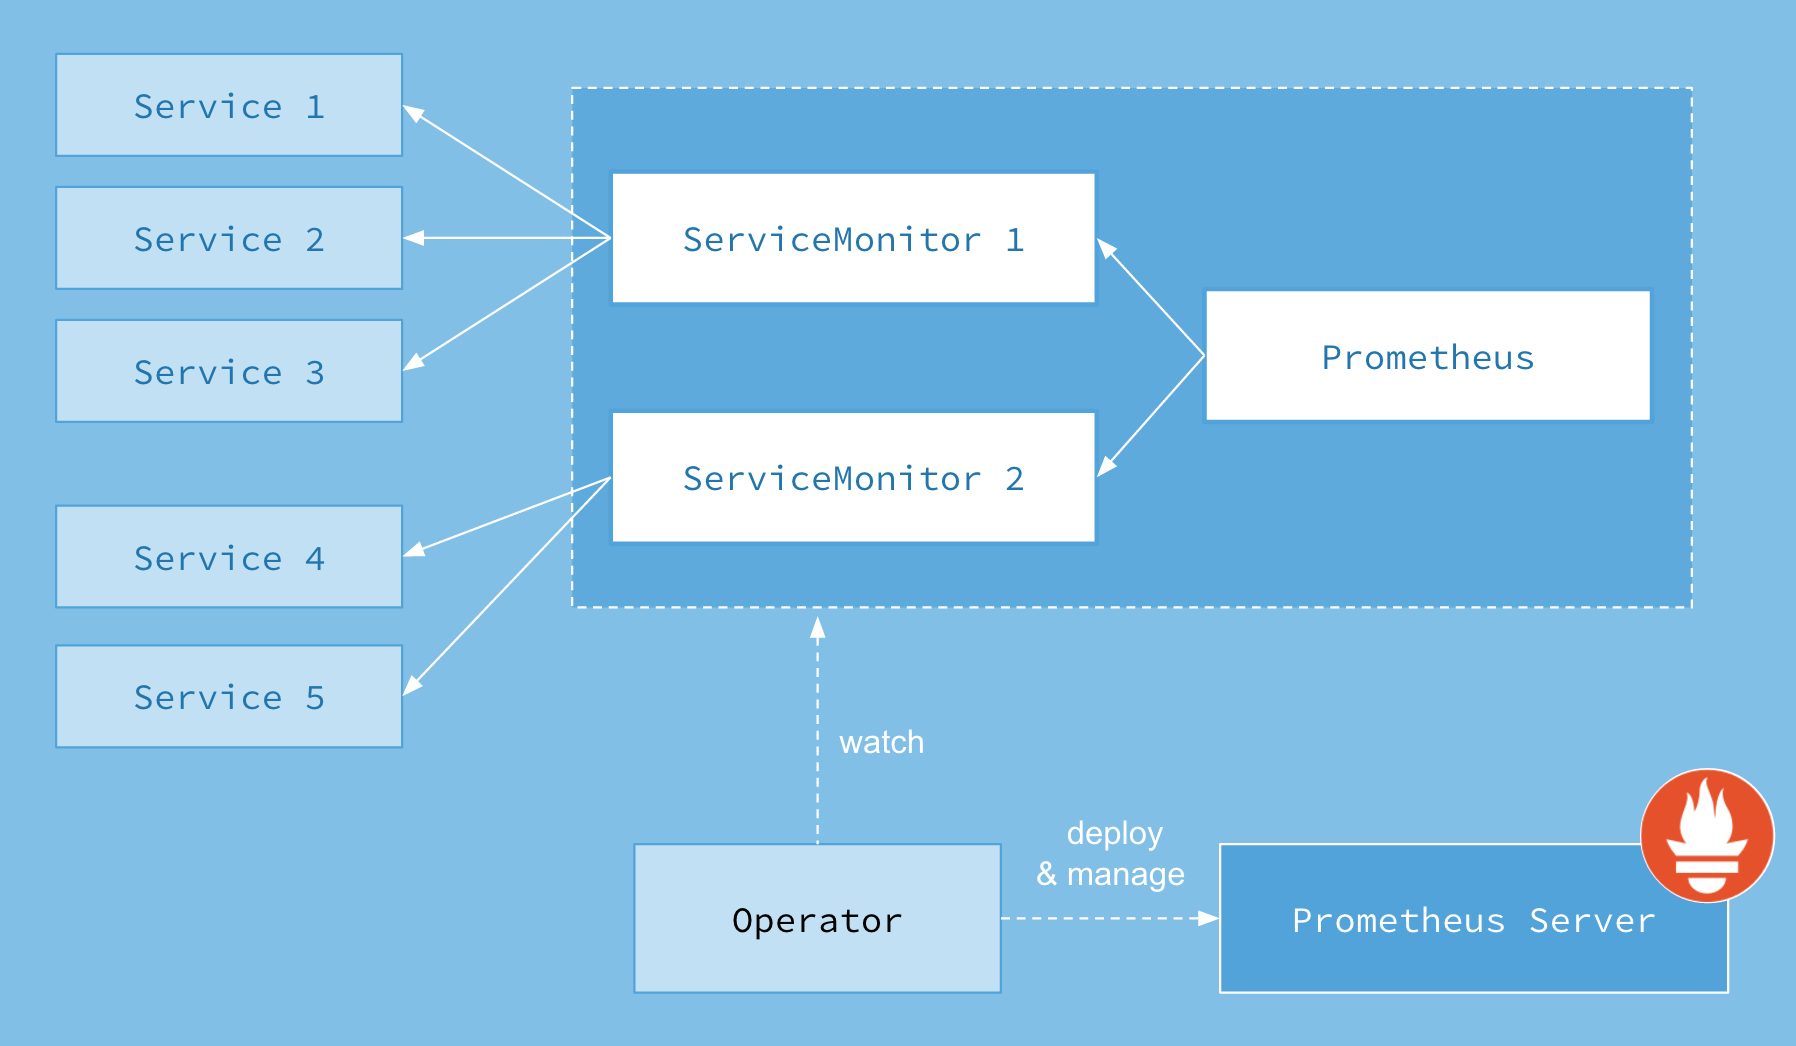 Image credit: https://coreos.com/operators/prometheus/docs/latest/user-guides/images/architecture.png
To view the Prometheus dashboard in a web browser:
open https://prometheus.<domain>.mk8s.systems
To view the Grafana dashboard in a web browser:
$ open https://grafana.<domain>/dashboard/db/deployment?orgId=1
Configuring a demo application for monitoring
The demo application consists of the following parts:
monitored-app: The application that you want to monitor.monitored-app-service-monitor: The service monitor.
The demo application assumes that you run the application in the default namespace. Any service monitor that you develop including the one for the demo application needs to be deployed into the rackspace-system namespace to run in the same namespace as the Prometheus resource.
Execute all commands in this section from the mk8s/tools/installer/deployments/stable/monitoring directory.
To configure a demo application, run the following command:
kubectl apply -f tests/manifests/monitored-app.yaml -n default
kubectl apply -f tests/manifests/monitored-app-service-monitor.yaml
Now you should see the metrics in the web application.
Troubleshooting
You can get or describe the Prometheus resource and the service monitor resource for more insight.
You might also want to review the Prometheus resource configuration for further information:
$ kubectl describe -n rackspace-system cm prometheus-k8s-rules
Because the system relies heavily on labels, verify that the labels match up correctly:
- The service monitor needs the label “k8s-app: your-app-name-here” to be detected by the Prometheus resource.
- The service monitor’s selector labels and namespace need to match the application service. The endpoint names need to match as well.
- Verify that your service discovered the endpoints by running the
kubectl describecommand for the service or the endpoint. - The endpoint should emit metrics.
Configure a MaaS agent
Monitoring as a Service (MaaS) is a Rackspace internal monitoring solution. You can set up a MaaS agent that queries Prometheus for potential alarm conditions in a development environment.
To create a new alarm or check from Prometheus, follow these steps:
- Log in to the Prometheus UI at
https://prometheus.<domain-name>/alerts. - Look at the details of the check by clicking on the check.
- Take note of the fields
expr,severity, andfor. - Create a new entry in
maas-agent-configmap.yaml:
<name of the check lowercase and underscores, e.g. dead_man_switch>.yaml: |-
    type              : agent.plugin
    label             : "<Name of the check, e.g. DeadManSwitch"
    period            : "60"
    timeout           : "30"
    disabled          : "false"
    details           :
      file            : check_prometheus.py
      args            : ["--query=<expr field from Prometheus, e.g. vector(1)>", "--check=<Name of the check, e.g. DeadManSwitch>", "http://prometheus-k8s.rackspace-system.svc.cluster.local:9090"]
    alarms            :
        <name of the check lowercase and underscores, e.g. dead_man_switch>   :
            label                   : <Name of the check, e.g. DeadManSwitch>
            notification_plan_id    : "npManaged"
            disabled                : "false"
            criteria                : |
                :set consecutiveCount= <what's in the for field but maximum is 5, e.g if for says 10 write 5 here>
                if (metric["<Name of the check, e.g. DeadManSwitch"] > 0) {
                    return new AlarmStatus(<severity, e.g WARNING or ERROR>, "<some good warning message>");
                }
Using the Container Linux Update Operator
The Container Linux Update Operator (CLUO) is a node reboot controller for Kubernetes that runs Container Linux images. When a reboot is needed after updating the system by using update_engine, the operator drains the node before rebooting it.
CLUO fulfills the same purpose as locksmith, but has a better integration with Kubernetes by explicitly marking a node as unschedulable and deleting pods on the node before rebooting.
Requirements
You need the following items to be configured in your environment before you can use CLUO:
- A Kubernetes cluster (>= 1.6) running on Container Linux.
- The
update-engine.servicesystemdunit on each machine must be unmasked, enabled, and started insystemd. - The
locksmithd.servicesystemdunit on each machine must be masked and stopped insystemd. - To unmask a service, run
systemctl unmask <name>. - To enable a service, run
systemctl enable <name>. - To start a service, run
systemctl start <name>. - To stop a service, run
systemctl stop <name>.
Usage
Execute all commands in this section from the mk8s/tools/installer/deployments/stable/container-linux-updates directory.
To start the update-operator deployment, run:
kubectl create -f update-operator.yaml
By default, the update-operator manages the update-agent DaemonSet on your behalf.
Testing
To test that CLUO is functioning correctly, you can connect to a node through SSH and trigger an update check by running update_engine_client -check_for_update. If needed, you can simulate a reboot by running locksmithctl send-need-reboot.
CircleCI configuration and setup
This section describes how KaaS uses CircleCI™ for all continuous integration work.
Environments and projects
KaaS is configured in the RackerLabs organization to execute jobs on every push.
CircleCI workflows which include a number of jobs target the following primary test environments:
- mk8s-dev2.rpc.rackspace.com, an OpenStack testing environment
Tags and labels
The rackerlabs/kaas repository uses specific tags and labels to organize and optimize the use of continuous integration (CI) resources.
Tags
CircleCI builds all commits that you push to the repository. However, each change triggers a build that takes a lot of time and resource. To optimize resource utilization, the KaaS team configured the following tags that enable you to skip all or some of the build stages:
ci-skip- skips all CI stages. Use for all documentation PRs.ci-skip-build- runs unit tests, but skips the build.ci-skip-test- skips all tests, except for unit tests.ci-skip-integration- skips the provider andkaasctlfull integration test suite, but runs the other e2e tests.
These tags skip the corresponding build stages for all commits in the pull request (PR).
Labels
GitHub labels provide details about the type of changes each PR introduces, to which version the changes apply, and other useful information that team members can use to track the issue progress.
The team uses the following labels:
- Version labels: 1.5.x, 2.0.x, and so on - describe the version to which the PR applies. Marking the issues with the version label helps to update the release notes.
- CI labels: ci-skip, ci-skip-build, ci-skip-test, ci-skip-integration - describe whether some or all of the CI stages are skipped for this PR.
- Issue type: bug, documentation, enhancement question, test - describe the type of the issue addressed in the PR.
- Component type: eks, PCI, managed services - describe which component is affected by the PR.
- Status labels: WIP, won’t-fix, do-not-merge, duplicate, invalid - describe the status of the issue progress.
- Level of difficulty labels: good first issue and so on - describe how difficult the issue is.
Modify the KaaS job configuration
The CircleCI configuration is stored in .circleci/config.yml and uses a format defined by the CircleCI configuration reference.
Follow the guidelines in the CircleCI documentation to modify the KaaS job configuration.
KaaS release pipeline
The KaaS release pipeline is the primary CI automation for the following use cases:
- PR testing.
- Release branch testing, including such branches as master, 1.4.x, 1.5.x, and so on.
- Building and testing release candidates.
- Promotion of release candidate build artifacts into release build artifacts.
This document details these use cases and touchpoints for team members who need to add to or modify the release pipeline.
Concepts
This section describes concepts used in our release process.
Build triggers
Refers to one of various mechanisms that trigger a build of the release pipeline. For example:
- A tag pushed to the repo.
- Commits pushed to a release branch.
- A PR submitted against a release branch.
- Periodic CRON-like scheduling.
- Manual builds.
Build artifact
Refers to the deliverable artifacts of the build process for a given KaaS subproject. The KaaS team supports only two types of build artifacts - Docker images and Git repositories.
Release candidate
Refers to a tagged revision of the https://github.com/rackerlabs/kaas GitHub repo for which build artifacts will be produced and against which tests will be run to validate their suitability for release.
Release candidate tags use the X.Y.Z-rcN format.
Release phases
The release pipeline consists of the following conceptual phases.
pre-release
pre-releasePerforms validity checks against release tags and the tagged revision of the https://github.com/rackerlabs/kaas Git repo. Is only run conditionally depending on whether or not the build trigger is a release candidate.
build
buildProduces build artifacts for all subprojects in parallel. This should be the only place in CI where artifacts are built. Store and name the artifacts so that they are discoverable by setup and test stages in other subprojects.
test
testRuns tests for all subprojects in parallel.
release
releasePromotes a set of release candidate build artifacts and a Git tag to an actual release by rebuilding them using the release version and pushing new tags to the target Git and Docker repositories. For example, if the Docker and Git tags for a release candidate are X.Y.Z-rcN, then the -rcN is stripped off to produce a release version of X.Y.Z.
Also, it retags and pushes all the Docker images found in [kaas_source_images.txt] to be used for the Helm charts.
At the end, it is published a GitHub release including the release notes specified in docs/internal/releasenotes-internal/releasenotes.md.
How-to
This section provides a reference for how to use and maintain the KaaS release pipeline.
Trigger a release
To create a release, you need to have write permissions to the rackerlabs/kaas GitHub repository to push the Git tag.
- Ensure all code and configuration references to the new release are specified throughout the Git repo.
- Submit a PR to update the internal release notes for the new version.
- Create an annotated Git tag of `X.Y.Z-rc0’ on the commit you want to release.
- Push the new tag to https://github.com/rackerlabs/kaas.
- Watch the CI pipeline in CircleCI for failures. Failures for CI runs against release candidates are also reported to the #kaas Slack channel.
- If the release pipeline fails for this release candidate, then you might need to submit an additional PR to fix the problem. Once that is done, or if it is determined that the release candidate CI failure was a test flake, then simply create a new release candidate Git tag with an incremented RC counter, such as
X.Y.Z-rc1and go to step 4. - If the release pipeline is successful, then there is nothing more to do but sit back and watch the promotion of tested artifacts!
- If the release pipeline fails for this release candidate, then you might need to submit an additional PR to fix the problem. Once that is done, or if it is determined that the release candidate CI failure was a test flake, then simply create a new release candidate Git tag with an incremented RC counter, such as
For new releases without a corresponding support branch, you need to create a branch from the new tag if it does not exist already. For example, if you are creating 1.5.0 and expect to release several patch versions, complete the following steps:
- Fetch the newly-release tag and create a new branch from it:
git fetch --tags [email protected]:rackerlabs/kaas && git push 1.5.0:1.5.x - In the repository settings, protect the new branch to prevent accidental changes:
- Require pull request reviews before merging.
- Require status checks to pass before merging.
- Require branches to be up-to-date before merging.
- Include administrators.
- Restrict who can push to this branch to the following groups:
rackerlabs/rackspace-kaas-leadershiprackerlabs/rackspace-kaas-supportrackerlabs/rackspace-kaas-dev
Add a new sub-project to the release pipeline
- If the sub project doesn’t already have one, add a Makefile to the root of its subdirectory.
- Add a
buildMake target that makes use of thebuild-docker-implmake target fromcommon.mkat the root of the git repo. - Define default values for the following variables in the Makefile. The following example should be sufficient for most use cases with the only required change for a new project being the
BASENAMEvalue.
BASENAME=newprojectname REVSHORT=$(shell git describe --always --tags)
REVLONG=$(shell git rev-parse HEAD)

DOCKER_REGISTRY ?= quay.io/rackspace DOCKER_IMAGE_TAG ?= $(REVSHORT)
DOCKER_IMAGE_NAME=$(DOCKER_REGISTRY)/$(BASENAME) DOCKER_BUILD_DIR=../../
DOCKERFILE=Dockerfile
- Register the new subproject in the CircleCI configuration
- Finally, you need to add some test scripts in a subdirectory of the new subproject’s subdirectory. These will need to be added to the CircleCI configuration as a seperate test job.
Jira issues overview
Atlassian® Jira® is a product management software that Rackspace teams use as an online representation of an Agile storyboard. Jira provides a way to transfer the information of a development team’s progress to everyone in the organization.
Jira issues are entities that represent the elements of an Agile software development process. The issue types that the KaaS team uses include Epic, Story, Technical Spike, and Bug.
Epic
An Epic is a collection of features, improvements, or changes that cohesively form a significant impact on the product. An Epic represents a more significant effort than a single Story and might take more than one sprint to complete.
Typically, product managers or other individuals involved in product design create Epics that outline high-level features. An Epic must have Stories or other Jira issues under it. If an Epic does not have any Jira issues under it, convert it into a story.
Epics are often phrased with both a short, colloquial title with a meaning to the development team. Also, Epics describe the potential impact on the customer.
Examples of Epics:
- Enable support for wishlists
- KaaS support for GCP
When you create an Epic, avoid the following common mistakes:
- Epics have the same name as a sprint, or as a miscellaneous group of stories for a sprint
- Epics must represent a cohesive collection of stories that have a larger impact on the product.
- It is better to have five different epics with one story each than one epic with five mismatched stories.
- Epics are a way to organize stories within one or several sprints. They are like categories or swim lanes for various stories.
- Epics are often created by Product Management to give a broader picture of the work in progress.
- Developers use epics to track other product development activities and to focus on the value that engineering tasks subsequently deliver to the customer.
Technical Spike
Do not create Technical Spikes. Create Tasks instead.
Bug
A Bug is a problem that impairs the functionality of the product. Typically, users report new issues by creating Bugs. They often phrase Bugs in the negative form. For example, Feature B does not work as intended.
Many times, you can convert a Bug into a Story. A Bug must include details about the environment in which the bug emerged and have enough information so that any member of the team can reproduce the error. Often, it is helpful to include screenshots or terminal output in the case of development tooling Bugs.
Examples of Bugs
- Feature B does not work as intended
- The test fails with an xyz error
When you create a Bug, avoid the following common mistakes:
- Bugs submitted without any details about how to recreate the issue.
- Mentioning that something does not work or that a feature is broken does not help engineers to investigate and resolve the issue.
- Vague Bugs often require additional work to understand what the reporter meant and might frustrate engineers.
Task
A Task is a contributor-focused piece of work aimed at accomplishing a small piece of work that is part of a Story or an Epic. When you create a Task use, the SMART (Specific, Measurable, Achievable, Relevant, and Time-boxed) approach as a guidance. A Task might or might be a part of a Story or an Epic.
Story
A Story describes a feature, improvement, or change from the perspective of a software user or a specific persona. A Story does not focus strictly on the features requirements but the desired functionality. A Story invites team members to a discussion about the implementation rather than tells specifically how it needs to be accomplished.
When you create a Story, you can use the following format for the Story description:
As a <type of user>, I want <some goal> so that <some reason>
However, the format above is more a recommendation, rather a hard requirement.
Examples of Story descriptions
- As a customer, I want to be able to save a product in my wishlist so that I can view it again later.
- As a customer, I want to be able to view my wishlist so that I can buy items from it.
- As a Marketing Data Analyst, I need to run the Salesforce and Google Analytics reports so that I can build the monthly media campaign plans.
- As a Rackspace SRE, I need to specify the CA cert validity period so that customers do not require mandatory monthly maintenance.
When you create a Story, avoid the following common mistakes:
- Stories written as developer tasks. For example, As a user, I want to click the button so I can submit the form.
- User stories open a conversation between the team members and should not include implementation details.
- If you have ideas about implementation details, include them in a comment to the Story in the form of suggestions.
- If you have specific technical requirements, include them in the Story description.
User stories guidelines
Writing good user stories is as much an art as it is a skill. It requires a complete context reversal to empathize with users of Rackspace products. Take a few minutes to shift context before you write user stories.
When you create a user story, think about answers to the following questions:
- Who does this workflow serve?
- What are the real-world implications of that person performing tasks in this app? Remember, the physical world exists, too.
- How will their life change when that thing happens?
To write a good user story, remove yourself from the implementation details and instead think critically about the actual people who are using Rackspace products.
Story points
To provide an estimated effort that a story requires to be completed, use Fibonacci sequence numbers in which the next number is a sum of the previous two. For example, 1, 2, 3, 5, 8, 13, 21, 34 and so on. The numbers are relevant and might mean a different amount of required work. Generally, use the following guidelines for the effort and time required to accomplish a task:
- 1 - from half an hour to half a day
- 2 - from one day to one and a half day
- 3 - around two days
- 5 - around three days
- 8 - around five days or a whole working week
- 13 - a whole sprint or around ten working days
Generally, most of your stories should have 1 - 5 points. If a story has more than 5 points, you might need to break it down to several smaller stories.
What to include in sizing?
When you size a story, include the estimated time that represents your actual work. Do not include the time needed for any dependent issues to resolve. Only include the time that you estimate it should take to complete the story.
References
Updated 5 months ago