Troubleshoot a Cloud Block Storage Volume in Read-only Mode
If your Cloud Block Storage volume enters read-only mode, you need to unmount the volume, run a file system check, then remount the volume to get it back into read-write mode. This article shows you how to perform these tasks.
Test Write Mode
First, you need to confirm that the volume has become a read-only volume. The fastest way to perform this task is to attempt to create or edit a file. On a Windows® server, you can create a new file by using either the graphical user interface (GUI), or the New-Item cmdlet in PowerShell®, as shown in the following example:
New-Item c:\scripts\test_file.txt -type file
If the volume is in read-only mode, it returns an error.
On a Linux® system, you can use the touch command, as shown in the following example:
touch test_file
Again, a read-only volume returns an error. If this occurs, you need to unmount the server.
Unmount a volume from a Linux server
To unmount a volume from a Linux server, you first need to confirm how the volume is presented to the cloud server by following these steps:
- Log in to the Cloud Control Panel.
- In the top navigation bar, click Select a Product > Rackspace Cloud.
- Select Storage > Block Storage Volumes.
- Click on the block storage volume that you want to troubleshoot.
- On the Volume Details page, note the value in the Attached to field.
At the command line, use the df -h command on your server to see how it is mounted.
The output looks like the following example:
Filesystem      Size  Used Avail Use% Mounted on
/dev/xvda1      158G  1.1G  149G   1% /
tmpfs           3.9G     0  3.9G   0% /dev/shm
Note the value that appears in the Mounted on column of the output.
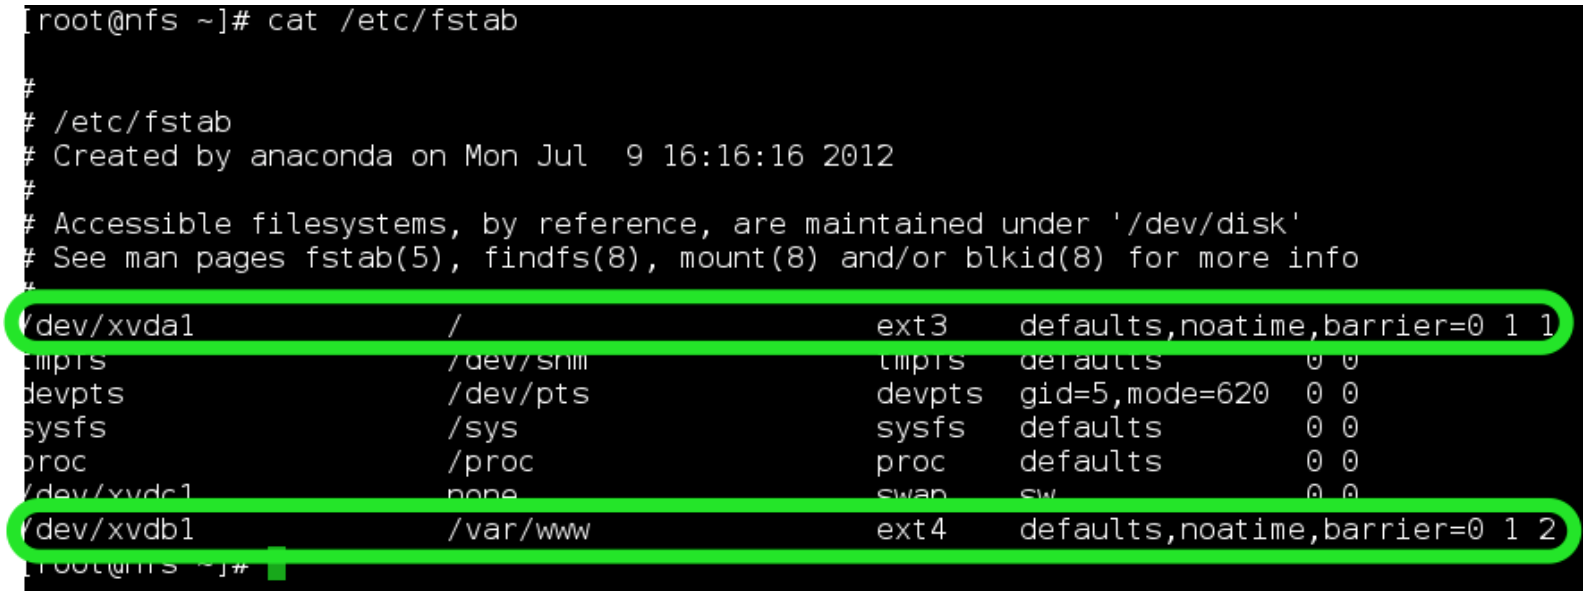
Use the cat command to open the configuration file at /etc/fstab, as shown in the following example:
# cat /etc/fstab
Comment out the line or lines that begin with /dev/xvdb1 (which are circled in the following image) in /etc/fstab to prevent the volume from trying to mount on the next boot:
Run the umount command, using the Mounted on volume that you noted from the output of the df -h that you used earlier, as shown in the following command:
# umount /dev/xvdb1/
The only output from this command is a command prompt.
Unmount a Volume from a Windows Server
Use the following steps to unmount a volume from a Windows server:
- In Windows Server Manager, select File and Storage Services > Disks.
- Under the Disks window, right-click the Cloud Block Storage volume.
- Select Take Offline from the pop-up menu. If the Take Disk Offline warning window displays, click Yes.
The Cloud Block Storage volume no longer displays as a drive under Computer.
Check the file system
After the volume is unmounted, run a file system check by using the following command for your operating system:
- Linux with ext3/4:
fsck - Windows:
chkdsk
Address any errors that the file system check generates.
Mount the volume on Linux
To mount the volume on Linux, run the mnt command and assign the volume a name for use on your server.
In the following example, the name of the volume is cbsvolume1:
root@nosnetdfw:~# mkdir -p /mnt/cbsvolume1
root@nosnetdfw:~# mount /dev/xvdb1 /mnt/cbsvolume1/
After the volume is mounted, the system does not send feedback. However, you can check that your volume is ready by running the df command to show your free disk space, as shown in the following example:
root@nosnetdfw:~# df -h
Your new volume displays last in the list of available drives, as shown in the following example:
Filesystem            Size  Used Avail Use% Mounted on
/dev/xvda1             40G  632M   37G   2% /
none                  493M  136K  493M   1% /dev
none                  498M     0  498M   0% /dev/shm
none                  498M   36K  498M   1% /var/run
none                  498M     0  498M   0% /var/lock
none                  498M     0  498M   0% /lib/init/rw
none                   40G  632M   37G   2% /var/lib/ureadahead/debugfs
/dev/xvdb1             99G  188M   94G   1% /mnt/cbsvolume1
Your drive is ready for use with your Linux server. However, you should consider performing the steps in the following section to ensure that your volume remains persistent after a server restart.
Make the volume persistent when the server restarts (Recommended)
We recommend that you add the volume to the static file system information in your fstab configuration file. This step is optional, but it ensures that your volume remains attached to your server after the server restarts.
Use the following steps to make the volume persistent:
-
If it is not already open, open the /etc/fstab configuration file. The following example command opens it in the
nanotext editor:root@nosnetdfw:~# nano /etc/fstabThe file should look similar to the following example:
# # /etc/fstab # Created by anaconda on Tue May 29 20:13:27 2012 # # Accessible filesystems, by reference, are maintained under '/dev/disk' # See man pages fstab(5), findfs(8), mount(8) and/or blkid(8) for more info # /dev/xvda1 / ext3 defaults,noatime,barrier=0 1 1 -
To add the volume to the static file system, add the following line beneath
/dev/xvda1:/dev/xvdb1 /mnt/cbsvolume1 ext3 defaults,noatime,_netdev,nofail 0 2This line includes the
_netdevoption, which prevents attempts to mount the volume until all networking is running.
Now the volume persists on the server after server restarts.
Mount the volume on Windows
Use the following steps to mount the volume on Windows:
-
Open the Server Manager window by right-clicking on the computer icon and selecting Manage.
The Server Manager window displays.
-
In the left pane of the Server Manager window, click File and Storage Services.
-
In the left pane, click Disks.
In the following example, a 100 GB volume is attached to the server. It is listed as Offline, it has 100 GB of unallocated space, and its partition size is Unknown. The volume is partitioned and formatted. It only needs to be remounted.
-
To bring the volume online, in the Disks pane, right-click the offline drive and select Bring Online from the pop-up menu.
When you open the Computer window now, the new Cloud Block Storage volume displays like a regular hard drive. The volume is now ready to use.
Updated 5 months ago