Flex OnPrem DRaaS Onboarding
Overview
Using VMware Cloud Director Availability, SDDC Flex customers can protect their On-Premises vSphere workloads with disaster recovery capabilities utilizing their SDDC Flex organization as an on-demand recovery site. Following the deployment of a lightweight VCDA appliance in the On-Premises site, customer's can replicate their VMs into Flex and utilize the platforms software-defined capabilities to configure network and storage infrastructure to support a full recovery plan.
The intended audience for this document is personnel responsible for configuring On-Premises VMware vSphere environments and SDDC Flex organizations.
Deployment Architecture
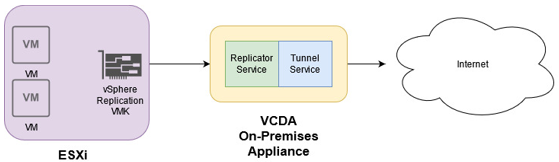
To replicate vSphere workloads from an On-Premises vCenter Server to SDDC Flex one or more VCDA On-Premises Appliances (VCDA-OP) need to be deployed in the On-Premises site.
The VCDA-OP appliance uses host-based replication provided by the vSphere Replication Service to replicate data from the source ESXi hosts to SDDC Flex. ESXi transfers raw VM replication data over a vSphere Replication enabled VMkernel interface to the VCDA-OP appliance which then encrypts and optionally compresses it before sending it to SDDC Flex via a publicly accessible URL.
VCDA uses end-to-end encryption for communication to SDDC Flex and does not support and TLS terminating products or solutions placed between the On-Premises appliance and SDDC Flex. If such tools are in place, they must be configured in pass-thru mode (TCP mode) to prevent from interfering with the TLS traffic.
VCDA-OP appliances require a communication path to the ESXi hosts hosting the VMs to be replicated and access to the for communication to SDDC Flex. The VCDA-OP appliance supports multiple vNICs so different traffic types can be isolated onto different networks.
Multiple VCDA-OP appliances can be deployed on the customer site to scale out the replication infrastructure as required based on the appliance workload.
Each appliance has a management UI accessible via a web browser from which the appliance can be configured and replications setup. VCDA can also be centrally managed from the SDDC Flex portal which may be preferable if multiple VCDA-OP appliances are deployed and paired to the same SDDC Flex tenant.
VCDA provides asynchronous replication of data at a defined RPO (between 1 minute to 24 hours).
After replication is initially configuration VCDA will perform a full synchronization of the VM’s VMDKs and configuration files to SDDC Flex. After the full synchronization is complete, any block changes to the replicated VM’s VMDKs are tracked, and the block addresses stored in a tracking file in the directory of the virtual machine. When the RPO window expires the changed blocks are read and sent by the VCDA-OP appliance to SDDC Flex. If a block is overwritten multiple times within the RPO window, only the last change is replicated.
Further details regarding the architecture of VCDA can be found in VMware's "Replication Flow - VMware Cloud Director Availability" document.
Requirements
Hardware
The VCDA On-Premises appliance is a virtual machine deployed into the On-Premises vSphere infrastructure and has the following virtual hardware requirements:
- 8 vCPU
- 8 GB RAM
- 10GB Storage
- 1 or more vNICs
Network
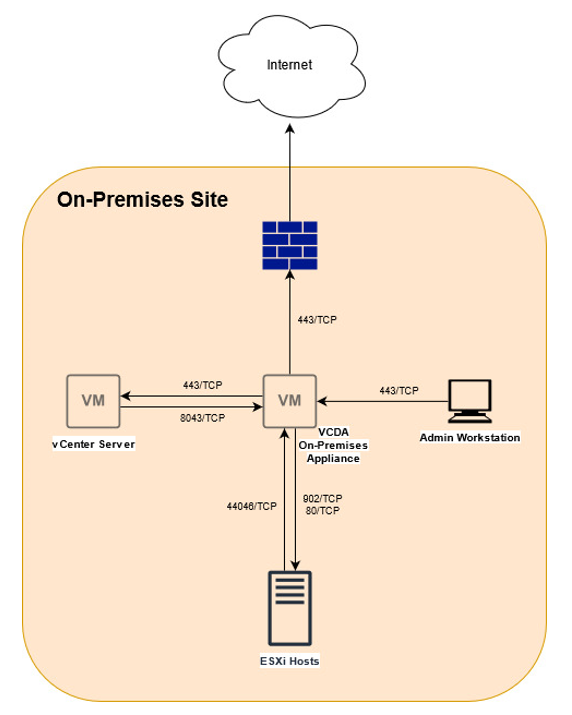
The following diagram shows the required network ports for communication between the VMware Cloud Director Availability On-Premises Appliance and the on-premises vSphere infrastructure.
This information can also be found in the VMware Ports and Protocols tool.
vSphere Infrastructure
The VCDA-OP appliance must have TCP access to the vCenter Server Lookup service and requires a user account with administrator level permissions for access to the vCenter Server.
It also must have a communication path to a vSphere Replication enabled VMkernel interface on each of the source ESXi hosts for managing the replications and transferring data. It is recommended that the ESXi VMkernel interface enabled for vSphere Replication is in the same broadcast domain as the VCDA-OP appliance to avoid uncompressed replication data crossing a router.
The VCDA-OP appliance comes with a single vNIC as default but additional can be added to separate traffic types. Optionally the following traffic types can be bound to different IP addresses on the appliance:
- Management: used for management traffic between local-site components
- LWD: used to receive incoming replication data from source ESXi hosts (outbound replication)
- NFC: used to send outgoing replication data to destination ESXi hosts (inbound replication)
As VCDA leverages the vSphere Replication service to perform replication, the On-Premises version of vSphere must include vSphere Replication in its licenses. The following product editions include the vSphere Replication feature:
- vSphere Essentials Plus
- vSphere Standard
- vSphere Enterprise
- vSphere Enterprise Plus
- vSphere Desktop
Interoperability
To verify interoperability of VCDA with on-premises versions of ESXi and vCenter Server please refer to the VMware Product Interoperability matrix.
Configuration Maximums and Limits
VCDA has a maximum protected virtual machine size of 15TB.
To avoid network congestion limits to the number of in-flight replications and the maximum throughput of each On-Premises replication appliance can be applied by Rackspace from SDDC Flex Account teams can work with customers to define these as required.
A full list of the VCDA configuration maximums can be found at VMware Configuration Maximums
Deployment Checklist
Before being able to replicate data to SDDC Flex a number of pre-requisites must be completed:
- VCDA On-Premises Appliance network configuration
- Prior to deploying the VCDA-OP appliance, consider the network layout of the on-premises site and if a multi-NIC deployment of the appliance is required. If so, what networks will each vNIC be on and what routes are required.
- For example, does the appliance need an internal-facing interface on which it can receive replication traffic from ESXi hosts, and a separate interface-facing interface over which it can send the replication data to SDDC Flex
- Confirm the SDDC Flex organization is available for use
- VCDA replicates On-Premises VMware virtual machines into an SDDC Flex organization. The organization must be provisioned and accessible prior to configuring replication.
- If unsure, speak to your account team to confirm your organization details.
- Service account created in SDDC Flex organization.
- When configuring the VCDA On-Premises Appliance it must be paired to an SDDC Flex organization site. This requires a user account is created in SDDC Flex with Organization Administrator (OrgAdmin) privileges
- Please see the SDDC Flex documentation for details on how to create local users in your Flex organization
- Create required networks in SDDC Flex
- During configuration of replication into SDDC Flex the networks and IP addresses which the VMs will use when imported into SDDC Flex must be configured. Whilst these networks can be configured after initial replication is setup, it is recommended to plan and deploy these before configuring replication.
- Please consult the SDDC Flex documentation for details on how to configure SDDC Flex networking.
- VM Groupings
- When selecting VMs to be replicated into SDDC Flex you may optionally group them into vApps which will be realized in SDDC Flex following failover. Whilst vApp groupings can be configured after failover, it is recommended to plan this prior to VM replication configuration.
- Compression
- When ESXi hosts send VM replication data to the VCDA On-Premises Appliances it is in raw format. The VCDA-OP appliances can optionally compress the data before sending it to SDDC Flex to conserve network bandwidth.
- Some data types do not compress well and the processing load on the VCDA-OP to compress them outweighs any bandwidth savings it provides.
- Prior to replication configuration, VMs should be evaluated to determine if compression should be turned on or off. By default it is on and in most cases this is recommended.
- Staggered start times
- During initial synchronization of a VM being replicated into SDDC Flex all the blocks of it’s VMDKs are read and transferred to the cloud site. Synchronizing multiple VMs at one time can generate a large amount of read activity on the source VM’s storage.
- One option to minimize this is to stagger the start times of initial synchronizations.
Appliance Deployment
The VCDA On-Premises Appliance comes as an OVA from VMware and can be deployed via the vSphere Client or via the VMware OVF Tool.
Rackspace would recommend using VCDA version 4.5.
Details of how to perform appliance deployment using both methods can be found in VMware’s VCDA installation documentation.
It is important that the VCDA On-Premises appliance, the vCenter Server, and the ESXi hosts all use the same NTP server.
The following are the steps to deploy the appliance via the vSphere Client as found in the VMware documentation.
- Log in to the vCenter Server by using the vSphere Client.
- Navigate to a target object where you want to deploy the VMware Cloud Director Availability On-Premises Appliance. As a target object you can use: a data center, a folder, a cluster, a resource pool, or a host.
- Right-click the target object and from the drop-down menu select Deploy OVF Template.
The Deploy OVF Template wizard opens. The following steps depend on the vSphere version that you use. - On the Select an OVF template page, browse to the .ova file location and click Next.
- On the Select a name and folder page, enter a name for the on-premises appliance, select a deployment location, and click Next.
- On the Select a compute resource page, select a host, or cluster as a compute resource to run the appliance on, and click Next.
- On the Review details page, verify the OVF template details and click Next.
- On the License agreements page, select the I accept all license agreements check box and click Next.
- On the Select storage page, select the virtual disk format and the storage policy for the appliance and click Next.
- On the Select networks page, optionally configure the network settings and click Next.
- On the Customize template page, customize the deployment properties of the on-premises appliance and click Next.
- Enter and confirm the initial password for the appliance root user. When you log in for the first time, you must change the initial root user password.
- Select the Enable SSH check box.
If you do not enable SSH, you can configure the appliance later. For more information to allow the SSH access, see the Administration Guide document. - In the NTP Server section, enter the NTP server address for the appliance to use.
- On the Ready to complete page, review the settings, and to begin the .ova installation process, click Finish.
- (Optional) Once the OVA has been deployed, edit the appliance’s settings and add any additional network adapters which will be required.
- Finally, power on the VCDA On-Premises appliance.
Appliance Configuration
After deploying the VCDA On-Premises Appliance, configuration must be applied to pair the appliance with the SDDC Flex cloud site.
- Login to the VCDA-OP appliance by opening a web browser “https://” and entering the root password specified during deployment.
- You will be prompted to update the root password before you can start using the service.

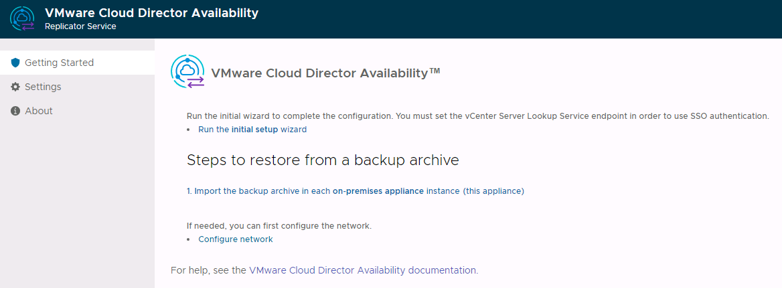
- On the Getting Started page, select Configure network. Alternatively select Settings from the left hand menu
- (If using multiple vNICs) To configure additional vNICs open the Network drop down in the Appliance settings section of the Settings page.
- To add or update the IP address of a vNIC use the Edit link for the vNIC you wish to change.
- If any static routes are required for the vNICs, use the Static routes link for the relevant vNIC and enter the destination network and gateway.
- (If using multiple vNICs) To map traffic types to specific vNIC IP addresses edit the Traffic Control setting in the Appliance settings section of the Settings page
- To pair the VCDA On-Premises appliance with SDDC Flex, go to the Getting Started page and select Run the initial setup wizard.
- On the Lookup Service Details of the Initial Setup page enter.
- The Lookup Service address of the local site vCenter Server.
- The username and password of a vSphere administrator user.
- Click NEXT
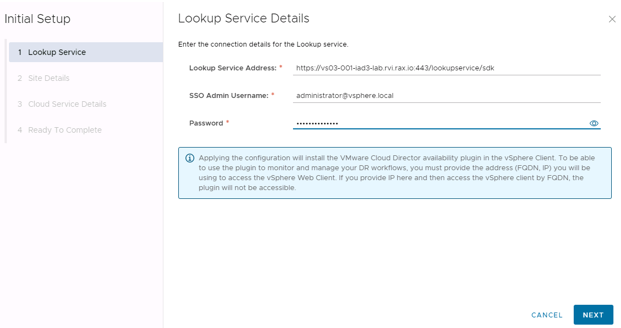
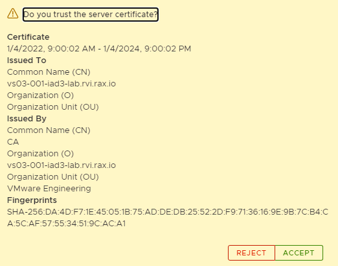
- You will then be prompted to accept the vCenter Server certificate.
- Click ACCEPT
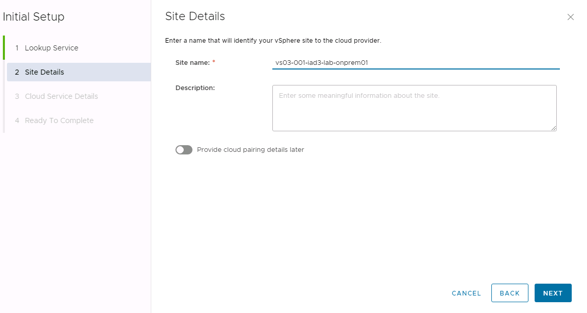
- On the Site Details page, enter a Site name and Description for the local site.
- This site name will be visible in the SDDC Flex Portal when configuring and managing VCDA replications.
- Please prefix the site name with the SDDC Flex tenant name as it appears in SDDC Flex Portal. This will make identification of the site easier in the case of support activities.
- Click Next
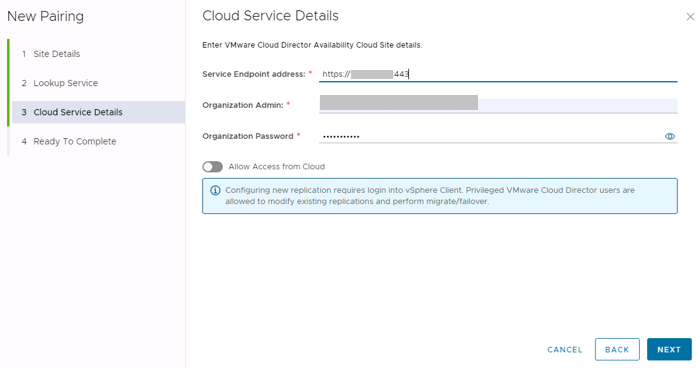
- On the Cloud Service Details page, enter.
- Service Endpoint address: https://vcda01-data01. SDDC Flex Region
- Where “SDDC Flex Region” is the region, you wish to replicate into – i.e us1
- Organization Admin: the username of the organization administrator account created in SDDC Flex prior to starting the appliance deployment.
- Organization Password: the password of the organization administrator account created in SDDC Flex prior to starting the appliance deployment.
- Leave “Allow Access from Cloud” disabled.
- Click NEXT.
- Service Endpoint address: https://vcda01-data01. SDDC Flex Region
- Accept the SDDC Flex certificate when prompted.
- On the Ready To Complete page, review the configuration and click FINISH.
- Leave Edit/configure local placement now disabled.
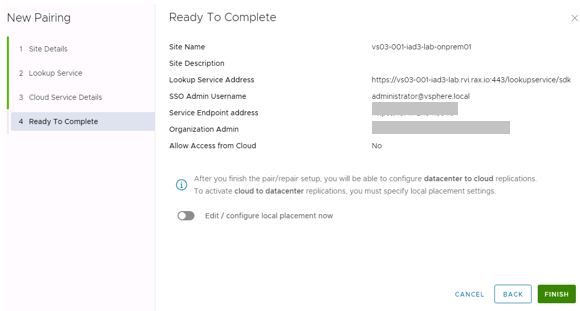
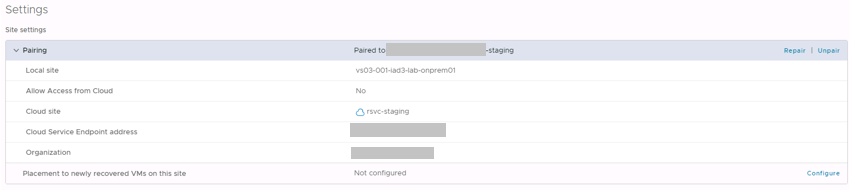
- In the Paring section of the Settings page, review the pairing details.
- If required, edit the pairing using the Repair link.
Allow On Premise Appliance Source IP Address
Once the On-Premises appliance is deployed and configured, you must configure the allowed source IPs for the On-Premise appliance. The On-Premise source IP address must be a valid public IP address, and the source IP address must not reside on any public blacklists. Rackspace references the Cisco Talos Intelligence IP Reputation Center to validate
IP reputations.
Allow DR Source IP
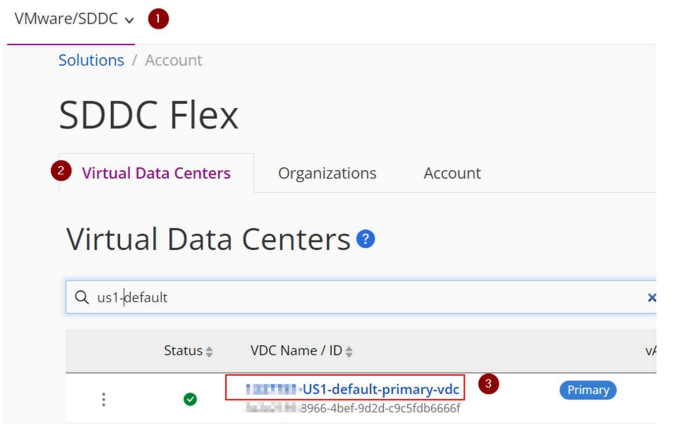
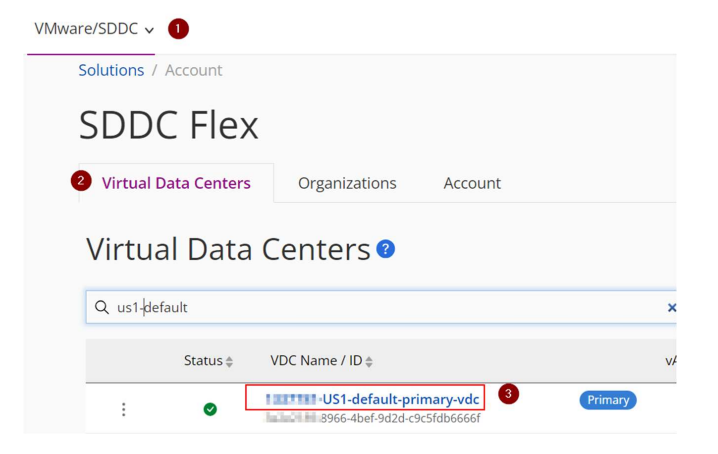
- Log in to your Rackspace Fabric Portal account and navigate to the VMware/SDDC Platform.
- Navigate to the Virtual Data Centers tab.
- Click on link for the default VDC for the appropriate region.
- Navigate to the Networking tab.

- Locate the Disaster Recovery section and review any currently allowed source IP addresses.

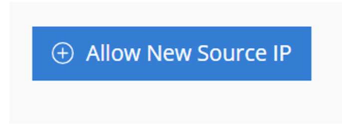
- Click on Allow New Source IP and input your allowed source IP address.
- In the Allow New Source IP box, key in your source IP a green check signifies that your IP has been validated, and then click on Allow New Source IP.
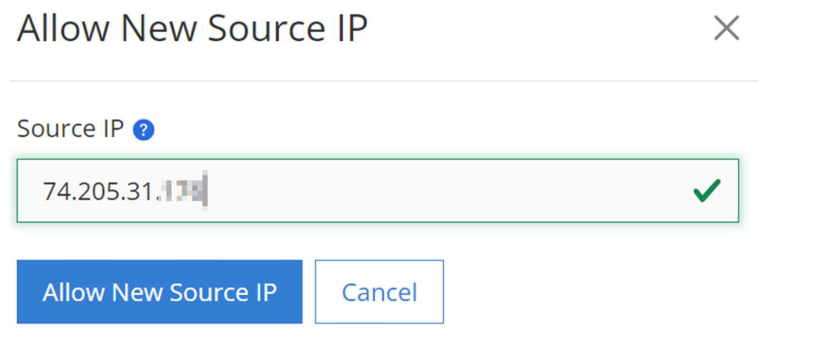
- Once the source IP has been allowed you will see it in the allowed list, with a status of In_USE.

Delete DR Source IP
- Log in to your Rackspace Fabric Portal account and navigate to the VMware/SDDC Platform.
- Navigate to the Virtual Data Centers tab.
- Click on link for the default VDC for the appropriate region.
- Navigate to the Networking tab.

- Locate the Disaster Recovery section and locate the currently allowed source IP address that you would like to remove and click on the to delete button.
Replicating VMs and Performing Failovers
Once the On-Premises appliance is deployed and configured, VM replications can be setup and failovers performed into SDDC Flex as required. Replication configuration and failover initiation can be performed from either the source On-Premises appliance UI or from the recovery SDDC Flex site UI.
Recovery Plans can also be configured in SDDC Flex to orchestrate the recovery of multiple replicated VMs from the On-Premises site.
The procedure to setup VM replications, configure Recovery Plans and perform failovers is documented in the SDDC Flex documentation and is applicable when working with the On-Premises appliance.
Troubleshooting
In the event that a problem is experienced with the VCDA On-Premises Appliance there are a number of troubleshooting recommendations which may help to resolve the problem.
- On the System Health page of the VCDA On-Premises Appliance management UI, confirm if any services are in an error state.
- SSH to the VCDA-OP appliance as root and confirm connectivity to each local and remote endpoint. Ensure the appliance can connect to each required endpoint on the relevant ports, and that each infrastructure component in the local site can connect to the VCDA-OP appliance.
- If connectivity issues are found, confirm the IP addresses and subnet masks of each VCDA-OP interface and the details of any static routes.
- Confirm the traffic types associated with each IP address. This can be done via the management UI or via an SSH session. Details of how to do this can be found in the VMware Cloud Director Availability Multi-NIC Setup document.
- If name resolution is an issue, hosts file entries can be added to the appliance via an SSH session.
- Confirm that vSphere Replication has been enabled on the VMkernel interface ESXi uses to connect to the VCDA-OP appliance. vmkping can be used from the host to test connectivity to the appliance over this interface.
- Confirm that the VCDA-OP appliance, ESXi hosts and vCenter Server are all using the same NTP server and time is synchronized.
- Log files locations on the VCDA-OP Appliance:
- /opt/vmware/h4/tunnel/log/tunnel.log
- /opt/vmware/h4/replicator/log/replicator.log
Updated 5 months ago