Install and configure phpMyAdmin
phpMyAdmin® is a free and open source administration tool for MySQL®
and MariaDB®. As a portable web application written primarily in PHP,
phpMyAdmin has become one of the most popular MySQL administration tools,
especially for web hosting services.
This article describes how to install and configure phpMyAdmin on your
web server for CentOS® 7, Red Hat® Enterprise Linux® (RHEL) 7, and
Ubuntu® 16.04 LTS.
Prerequisites
Before you can install phpMyAdmin, you must have the following installed
on your server:
- A web server, such as Apache® or NGINX®
- PHP
Check whether a web server is installed
Use the commands in the following table to check whether a web server is
installed:
| Operating system | Web server | Command |
|---|---|---|
| CentOS and RHEL | Apache | rpm -qa | grep httpd |
| CentOS and RHEL | NGINX | rpm -qa | grep nginx |
| Ubuntu operating system | Apache | dpkg -l | grep apache |
| Ubuntu operating system | NGINX | dpkg -l | grep nginx |
Check whether PHP is installed
Use the following command to check whether PHP is installed on CentOS
or RHEL:
rpm -qa | grep php
Use the following command to check whether PHP is installed on the Ubuntu operating system:
dpkg -l | grep php
Install phpMyAdmin
Use the instructions in the following sections to install phpMyAdmin.
CentOS and RHEL
Install phpMyAdmin by using the following command:
yum install phpmyadmin
The output should be similar to the following example:
Loaded plugins: fastestmirror, langpacks
Loading mirror speeds from cached hostfile
 * base: mirror.mhd.uk.as44574.net
 * epel: mirror.freethought-internet.co.uk
 * extras: mirror.mhd.uk.as44574.net
 * updates: mirror.mhd.uk.as44574.net
Resolving Dependencies
--> Running transaction check
---> Package phpMyAdmin.noarch 0:4.4.15.10-3.el7 will be installed
--> Processing Dependency: php-mysqli >= 5.3.7 for package: phpMyAdmin-4.4.15.10-3.el7.noarch
--> Processing Dependency: php-mbstring >= 5.3.7 for package: phpMyAdmin-4.4.15.10-3.el7.noarch
--> Processing Dependency: php-gd >= 5.3.7 for package: phpMyAdmin-4.4.15.10-3.el7.noarch
--> Processing Dependency: php-xmlwriter for package: phpMyAdmin-4.4.15.10-3.el7.noarch
--> Processing Dependency: php-tcpdf-dejavu-sans-fonts for package: phpMyAdmin-4.4.15.10-3.el7.noarch
--> Processing Dependency: php-tcpdf for package: phpMyAdmin-4.4.15.10-3.el7.noarch
--> Processing Dependency: php-php-gettext for package: phpMyAdmin-4.4.15.10-3.el7.noarch
--> Running transaction check
The Ubuntu operating system
Install phpMyAdmin by using the following command:
apt-get install php phpmyadmin
The output should be similar to the following example:
Reading package lists... Done
Building dependency tree
Reading state information... Done
The following additional packages will be installed:
  dbconfig-common dbconfig-mysql fontconfig-config fonts-dejavu-core javascript-common libfontconfig1 libgh3 libjbig0 libjpeg-turbo8 libjpeg8 libjs-jquery libjs-sphinxdoc libjs-underscore libtiff5 libvpx3 libxpm4 libxslt1.1 php-gd php-gettext php-mbstring php-pear php-phpseclib php-tcpdf php-xml php7.0-gd php7.0-mbstring php7.0-xml
Suggested packages:
  libgd-tools php-libsodium php-gmp php-imagick www-browser
The following NEW packages will be installed:
  dbconfig-common dbconfig-mysql fontconfig-config fonts-devaju-core javascript-common libfontconfig1 libgd3 libjbig0 libjpeg-turbo8 libjpeg8 libjs-jquery libjs-sphinxdoc libjs-underscore libtiff5 libvpx3 libxpm4 libxslt1.1 php-gd php-gettext php-mbstring php-pear php-phpseclib php-tcpdf php-xml php7.0-gd php7.0-mbstring php7.0-xml phpmyadmin
0 upgraded, 28 newly installed, 0 to remove and 6 not upgraded.
Need to get 16.3 MB of archives.
After this operation, 61.5 MB of additional disk space will be used.
Do you want to continue? [Y/n]
Press Y and then press Enter to continue to the configuration
process. See the Configure phpMyAdmin on the Ubuntu operating system section for further
instructions.
Configure phpMyAdmin on CentOS and RHEL
After you have installed phpMyAdmin on your web server, use the instructions
in the following sections to configure phpMyAdmin.
Apache web server
You first need to add the Internet Protocol (IP) address that you want to use
to access phpMyAdmin to the /etc/phpMyAdmin/config.inc.php configuration
file.
-
Open the /etc/phpMyAdmin/config.inc.php file in a text editor.
-
In the section beginning with the line
<IfModule !mod_authz_core.c>, add
the IP address as shown in the following example:<IfModule !mod_authz_core.c> # Apache 2.2 Order Deny,Allow Deny from All Allow from 127.0.0.1 Allow from ::1 Allow from Require ip 94.236.7.190 </IfModule> </Directory> -
Save and close the file.
Set a URL alias (optional)
The standard URL for a phpMyAdmin installation is
https://ipaddress/phpMyAdmin, where ipaddress is the IP address that you
added to the configuration file in the previous section. If you want to
change the URL, you can set an alias.
-
Open the /etc/httpd/conf.d/phpMyAdmin.conf file in a text editor.
-
Find the lines beginning with
Aliasand change/phpMyAdminto the
alias of your choice, as shown in the following example:Alias /NewName /usr/share/phpMyAdmin Alias /newname /usr/share/phpMyAdmin -
Save and exit the file.
Database configuration file
If the MySQL or MariaDB database server that you want to use with phpMyAdmin
is not located on the same server
as your web server, you must edit the database configuration file to
define the database server location.
There are two configuration options:
- MySQL host or IP address
- MySQL/MariaDB port
Use the following steps to define the location of your database server:
-
Open the /etc/phpMyAdmin/config.inc.php file in a text editor.
-
Edit the file as shown in the following example:
$cfg['Servers'][$i]['host'] = 'localhost'; // MySQL hostname or IP address
$cfg['Servers'][$i]['port'] = ''; // MySQL port - leave blank for default port
$cfg['Servers'][$i]['socket'] = ''; // Path to the socket - leave blank for default socket
$cfg['Servers'][$i]['connect_type'] = 'tcp'; // How to connect to MySQL server ('tcp' or 'socket')
$cfg['Servers'][$i]['extension'] = 'mysqli'; // The php MySQL extension to use ('mysql' or 'mysqli')
$cfg['Servers'][$i]['compress'] = FALSE; // Use compressed protocol for the MySQL connection
// (requires PHP >= 4.3.0)
$cfg['Servers'][$i]['controluser'] = ''; // MySQL control user settings
// (this user must have read-only
$cfg['Servers'][$i]['controlpass'] = ''; // access to the "mysql/user"
// and "mysql/db" tables). -
Save and exit the file.
To make the changes live, you must check the syntax of the web engine daemon
and then gracefully restart or reload it.
Check the syntax by using the following command:
apachectl configtest
If there are no errors in the configuration file, you should see Syntax OK in
the output.
Reload the Apache web server by using the following command:
CentOS and RHEL 6
service httpd graceful
CentOS and RHEL 7
systemctl status httpd
Check the status of the httpd service to ensure that it is functioning as
expected by using the following command:
CentOS and RHEL 6
service httpd status
CentOS and RHEL 7
systemctl status httpd
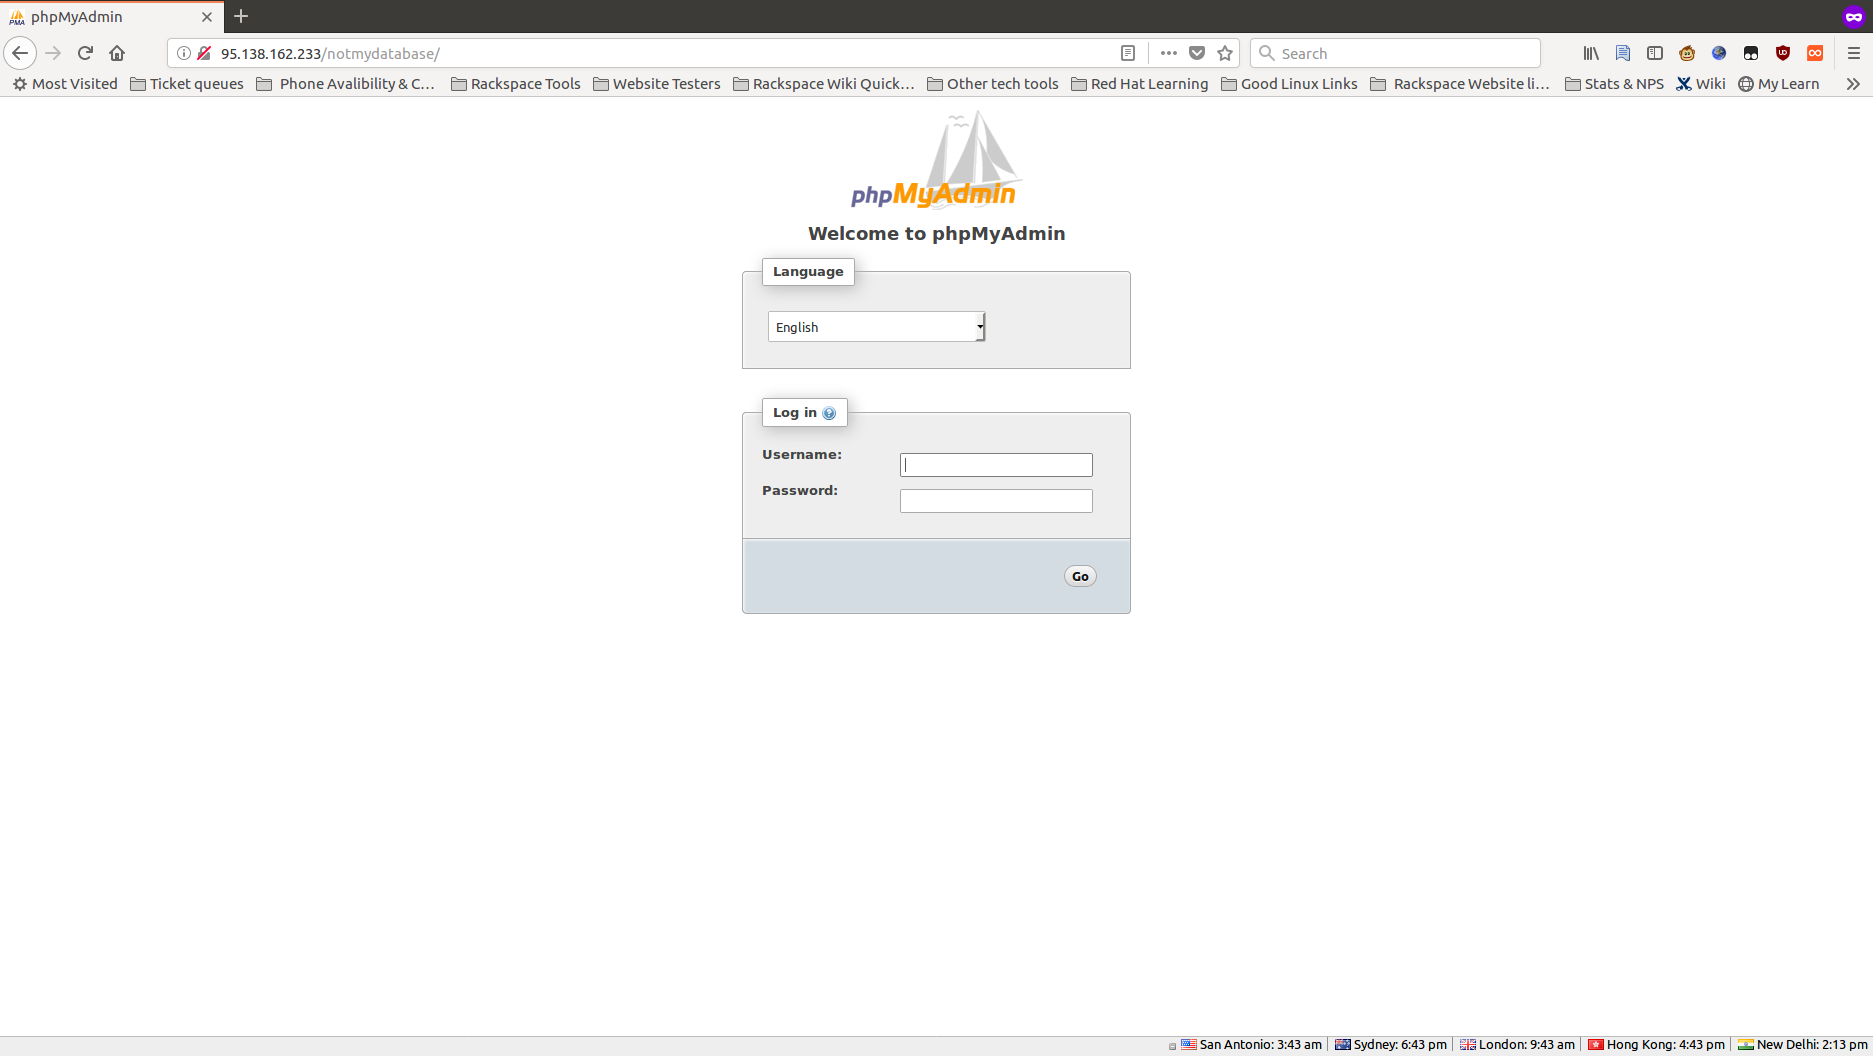
You should now be able to view phpMyAdmin through a web browser, as shown
in the following image:
NGINX web server
On NGINX, the phpMyAdmin package doesn't come with a configuration file, so
you have to create a server block to point at the phpMyAdmin
configuration file.
-
Open a text editor and create the file /etc/nginx/conf.d/phpMyAdmin.conf.
-
Enter the following configuration settings:
server {
listen 80;
server_name 95.138.162.233;
root /var/www;
location /phpMyAdmin {
root /usr/share/;
index index.php;auth_basic "phpMyAdmin Login"; # uncomment if using .htaccess & .htpasswd securityauth_basic_user_file /etc/nginx/.pma_pass; # uncomment if using .htaccess & .htpasswd securitylocation ~\.php$ { try_files $uri =404; fastcgi_pass 127.0.0.1:9000; fastcgi_index index.php; fastcgi_param SCRIPT_FILENAME $document_root$fastcgi_script_name; include /etc/nginx/fastcgi_params; } location ~* ^/phpmyadmin/(.+\.(jpg|jpeg|gif|css|png|js|ico|html|xml|txt))$ { root /usr/share/; } }location /phpmyadmin {
rewrite ^/* /phpMyAdmin last;
}
} -
Save and exit the file.
To make the changes live, you must check the syntax of the web engine daemon
and then gracefully restart or reload it.
Use the following command to check the syntax:
nginx -t
If there are no errors in the configuration file, you should see Syntax OK in
the output.
Reload the NGINX web server by using the following command:
CentOS and RHEL 6
service nginx graceful
CentOS and RHEL 7
systemctl reload nginx
Check the status of the NGINX service to ensure that it is functioning as
expected by using the following command:
CentOS and RHEL 6
service nginx status
CentOS and RHEL 7
systemctl status nginx
You should now be able to view phpMyAdmin through a web browser, as shown
in the following image:
Configure phpMyAdmin on the Ubuntu operating system
Use the steps in the following sections to configure phpMyAdmin on the Ubuntu operating system.
Apache web server
The installation process adds the phpMyAdmin Apache configuration file to the
/etc/apache2/conf-enabled/ directory, where it is read automatically. The
only thing you need to do is to enable the mbstring PHP extension, which
you can do by running the following command:
sudo phpenmod mbstring
After installing phpMyAdmin, the package configuration screen displays, as
shown in the following image.
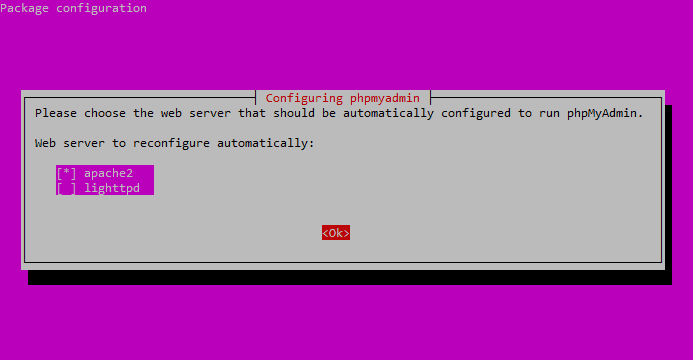
Use the space bar to select apache2, press Tab to select
Ok, and then press Enter.
The installation process continues until another configuration screen displays
that prompts you to confirm if you want to configure your database for
phpMyAdmin by using dbconfig-common.
Select Yes, and then press Enter.
You are prompted for your database administrator password. Input your password,
press Tab to select Ok, and then press Enter.
Next, enter a password for the phpMyAdmin application itself, press Tab to
select Ok, and then press Enter.
Confirm the password by selecting Ok, and then press Enter.
After the installation process is complete, the phpMyAdmin configuration file
is added to /etc/apache2/conf-enabled/phpmyadmin.conf.
If this file doesn't exist after the installation is complete, you can copy it
from /etc/phpmyadmin/apache.conf to /etc/apache2/conf-enabled. If
that file doesn't exist, you must create a virtual host for phpMyAdmin
with the following settings:
server {
       listen 80;
       server_name example.com www.example.com;
       root /var/www/vhosts/example.com;
       ..

       location /phpMyAdmin {
           root /usr/share/;
           index index.php;

           # auth_basic "phpMyAdmin Login";                                # uncomment if using .htaccess & .htpasswd security
           # auth_basic_user_file /etc/phpMyAdmin/.phpmyadmin-htpasswd;    # uncomment if using .htaccess & .htpasswd security

           location ~\.php$ {
                   try_files $uri =404;
                   fastcgi_pass unix:/var/run/php-fpm.sock;
                   fastcgi_index index.php;
                   fastcgi_param SCRIPT_FILENAME $document_root$fastcgi_script_name;
                   include /etc/nginx/fastcgi_params;
           }
           location ~* ^/phpmyadmin/(.+\.(jpg|jpeg|gif|css|png|js|ico|html|xml|txt))$ {
                   root /usr/share/;
           }
    }
    location /phpmyadmin {
           rewrite ^/* /phpMyAdmin last;
    }
    ...
}
If at any time you need to reconfigure phpMyAdmin, you can use the following
command:
dpkg-reconfigure phpmyadmin
Remote database configuration
If the database server that you want to manage with phpMyAdmin is remote, you
must configure phpMyAdmin differently. The configuration files are located in
the /etc/phpmyadmin directory. The main configuration file is
/etc/phpmyadmin/config.inc.php, which contains the configuration
options that apply globally to phpMyAdmin.
To use phpMyAdmin to administer a MySQL database hosted on another server,
open /etc/phpmyadmin/config.inc.php in a text editor and then edit
the following line:
| Old line | New line |
|---|---|
$cfg['Servers'][$i]['host'] = '$dbserver'; | $cfg['Servers'][$i]['host'] = '192.168.71.21'; |
Note: Replace $dbserver with the actual remote database server name or
IP address. Also, ensure that the phpMyAdmin host has permissions to access
the remote database.
The other configuration file that you must edit is
/etc/phpmyadmin/apache.conf. This file is linked symbolically to
/etc/apache2/conf-available/phpmyadmin.conf. After it is
enabled, it is used
to configure Apache2 to serve the phpMyAdmin site. The file contains
directives for loading PHP, directory permissions, and so on.
Run the following command to enable the configuration file, and then reload
the service:
sudo ln -s /etc/phpmyadmin/apache.conf /etc/apache2/conf-available/phpmyadmin.conf sudo a2enconf phpmyadmin.conf sudo systemctl reload apache2.service
Now that phpMyAdmin is installed on the client computer, connect to the
remote server where the MySQL or MariaDB database is installed. Open the
file /etc/mysql/mysql.conf.d/mysql.cnf and edit the following line:
bind-address = 0.0.0.0
Replace 0.0.0.0 with the IP address of the remote server, and then save
and exit the file.
Run the following command to allow the root user to access the server from
the client computer:
sudo mysql -u root -p GRANT ALL PRIVILEGES ON *.* TO 'root'@'192.168.71.20' IDENTIFIED BY 'root_password_here' WITH GRANT OPTION;
Replace the IP address with the address of the remote server, and
root_password_here with the root user password.
After you edit the configuration settings, open a browser and navigate to
https://clientPC/phpmyadmin, using the client computer IP address or
host name. You should be able to log on remotely to the server from the
client phpMyAdmin web portal.
Reload the web server
To make the changes to the configuration files live, you must first check the
syntax of the file and then gracefully restart or reload the web server.
Use the following command to check the syntax of the configuration files:
apache2ctl configtest
Then reload the Apache web server by running the following command:
systemctl reload apache2
Check the status of the service to ensure that it is functioning as
expected by running the following command:
system status apache2
You should now be able to view phpMyAdmin through a web browser, as shown
in the following image:
NGINX web server
After installing phpMyAdmin, the package configuration screen displays, as
shown in the following image:
Use the space bar to select apache2, press Tab to select
Ok, and then press Enter.
The installation process continues until another configuration screen displays
that prompts you to confirm if you want to configure your database for
phpMyAdmin by using dbconfig-common.
Select Yes, and then press Enter.
You are prompted for your database administrator password. Input your password,
press Tab to select Ok, and then press Enter.
Next, enter a password for the phpMyAdmin application itself, press Tab to
select Ok, and then press Enter.
Confirm the password by selecting Ok, and then press Enter.
After the installation process is complete, you must create the phpMyAdmin
configuration file here: /etc/nginx/sites-enabled/phpmyadmin.conf.
Enter the following information in the file and then save it:
server {
   listen 80;
   server_name 95.138.162.233;
   root /var/www;

   location /phpmyadmin {
             root /usr/share/;
             index index.php;
             try_files $uri $uri/ =404;

             # auth_basic "phpMyAdmin Login";   # uncomment if using .htaccess & .htpasswd security

             # auth_basic_user_file /etc/nginx/.pma_pass;  # uncomment if using .htaccess & .htpasswd security


    location ~ ^/phpmyadmin/(doc|sql|setup)/ {
           deny all;
    }

    location ~ /phpmyadmin/(.+\.php)$ {
         fastcgi_pass unix:/run/php/php7.0-fpm.sock;
         fastcgi_param SCRIPT_FILENAME $document_root$fastcgi_script_name;
         include fastcgi_params; include snippets/fastcgi-php.conf;
   }
  }
}
Your phpMyAdmin files are located in the /usr/share/phpmyadmin/ directory.
The configuration above tells NGINX that if visitors enter
https://ip_address/phpmyadmin in the browser address bar, it should find
the index.php file in the /usr/share/phpmyadmin/ directory and
display it.
Reload the web server
To make the changes to the configuration files live, you must first check the
syntax of the file and then gracefully restart or reload the web server.
Use the following command to check the syntax of the configuration files:
nginx -t
Then reload the Apache web server by running the following command:
RHEL and CentOS 6
service nginx graceful
RHEl and CentOS 7
systemctl reload nginx
Check the status of the service to ensure that it is functioning as
expected by running the following command:
RHEL and CentOS 6
service nginx status
RHEL and CentOS 7
systemctl status nginx
You should now be able to view phpMyAdmin through a web browser, as shown
in the following image:
Configure additional security (optional)
htpasswd is used to create and update the flat files that store
usernames and passwords for the basic authentication of HTTP users. If
htpasswd cannot access a file (cannot write to the
output file or read the file in order to update it),
it returns an error status and makes no changes.
Use the steps in the following sections to set up basic authentication on
a web server running phpMyAdmin.
Apache web server
By default, Apache does not allow the use of .htaccess. You must configure
Apache to allow .htaccess-based authentication.
Open the Apache configuration file in a text editor and find the section that
begins with <Directory "/var/www/html">.
For RHEL and CentOS, the configuration file is /etc/httpd/conf/httpd.conf.
For the Ubuntu operating system, the configuration file is /etc/apache2/conf/httpd.conf.
Change the line from AllowOverride none to AllowOverride AuthConfig.
Note: If this line reads AllowOverride All, then no change is required.
Save and close the file.
The htpasswd command is used to create and update the files that store
usernames and passwords for the basic authentication of Apache users. Use
the following command to create a hidden file to store the username and
encrypted password for each user:
htpasswd -c /etc/phpMyAdmin/.phpmyadmin-htpasswd username
After you create a user, run the following command to see the username and
password in the /etc/phpMyAdmin/.phpmyadmin-htpasswd file:
cat /etc/phpMyAdmin/.phpmyadmin-htpasswd
The output should be similar to the following example:
user1:$apr1$0r/2zNGG$jopiWY3DEJd2FvZxTnugJ/
user2:$apr1$07FYIyjx$7Zy1qcBd.B8cKqu0wN/MH1
Now you need to allow the apache user to read the .htpasswd file by
running the following commands:
chown apache:apache /etc/phpMyAdmin/.phpmyadmin-htpasswd
chmod 0660 /etc/phpMyAdmin/.phpmyadmin-htpasswd
Finally, you must uncomment the following lines from the phpMyAdmin
configuration files:
# auth_basic "phpMyAdmin Login";   # uncomment if using .htaccess & .htpasswd security
# auth_basic_user_file /etc/phpMyAdmin/.phpmyadmin-htpasswd;   # uncomment if using .htaccess & .htpasswd security
NGINX web server
The htpasswd command is used to create and update the files that store
usernames and passwords for the basic authentication of Apache users. Use
the following command to create a hidden file to store the username and
encrypted password for each user:
htpasswd -c /etc/nginx/.pma_pass username
After you create a user, run the following command to see the username and
password in the /etc/nginx/.pma_pass file:
cat /etc/nginx/.pma_pass
The output should be similar to the following example:
user1:$apr1$0r/2zNGG$jopiWY3DEJd2FvZxTnugJ/
user2:$apr1$07FYIyjx$7Zy1qcBd.B8cKqu0wN/MH1
Now you need to allow the apache user to read the .htpasswd file by
running the following commands:
chown nginx:nginx /etc/nginx/.pma_pass
chmod 0660 /etc/nginx/.pma_pass
Finally, you must uncomment the following lines from the phpMyAdmin
configuration files:
# auth_basic "phpMyAdmin Login";   # uncomment if using .htaccess & .htpasswd security
# auth_basic_user_file /etc/phpMyAdmin/.phpmyadmin-htpasswd;   # uncomment if using .htaccess & .htpasswd security
Updated 5 months ago