Troubleshoot DNS issues
This article shows you how to resolve issues in which the Domain Name System
(DNS) doesn't appear to be updating properly from Cloud
DNS entries. It helps you diagnose if
the DNS issue should be remedied from the customer side, or if you should
escalate it to Rackspace Support. It also describes information that you
should include when you create a ticket to expedite Rackspace's response.
Check the system status and open support tickets
Check the Rackspace system status
page for open issues that
might be affecting your Cloud DNS. Also log in to the Cloud Control
Panel and check for current support
tickets about Cloud DNS to ensure that there isn't a known problem.
Try a different browser
If the DNS doesn't appear to be updating and resolving correctly,
check the domain in another browser to ensure that the issue occurs
across multiple browsers. If the domain resolves properly in another browser,
then it's likely that a cached site on the original browser is using outdated
information. Clear the cache of the browser that's experiencing the problem
and check the domain again.
Check the authoritative name servers
If the issue persists on multiple browsers, check the authoritative
name servers to ensure that the DNS records are updated to reflect
Rackspace's data.
To check the name servers, open Terminal and run the following command:
dig ns <domain>
The output displays the name servers that are being used at the far right of
the window under ANSWER SECTION, as shown in the following image:
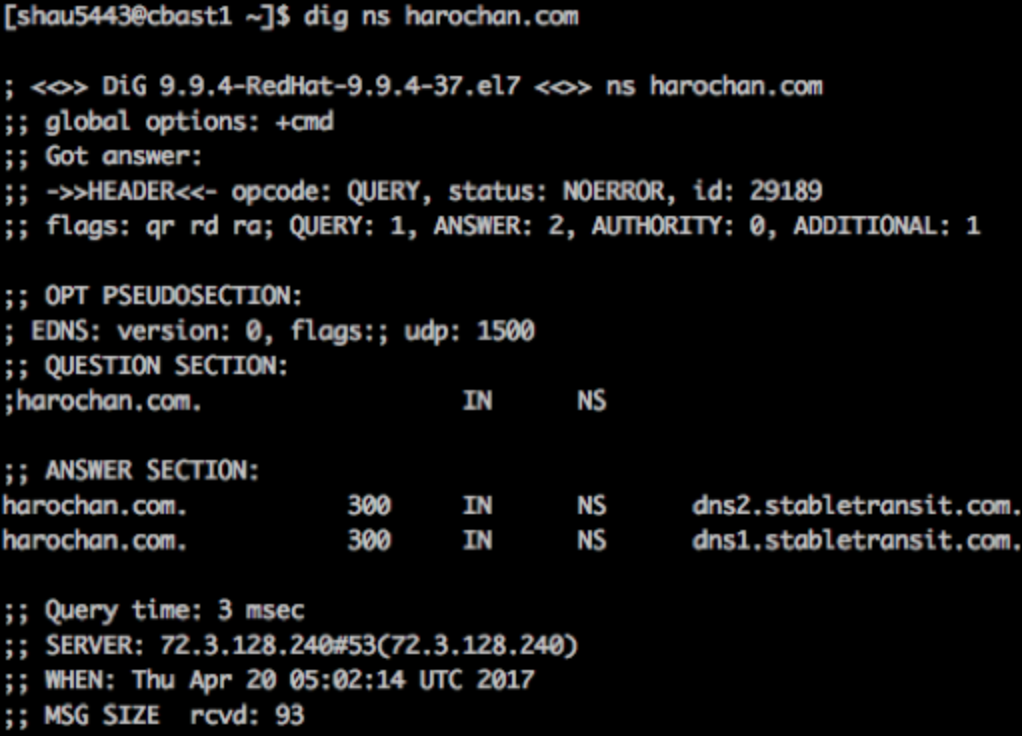 The two name servers that should appear for Rackspace Cloud are
`dns1.stabletransit.com` and `dns2.stabletransit.com`.
The two name servers that should appear for Rackspace Cloud are
`dns1.stabletransit.com` and `dns2.stabletransit.com`.
If the name servers are different, verify that they're set correctly at the
registrar where the domain name is hosted.
If the name servers are correctly set as Rackspace's stabletransit instances,
note that it can take up to 48 hours for the name servers to propagate fully.
You might need to wait for propagation to occur.
Note: For more information about DNS lookups, see Using dig to query name
servers (for Linux® and
macOS®) and Check DNS records on Windows with
nslookup (for Windows®).
Check the Time to Live
After you confirm that the registrar is correctly pointing the domain to
Rackspace, check the Time to Live (TTL) of the domain in Cloud DNS.
The TTL is the amount of time that must pass before the data expires and new
data is pushed. For example, if you have a domain set in Cloud DNS and it has
a TTL of three days (the default TTL), then even if you update the data in
Cloud DNS, it does not update globally until three days have passed, and the
data has expired. Therefore, it's important to check the TTL of a domain in
the Cloud DNS.
Use the following steps to change the TTL for a domain:
-
Log in to the Cloud Control Panel.
-
In the top navigation bar, click Select a Product > Rackspace Cloud.
-
Select Networking > Cloud DNS.
-
Locate the proper DNS record and click the gear icon to the left of
it. Then click Edit Time to Live (TTL). -
If the TTL is very high and a flush of the DNS is urgently needed, create a
ticket with Rackspace Support by clicking Ticket > Create Ticket at the
top right of the Rackspace Cloud Control Panel. -
Click Create Ticket, select Cloud DNS as the Category, and
provide an explanation of the steps that you have already taken.
Check the hosts file
If the DNS issue is specific to a single computer, check the hosts file
that's stored on that machine. The hosts file contains a list of host names
and IP addresses that your computer typically checks before it performs a DNS
lookup.
The nslookup and dig commands don't check this list of host names. If the
IP address that your application (for example, ping) is using doesn't match
what appears in the response to the lookup request, this mismatch might be
causing the DNS issue.
The hosts file is stored in one of the following locations:
- Linux:
/etc/hosts - Microsoft® Windows:
C:\\Windows\\System32\\drivers\\etc\\hosts
Each line in the hosts file represents one record. A hash sign (#) at
the beginning of a line indicates that the line is a comment and is
ignored.
If the domain appears in the list with an incorrect IP address and the line
isn't commented out, the incorrect IP address is probably causing the problem.
Add a hash sign at the beginning of the line to comment the line out.
Updated 4 months ago